You are using an out of date browser. It may not display this or other websites correctly.
You should upgrade or use an alternative browser.
You should upgrade or use an alternative browser.
The end is near....SCOTTeVEST's Baby
- Thread starter scottevest
- Start date
-
- Tags
- restoration list
- Status
- Not open for further replies.

what's wrong w/it exactly?
Front and rear glass finally got in. According to Benny it was the hardest one he’s ever done before
https://www.facebook.com/groups/bmwe9/permalink/1516065571871976/
https://www.facebook.com/groups/bmwe9/permalink/1516065571871976/
The detent is not holding. And as a result we cannot operate any of the lights otherwise. It does not click in and hold.what's wrong w/it exactly?
Need new hazard button urgently. Best source?
Attached Files:
a" data-thumb-height="100">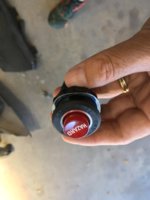
This is a common problem for the switches of this kind. It is possible to fix this by yourself, at least worth a try if the alternative is to dump it.
Just open the 6 latches around the housing carefully until the switch comes apart in two halves.
The problem is this tiny aluminum tongue, which slides up and down inside the guidance. It's gonna bend over the time by a couple of hundred uses. You just need to straighten it back to it's original shape (once again VERY carefully, since this part gonna tend to brake rather quick and than for sure it's trash).
You can test if you succeed even the switch is still in two pieces. If so, just push both parts back together.
Good luck and if you don't dare to try, W&N have so many, that they need to sell some ....
")
rope is the standard tool to install the window seals had it done 10 times
rope is the standard tool to install the window seals had it done 10 times
I've learned a number of things from this thread, and this is one of them. I would have never thought to use a rope this large to install a windscreen. With that said I'm still going to be stubborn and use shielded wire. I had to buy 300 feet of it when I redid my water main and had a bit left over. Heavy duty stuff but 1/3 the diameter of the rope that Benny used. I'm thinking it would be good to tack those little gaps in the windshield frame and grind them smooth. 30 minutes of work to save a headache when installing the windscreen. Obviously not something to do after paint.
I've learned a number of things from this thread, and this is one of them. I would have never thought to use a rope this large to install a windscreen. With that said I'm still going to be stubborn and use shielded wire. I had to buy 300 feet of it when I redid my water main and had a bit left over. Heavy duty stuff but 1/3 the diameter of the rope that Benny used. I'm thinking it would be good to tack those little gaps in the windshield frame and grind them smooth. 30 minutes of work to save a headache when installing the windscreen. Obviously not something to do after paint.
View attachment 48425
In the dim distant past, I've installed VW windshields with a thin rope. Looking at this larger one, I realized that the larger diameter will be less likely to tear the gasket when it's pulling it over the frame. I'm not sure I'd go with one this large, but probably bigger than the ones I use in the past. And lots of lube.
Ian
Soooo close..... but I see little likelihood that it will be done until at the end of next week at the earliest https://www.facebook.com/1439430262/posts/10211470206937712/
restart
Well-Known Member
Huh, i have always used thinner rope. It seemed counter-intuitive to use thicker rope.rope is the standard tool to install the window seals had it done 10 times
Oh, and having just come in from weed whacking...I can confirm that weed whacker line would not be a good choice. The edges are very sharp.
Just got a call from Benny. He thinks the car will be DONE early next week, and i may be able to drive it this weekend. He wanted more money.... I told him I'd like to pay balance when car is done. Apparently, there are some more extras.... I am not sure what they are, but trust him. I don't think there are many.
He mentioned that the door lock on drivers side is missing the small flap that is flush on the lock when no key is in it. I assume this is easy to source. I asked Carl Nelson.
Will head down there this afternoon to see how things are going.
I can't wait.
He mentioned that the door lock on drivers side is missing the small flap that is flush on the lock when no key is in it. I assume this is easy to source. I asked Carl Nelson.
Will head down there this afternoon to see how things are going.
I can't wait.
Sounds very exciting - must take a video from the drivers seat pulling away from the shop!Just got a call from Benny. He thinks the car will be DONE early next week, and i may be able to drive it this weekend. He wanted more money.... I told him I'd like to pay balance when car is done. Apparently, there are some more extras.... I am not sure what they are, but trust him. I don't think there are many.
He mentioned that the door lock on drivers side is missing the small flap that is flush on the lock when no key is in it. I assume this is easy to source. I asked Carl Nelson.
Will head down there this afternoon to see how things are going.
I can't wait.
I think if you backed out the cost of all the extra and upgraded parts you've purchased, and arrived at just the shop/paint/ disassembly and assembly costs - the price would be extremely "fair". I say this only based on how much time it seems they have spent on the project, and the apparent results.
Shiny new flag or trap mirrors from Vintage Autobahn (in Oregon)...
https://vintageautobahn.com/bmw2002parts/
https://vintageautobahn.com/bmw2002parts/
FINALLY!!!! Benny says I can pick it up on Monday am!!!! Almost done. Got final numbers/bill. Not bad. All-in, about $25k, which is more than the $8500 original quote, but so much more done. A long video this time. Nothing earth shattering to watch. Benny and Gary are great guys. Thanks to all of you for your help in this process.
now go smoke the tires !!:eek:
Probably half of what the guys on the show Phantomworks would have charged. They'd say parts alone was $25k.
All in all, you got a good deal given all the work they did.
All in all, you got a good deal given all the work they did.
Scott, congrat's, car is looking great.
m_thompson
Well-Known Member
Probably half of what the guys on the show Phantomworks would have charged.
I am always surprised by the low labor rates at FantomWorks.
67 pages of posts. A new record? Despite predictions to the contrary, the car will be completed before Trump is out of office, unless god willing he resigns in the next week. Seriously, I want to thank all of you for following along in my project and especially for all your advice and help along the way. I could not have done this without all of you. I hope someday to meet as many of you as possible.
Perhaps when this is all over, I will summarize my experience, maybe even editing the videos so that someone can watch from the process to help others.
Thanks.
Perhaps when this is all over, I will summarize my experience, maybe even editing the videos so that someone can watch from the process to help others.
Thanks.
Great looking car, excellent value on the restoration.
The BBS wheels really change the look (2x more sporty).
What I like best is that your interior is installed yet they haven't done the belt-line trim.
I hope they have someone with small hands (that's why we have kids, right?).
Exhaust tip: keep a piece of green scotchbrite (cut into a 3" or 4" wide but long strip) in the trunk. When the satin exhaust tip looks grungy, just polish it up with that scotchbrite (just like shining the tips of your shoes with a strip of cloth). 60 sec and your tip will look like new.
- Status
- Not open for further replies.