Going back together- slowly

Peter Coomaraswamy

Well-Known Member
Site Donor $$
Messages
3,787
Reaction score
896
Location
Austin, TX
making like new

Hi All,

Thanks for the information on this thread, and I have some questions; I was reading some of the recent posts regarding rear shock tower bracing, etc and as I put this beast back together I was hoping to get some suggestions on how to make this coupe ride and feel like a new car. I'm spraying the engine bay and trunk this weekend in "midnight blue" 040 I believe is the color code and if anyone has suggestions on how to keep things quiet and tight it would be appreciated. I understand that the CSL's weigh about 2950 lbs and the regular optioned cars weigh about 300 more lbs. I hope to boost the power to around 225 hp with the use of headers (if I can find some) and a custom exhaust. Also the electronic ignition as mine is carbed. I know this covers allot of stuff, but the goal is to make this car ride and handle like a new car so since many of you have been at this point in the build process I was wondering if I could get some suggestions on how best to achieve my goal. Please include any modifications that have proven successful.

Thanks as always!
 

Nicad

Well-Known Member
Site Donor
Messages
3,519
Reaction score
544
Location
Toronto
You are moving along quickly Peter. Looks very nice. Looking forward to answers to your question.
 

Peter Coomaraswamy

Well-Known Member
Site Donor $$
Messages
3,787
Reaction score
896
Location
Austin, TX
Thought I'd post a few

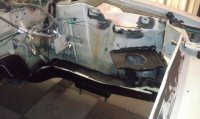
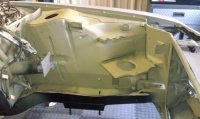
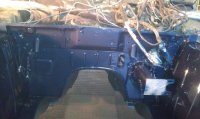
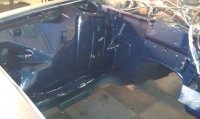
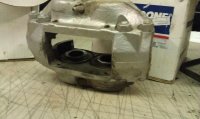
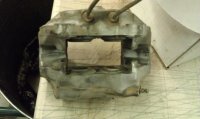
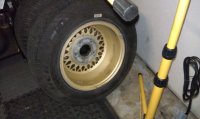
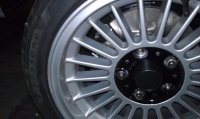
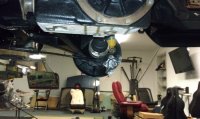
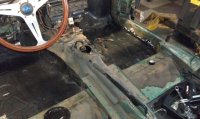
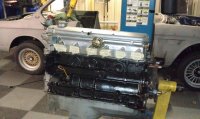
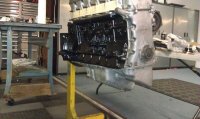
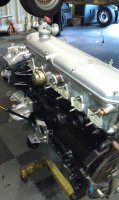
Now that the engine bay is done I can start putting this back together- a little. I included some before and after shots- not all that clear.
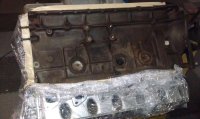
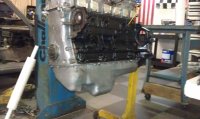
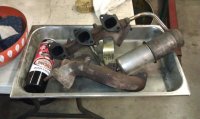
 

Attachments

  • engine bay-pre.jpg
    engine bay-pre.jpg
    93.6 KB · Views: 192
  • enginebaya.jpg
    enginebaya.jpg
    90.6 KB · Views: 206
  • enginebay3.jpg
    enginebay3.jpg
    95.9 KB · Views: 192
  • enginebay6.jpg
    enginebay6.jpg
    93.9 KB · Views: 201

Luis A.

Well-Known Member
Site Donor
Messages
1,533
Reaction score
358
Location
Wisconsin
Peter,

You said you rebuilt your CV joints? What exactly did you do? I'm in the process of taking mine apart and have yet to degrease them and inspect them but one of them is somewhat balky. There are no replacement CV joints from BMW just from W&N and they are pricey enough to not be casual about replacing them...
 

Peter Coomaraswamy

Well-Known Member
Site Donor $$
Messages
3,787
Reaction score
896
Location
Austin, TX
cv joints

Hi Luis,

To rebuild them I removed the ball-bearings and washed everything thoroughly, then reversed the collar (center piece) and re assembled. It’s a little like a Rubik’s cube getting them back together but they DO NOT need to be forced at all. The reversing of the center collar "supposedly" allows the balls to ride on a slightly different spot on the hub, but at this stage in the drive line I feel that's questionable (so if they go in the same way they came out you'll be fine). If there is excessive wear you may want to replace. If you get the part number off the hub you may be able to get them from Porsche (or world-pac) but I know of a place that has them but they're just under 100 bucks a piece. Instructions on rebuilding them can also be found on youtube- sorry I don't have the link, but I'll get it and re-post though I'm sure you can find it too.

Good luck- if I can help let me know.

STEVE- I'll let you know what I used after I go to the shop today and make sure it hasn't peeled off :)
 

Peter Coomaraswamy

Well-Known Member
Site Donor $$
Messages
3,787
Reaction score
896
Location
Austin, TX
need some help with this

My coupe is a 1974 auto.- soon to be 5 speed. When I was disassembling the front end the brake rotors were solid-not vented and someone wrote me that all 3.0 cs had vented disks up front. I bought the "correct" calipers/rotors and mounted them on the sub-frame-etc-and when I got the front end together and up, went to put what I thought were the original wheels on and they did not fit. I had a pair of knock-off Alpinas- Chinese junk, but they fit perfectly. My question is- what happened here. If the rotors and calipers were changed at some point for either price or availability then I would suspect the wheels would fit either - or maybe these are not the original BBS 14 in. wheels. Anyhow, not really all that important but I was curious and thought I would ask around.

Thanks,
Peter C
 

Attachments

  • caliper question.jpg
    caliper question.jpg
    87.5 KB · Views: 161
  • caliper question1.jpg
    caliper question1.jpg
    85.3 KB · Views: 157
  • caliper question2.jpg
    caliper question2.jpg
    91.7 KB · Views: 155
  • caliper question4.jpg
    caliper question4.jpg
    87 KB · Views: 154

Stevehose

Well-Known Member
Site Donor $$
Messages
13,010
Reaction score
5,684
Location
Sarasota, FL
The BBS wheels are not original to CS's so that may be the issue. Can you get hold of a stock CS wheel to check fit? The '74's came with turbines but I think they are they same fit as the earlier 5 slot wheel.
 

Peter Coomaraswamy

Well-Known Member
Site Donor $$
Messages
3,787
Reaction score
896
Location
Austin, TX
very cool

Thanks for the quick answer. I did have an original turbine- for the spare and it did fit so it looks like that's the answer. I see the BBS's on allot of coupes- is there any history behind these- did they fit older coupes? Just curious.

Cheers,
 

Stevehose

Well-Known Member
Site Donor $$
Messages
13,010
Reaction score
5,684
Location
Sarasota, FL
Not sure but there are lots of different bbs styles and I think the key is getting the offset correct. Yours probably have a mismatching offset to the stock setup requirements that the PO remedied by the rotor change. Always PO mysteries to solve when sorting these cars. If you like BBS then research the correct offset needed for coupes then source those for proper fit. I am sure members here have turbines available also.
 

Peter Coomaraswamy

Well-Known Member
Site Donor $$
Messages
3,787
Reaction score
896
Location
Austin, TX
finishing up the rear

Put the brakes back together and new flex lines and tightened everything up. I had a bump in the rear when I pushed down on the right corner- I re-seated the shock and it seems to have gone away. I included a couple of pics- I think I got everything right. I hope to get the engine back in the bay this weekend then complete the 5 speed conversion. I think I have all the parts and then I'll have to fashion a full exhaust system from the manifolds down. That should prove interesting. We do not have emissions checks on these cars so I can put up anything I want. It will be interesting to make something that sounds good but is not overwhelming in the passenger compartment.
 

Attachments

  • right rear brake.jpg
    right rear brake.jpg
    94 KB · Views: 186
  • new floors and wiring.jpg
    new floors and wiring.jpg
    96.4 KB · Views: 201
  • engine block ready for paint.jpg
    engine block ready for paint.jpg
    95.8 KB · Views: 189

Luis A.

Well-Known Member
Site Donor
Messages
1,533
Reaction score
358
Location
Wisconsin
Hey Peter, looking good. I'll be soon painting my block as well. What primer/paint are you using?

When you say you'll fashion the exhaust system, are you fabricating it yourself?
 

Peter Coomaraswamy

Well-Known Member
Site Donor $$
Messages
3,787
Reaction score
896
Location
Austin, TX
Block paint

Hello Luis

I will probably just use a commercial engine paint (black of course :)). I usually don't prime because the primer is not usually heat resistant and I have painted some Ford V8 blocks- Ford Blue (of course) and never had a problem with peeling. Usually 2 coats so it covers up the inevitable "nibbs" that are inherent in the iron. Regarding the exhaust, the last time I had an exhaust made, dual and over the axel (Mustang) it only cost me about 500.00 including the mufflers of my choice, so I'll probably see a friend-or make one- at an exhaust shop and see if we can re-create the down pipes, then I may go with a 2 into 1 oversize pipe along the drive-shaft area with a quality silencer and route it out the stock rear hole. If it's too loud I'll fashion another muffler to fit in the stock area. If it's neat and clean and sounds good then I don't think there will be any problem with "originality". It's going to be a while until I start on that, 3 weeks if I'm lucky, so I'll post some pics with prices because I see allot of posting on the site for exhaust and more than a few concerns about the cost.

Thanks!
 

Peter Coomaraswamy

Well-Known Member
Site Donor $$
Messages
3,787
Reaction score
896
Location
Austin, TX
did a little work this evening-

Here are the pics. Sorry if they're a little fuzzy
 

Attachments

  • engine1.jpg
    engine1.jpg
    94.8 KB · Views: 191
  • engine2.jpg
    engine2.jpg
    96.9 KB · Views: 188
  • engine7.jpg
    engine7.jpg
    95.9 KB · Views: 200

Stefan

Well-Known Member
Messages
529
Reaction score
8
Location
Sweden
Here are the pics. Sorry if they're a little fuzzy

Nice workshop!
Is it your own or sharing?

I surely miss the space in my own garage!

Keep us updated with pics of your work. I think you get the work done almost 100% without overdoing things economically.

Well, we sure know that your restoration it's not for the thin wallet, but I anyway think that your work could inspire other E9 owners to keep up their work. I've done this journey earlier and it's worth it. Even though when the E9 is finished, it takes you to the next project.....
 

Peter Coomaraswamy

Well-Known Member
Site Donor $$
Messages
3,787
Reaction score
896
Location
Austin, TX
Thanks Stefan

Well, after many years working in spaces that could barely keep the rain out and even after abandoning a project, (1973 Q code 351 Mach 1 T1) German Export- that almost counts- I had a couple of kiddos, started a company and as the years went by we grew out of the space. I bought the property about 12 years ago, so I rent out the office space and work in the warehouse and thanks, it is very comfortable. Regarding the cost of restoration, it's not really that much, so far not more than a typical Mustang restoration although the new parts are more expensive. Since there is such a cross pollination of parts I can buy a donor car for 800.00 and even if it's just the hardware I use it saves allot of money. Also, after 8 hours at the office and putting the rodents to bed I can sneak out for a few hours and do almost all the work myself so labor is cheap!

Thanks to all the folks I have met during this restoration and especially the help from the folks on this forum this is actually allot of fun and in fact is cheaper than therapy!
 

Peter Coomaraswamy

Well-Known Member
Site Donor $$
Messages
3,787
Reaction score
896
Location
Austin, TX
More pics and a question

Since I was short a couple of parts this weekend and stripped out/buggered up some studs coming out of the exhaust manifold I decided to clean things up a little instead of dropping in the engine. I also took a pic of my intake manifold with something like a Jarvic-7 attached to it. Can anyone tell me what this thing is, possibly a scuba tank? And, more importantly does it need to be there. It does not seem to be connected to anything.

One more thing, when replacing the floors the brake line inadvertently was cut. I have a friend who owns a shop and said to connect it with a standard compression fitting. I noticed on the box on the one I bought it said specifically NOT for brakes. Are there some that are acceptable to use or should I replace the entire line (master cyl. to the rear)

Thanks!
 

Attachments

  • scrape and paint.jpg
    scrape and paint.jpg
    94.8 KB · Views: 158
  • almost ready to go in1.jpg
    almost ready to go in1.jpg
    94.3 KB · Views: 172
  • almost ready to go in.jpg
    almost ready to go in.jpg
    95.9 KB · Views: 167
  • exhaust manifold.jpg
    exhaust manifold.jpg
    90.9 KB · Views: 172

HB Chris

Well-Known Member
Site Donor $$
Messages
19,418
Reaction score
8,759
Location
Huntington Beach, CA
Great pic of the early style water pump upgrade with the nose piece in place. Are you keeping the smog junk on your manifold?
 
Top