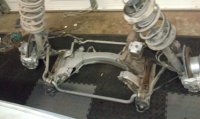
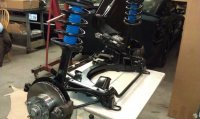
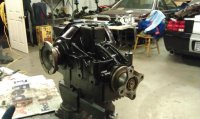
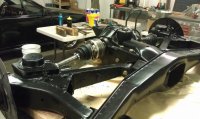
Well, I pretty much have everything off the car and have started rebuilding the individual components in preparation for the re-assembly. I thought I would attach a couple of pics in case anyone is interested and thanks to all the folks who supplied parts and advice (so far). Below is the front sub-frame before and after.
You are using an out of date browser. It may not display this or other websites correctly.
You should upgrade or use an alternative browser.
You should upgrade or use an alternative browser.
Going back together- slowly
- Thread starter Peter Coomaraswamy
- Start date
Beautiful, wish mine looked like that. Keep us posted with more pics.
Steve
Steve
Really nice! Painted or powdercoated? Keep the pics coming. :wink:
Thanks-
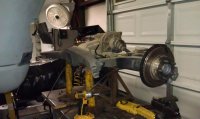
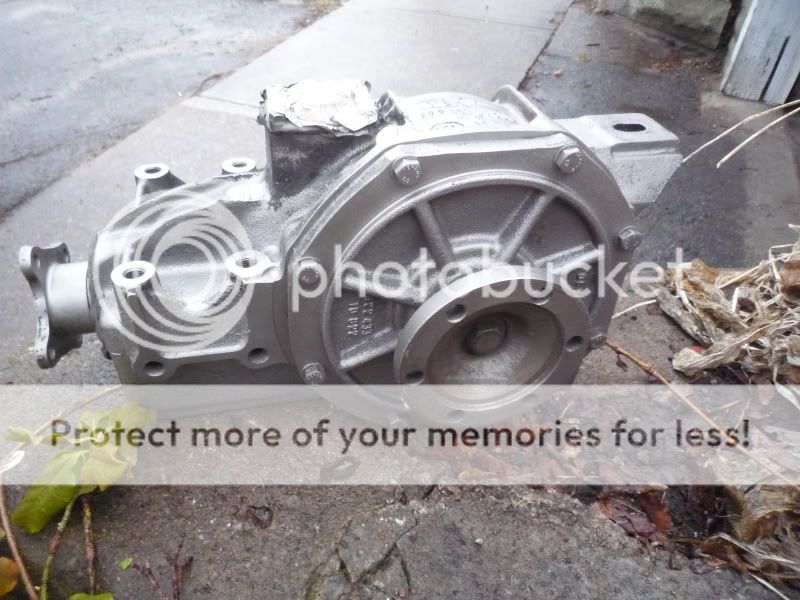
Thanks for the kind words Steve & Bert- The forum says "let's see em" so I thought there might be some interest. The solid sub-frame is powder coated and all the components are primed and painted. After using a parts washer I usually do a final spray-off with brake cleaner- it has a high ether content and evaporates really quickly- of course you have to be careful not to pull a "Richard Pryor" with that stuff. I then just use a primer like rustoleum and then a couple of top coats with whatever the original color calls for and as long as it dries completely it will last for a long time. I'll attach a pic of the rear end unfinished-we just muscled it out last night and it's a mess, so when it's cleaned and painted I'll send some of those pics too.
Thanks for the kind words Steve & Bert- The forum says "let's see em" so I thought there might be some interest. The solid sub-frame is powder coated and all the components are primed and painted. After using a parts washer I usually do a final spray-off with brake cleaner- it has a high ether content and evaporates really quickly- of course you have to be careful not to pull a "Richard Pryor" with that stuff. I then just use a primer like rustoleum and then a couple of top coats with whatever the original color calls for and as long as it dries completely it will last for a long time. I'll attach a pic of the rear end unfinished-we just muscled it out last night and it's a mess, so when it's cleaned and painted I'll send some of those pics too.
Attachments

pamp
Well-Known Member
Front end
Just back from work up north and am contemplating the next winter coupe project. Carl N. springs in hand but will also need various bushings, tie rod ends,etc. Would it be easier to drop the entire sub-frame as you have done and block the motor somehow? Re-furb all needed and re-install? As a side note, I have been gone for over two months, installed a block heater on the car in the fall and she fired on the first turn.
Just back from work up north and am contemplating the next winter coupe project. Carl N. springs in hand but will also need various bushings, tie rod ends,etc. Would it be easier to drop the entire sub-frame as you have done and block the motor somehow? Re-furb all needed and re-install? As a side note, I have been gone for over two months, installed a block heater on the car in the fall and she fired on the first turn.
ooo-good question
I am doing a complete tear-down of every part so I had no choice") If I were going to just do the front end I think I would take the parts off individually because there are allot of lines and hoses, A/C, etc. around the sub-frame and then you will need to support the engine and if you don’t have a lift it would be crazy!
If I were going to just do the front end I think I would take the parts off individually because there are allot of lines and hoses, A/C, etc. around the sub-frame and then you will need to support the engine and if you don’t have a lift it would be crazy!
You could even do one side at a time. Also, I've tried so many things to clean parts on this car, I have found for those parts that are going to stay on the car and are subject to road grime if you spray with oven cleaner and power-wash it seems to work pretty well. Then you can use a thinner to prepare it for paint. I'm doing the rear end this week with a plethora of Eastwood products so I'll post those pictures when I'm done and let you know how it went.
Hope that helps
I am doing a complete tear-down of every part so I had no choice
If I were going to just do the front end I think I would take the parts off individually because there are allot of lines and hoses, A/C, etc. around the sub-frame and then you will need to support the engine and if you don’t have a lift it would be crazy! You could even do one side at a time. Also, I've tried so many things to clean parts on this car, I have found for those parts that are going to stay on the car and are subject to road grime if you spray with oven cleaner and power-wash it seems to work pretty well. Then you can use a thinner to prepare it for paint. I'm doing the rear end this week with a plethora of Eastwood products so I'll post those pictures when I'm done and let you know how it went.
Hope that helps
pamp
Well-Known Member
Front end
Well....yeah, I do have my own lift. But I can indeed see that if one were to drop the entire assembly including the engine and trans. that this would one way to go. Looks like a side to side piece meal deal for me. Just curious if anyone had dropped just the suspension and left the motor in place somehow supported from above.
Well....yeah, I do have my own lift. But I can indeed see that if one were to drop the entire assembly including the engine and trans. that this would one way to go. Looks like a side to side piece meal deal for me. Just curious if anyone had dropped just the suspension and left the motor in place somehow supported from above.
I dropped my Diff yesterday and plan on dropping the subframes front and back next week. I was thinking I would support the motor with a couple of bottle jacks and wood under the oil pan and leave it in place. My car is on jackstands. Working under the car has been great exercise. A bit like Pilates.
Or...
You could support the motor from the top- I think Northern Tool sells an engine support pretty cheap, then you have good support, safety, and it's real clean and easy (nothing underneath the car to get in the way). You may want to use some padding where the brace sits though.
Good luck!
You could support the motor from the top- I think Northern Tool sells an engine support pretty cheap, then you have good support, safety, and it's real clean and easy (nothing underneath the car to get in the way). You may want to use some padding where the brace sits though.
Good luck!
I just blasted mine on Wednesday night. I was also worried about glass getting past the seals, so I used a hot Glue Gun to cover them up and put some plastic under the vent cap. Unfortunately, the diff got bumped inside the cabinet and the glue did not hold all that well. Might take it apart now just to be sure there is no glass media in the bearings.
Very Cool!
I'll remember the glue gun trick for some other operations. I had the "luxury" of driving mine around for about a week before I decided to do the complete tear down, it ran pretty well and the rear was very quiet so I am hoping that with some clean-up and replacement of normal worn parts like the boots I will be able to avoid rebuilding most of the components. I'll keep posting pics-please do same!
I'll remember the glue gun trick for some other operations. I had the "luxury" of driving mine around for about a week before I decided to do the complete tear down, it ran pretty well and the rear was very quiet so I am hoping that with some clean-up and replacement of normal worn parts like the boots I will be able to avoid rebuilding most of the components. I'll keep posting pics-please do same!
progress-slow
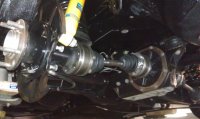
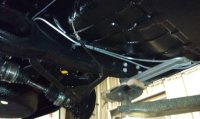
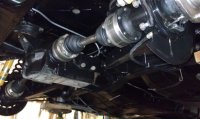
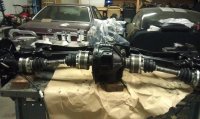
I plan on putting this back up today. Still have to clean up the brake and fuel lines but with any luck it will go up OK. I'm putting "Carls" springs in and found an easy way to get the bushings in. Also, for the bushings I was told by the good folks at Terry Sayther that kerosene should be used rather than assembly lube when putting in rubber bushings. Those guys are knowledgeable-and friendly... and local. Also, thanks to everyone here on the forum- I have got every answer (so far) I need!
I plan on putting this back up today. Still have to clean up the brake and fuel lines but with any luck it will go up OK. I'm putting "Carls" springs in and found an easy way to get the bushings in. Also, for the bushings I was told by the good folks at Terry Sayther that kerosene should be used rather than assembly lube when putting in rubber bushings. Those guys are knowledgeable-and friendly... and local. Also, thanks to everyone here on the forum- I have got every answer (so far) I need!
Attachments
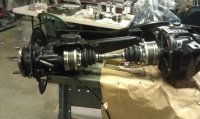
Yeah that does look Great Peter. Are those new axles? On mine I would like to replace the boost as they have some cracks and I want to do this once and for all. Does anyone know if they are user replaceable with out getting the axles rebuilt?
more info
Thanks for the comments folks! Regarding the axels, I just cleaned them up. Mineral spirits on a rag works wonders and I did put new booties on and rebuilt the CV joints. To prep for paint I just scraped, wire brushed- actually made my son do that, then used some solvent and power washed. Once all the guck was off and it looked pretty clean I washed all the parts with "Dawn" and power washed again and dried in the sun. Most of the original powder coat (I'm guessing) was still on so I sprayed a couple of coats of Eastwood-chasie black and there you have it. There are some interesting posts going on right now under the "undercoating" thread. I'll be posting some shots there as I just finished a complete undercoat and put the fuel lines and brake lines in. Tomorrow the rear end... finally, oh and the front end too. I'll post-
Thanks again all!