Finishing School for a Fjord 3.0 CS / 100 projects to improve a Coupe / Countdown

paul cain

Well-Known Member
Site Donor $$
Messages
680
Reaction score
1,336
Location
Orange County
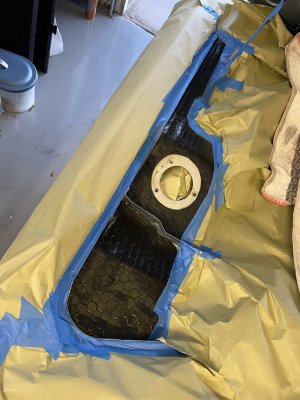
Project 38: Install the original hex pattern sound deadener in the inner front fenders. This was not a task I was looking forward to.

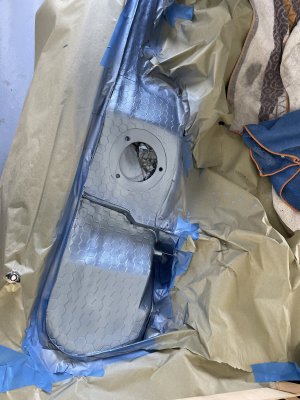
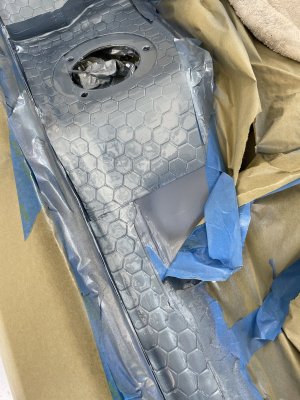
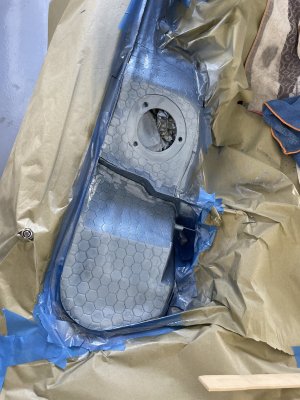
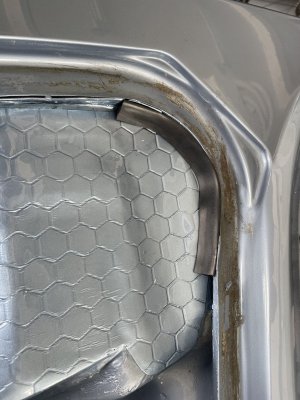
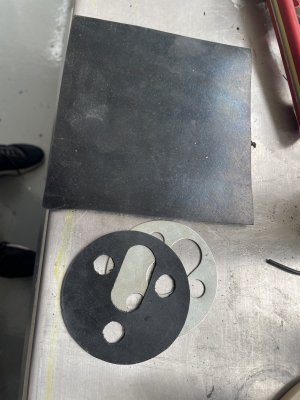
The PO had chosen to not reinstall the hex patterned sound deadener after the body restoration. It is clear he did an exemplary job in sealing off the the new inner fender joiner panels. I get it - to always 'show your work' when it comes to rust repair and prevention. Well, now that we all know that that fine work is there, I prefer the original look of the hex patterned material.

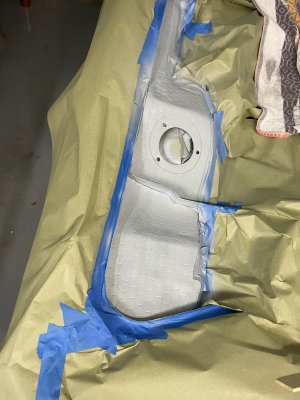
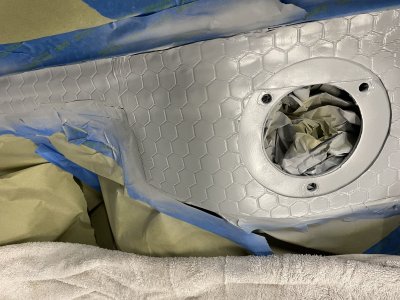
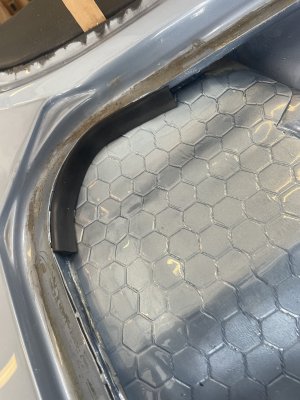
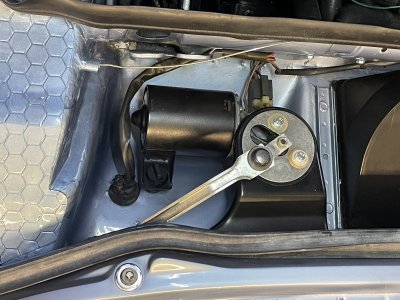
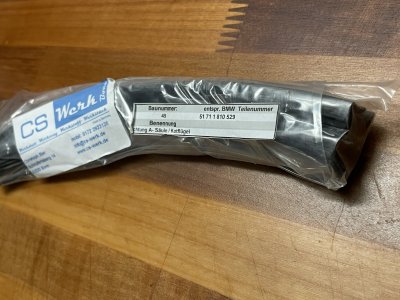
Image 9516 is a catalyzed high build primer that went on tonight. Hex material is from Chris at CS Werks with some light trimming. Like all painting projects it was 2 1/2 hours of prep and masking with about 4 minutes of paint application. Tomorrow its on to the Fjord base coat and then two coats of clear.
 

Attachments

  • IMG_9515.jpg
    IMG_9515.jpg
    316.1 KB · Views: 145
  • IMG_9516.jpg
    IMG_9516.jpg
    309.9 KB · Views: 111
  • IMG_9517.jpg
    IMG_9517.jpg
    367.6 KB · Views: 113
  • IMG_9514.jpg
    IMG_9514.jpg
    336.6 KB · Views: 117
Last edited:

paul cain

Well-Known Member
Site Donor $$
Messages
680
Reaction score
1,336
Location
Orange County
Image 9518 is two coats of base Fjord metallic. About 30 min between coats. Applied yesterday.
This morning it got the two coats of clear. Image 9521 shows the color match to the inner fender.
 

Attachments

  • IMG_9518 (1).jpg
    IMG_9518 (1).jpg
    362.5 KB · Views: 83
  • IMG_9521.jpg
    IMG_9521.jpg
    406.8 KB · Views: 82
  • IMG_9520.jpg
    IMG_9520.jpg
    363 KB · Views: 94

paul cain

Well-Known Member
Site Donor $$
Messages
680
Reaction score
1,336
Location
Orange County
Project 37: New brake system is now nearly complete, just have to bleed the brakes.
Project 39: Install new fuel lines and a new fuel filter
Project 40: Install new low pressure power steering fluid lines and a new reservoir filter. The PO had used domestic smooth hoses with Pep Boys hose clamps. Replaced with factory clamps and the correct black cloth hose. This is for the low pressure feed and return. Belmetric sells this hose by the foot. (3 ft required) It really needs 16mm ID, however Belmetric only sells 17mm, which is adequate.
 

Attachments

  • IMG_9523.jpg
    IMG_9523.jpg
    350.2 KB · Views: 80
  • IMG_9524.jpg
    IMG_9524.jpg
    353.8 KB · Views: 62
  • IMG_9525.jpg
    IMG_9525.jpg
    437.4 KB · Views: 61
  • IMG_9528.jpg
    IMG_9528.jpg
    366.3 KB · Views: 68

paul cain

Well-Known Member
Site Donor $$
Messages
680
Reaction score
1,336
Location
Orange County
Project 41: Clarify the VIN numbers. Both the VIN stamping on the cowling and on the steering column needed work from neglect. The VIN Stamping on the cowling had been painted body color which is not correct, should be flat grey. And the stamping on the Steering column had been scratched up. This got a polish and a repaint in high gloss black.
 

Attachments

  • IMG_9530.jpg
    IMG_9530.jpg
    256.3 KB · Views: 62
  • IMG_9533.jpg
    IMG_9533.jpg
    239.5 KB · Views: 67
  • IMG_9529.jpg
    IMG_9529.jpg
    575.4 KB · Views: 74

paul cain

Well-Known Member
Site Donor $$
Messages
680
Reaction score
1,336
Location
Orange County
Project 42: Replace the missing corner seals at the back edge of the engine compartment. These were missing at the purchase. When I installed the hex patterned insulation the available gap was too narrow to fit the weatherstripping in place. Don't be shy, cut it until it fits. This still needs Wurth rubber cement to be totally finished.
 

Attachments

  • IMG_9535.jpg
    IMG_9535.jpg
    400 KB · Views: 70
  • IMG_9536.jpg
    IMG_9536.jpg
    343.6 KB · Views: 66
  • IMG_9531.jpg
    IMG_9531.jpg
    339.2 KB · Views: 87

mulberryworks

Mr. Fixity
Site Donor
Messages
1,245
Reaction score
614
Location
Jacksonville FL
Project 41: Clarify the VIN numbers. Both the VIN stamping on the cowling and on the steering column needed work from neglect. The VIN Stamping on the cowling had been painted body color which is not correct, should be flat grey. And the stamping on the Steering column had been scratched up. This got a polish and a repaint in high gloss black.
I've never seen this, but then my Coupe experience is very limited. I can see it was easy for the factory to spray the body color and leave it at that, but then this was a top-end car so they took the extra effort. It would make the location stand out a bit. Not many Coupes at this age haven't had a repaint and I'd guess very few had the VIN treatment you've done here. Another detail restored.
 

John-T

Well-Known Member
Site Donor $
Messages
86
Reaction score
41
Location
Los Angeles
Project 42: Replace the missing corner seals at the back edge of the engine compartment. These were missing at the purchase. When I installed the hex patterned insulation the available gap was too narrow to fit the weatherstripping in place. Don't be shy, cut it until it fits. This still needs Wurth rubber cement to be totally finished.
Didn't even know there are seals that go in there!
Is there a part number for them?
 

paul cain

Well-Known Member
Site Donor $$
Messages
680
Reaction score
1,336
Location
Orange County
Project 43: Drop the 6 x 9 speakers so they are hidden and recover the rear parcel shelf in early black
Project 44: Add a ground strap to the alternator
Project 45: Retro fit the early solid brass overflow tank
 

Attachments

  • IMG_9537 (1).jpg
    IMG_9537 (1).jpg
    311.2 KB · Views: 61
  • IMG_9550.jpg
    IMG_9550.jpg
    337.1 KB · Views: 63
  • IMG_9544 (1).jpg
    IMG_9544 (1).jpg
    277.9 KB · Views: 65

paul cain

Well-Known Member
Site Donor $$
Messages
680
Reaction score
1,336
Location
Orange County
Project 46: Fix the windshield wiper motor assembly.
The PO hastily assembled the windshield wiper motor and linkage. I disassembled everything added the correct clear zinc plate (three bolt holes) left over from an early project, added the correct rubber seal and cleaned up the harness and routing. Note to confirm the wiper stop phasing is correct before reinstalling the wiper arms.
 

Attachments

  • IMG_9547.jpg
    IMG_9547.jpg
    329.9 KB · Views: 63
  • IMG_9549.jpg
    IMG_9549.jpg
    350.1 KB · Views: 56

paul cain

Well-Known Member
Site Donor $$
Messages
680
Reaction score
1,336
Location
Orange County
Project 47: Add a new Varta style OEM battery
Project 48: Convert the fog lamp into a brake lamp, add high intensity LED red blubs.
 

Attachments

  • IMG_9551.jpg
    IMG_9551.jpg
    297.5 KB · Views: 60
  • IMG_9552.jpg
    IMG_9552.jpg
    340.7 KB · Views: 59

paul cain

Well-Known Member
Site Donor $$
Messages
680
Reaction score
1,336
Location
Orange County
More hasty work repaired.
Project 49: Add the correct headlamp access door seal to the bottom side.
 

Attachments

  • IMG_9553.jpg
    IMG_9553.jpg
    370.9 KB · Views: 55
  • IMG_9556.jpg
    IMG_9556.jpg
    237.1 KB · Views: 51
  • IMG_9557.jpg
    IMG_9557.jpg
    244.8 KB · Views: 54

paul cain

Well-Known Member
Site Donor $$
Messages
680
Reaction score
1,336
Location
Orange County
Project 50: Install and OEM style relay bracket to body harness.
1974+ Coupes have an extra relay added to their harness. This recent addition was just left dangling behind the others that had a proper slide mount. This was some sloppy OEM work and it bugged me. I had this bracket left over in my 'box of random brackets' and with some light metallurgical editing it now fits very nicely behind the original relays.
 

Attachments

  • IMG_9555.jpg
    IMG_9555.jpg
    307.7 KB · Views: 67

eriknetherlands

Moderator
Site Donor
Messages
2,775
Reaction score
2,008
Location
Netherlands, Eindhoven area
I know you're still halfway, and it's likely on your list, but could it be that you are forgetting an essential part? Without it your car won't start and sound horrible ;-).

It's the round black plastic cap that goes inside the tube for the hood release cable to guide it. I think you may have missed that, as it requires a small hole in the tube to locate the plastic part. From your pic I think that the hole is missing as well.

Here's a pic of my car with the hole in the tube.
1709026711432.png
 

Attachments

  • Screenshot_20240227_073632_Samsung Internet.jpg
    Screenshot_20240227_073632_Samsung Internet.jpg
    208 KB · Views: 49
Last edited:

Ohmess

I wanna DRIVE!
Site Donor $
Messages
4,891
Reaction score
2,714
Location
Aiken, SC
Hello Paul
Why Project 44 „ground strap“?
Thanks Ulrich
Hi Ulrich - Its probably overkill, but I too have added this. It provides an easier path to ground than the OEM route. I've gone a step further, and installed a ground strap from the oil filter bolt to the bolt on the body where the battery is grounded.
 

paul cain

Well-Known Member
Site Donor $$
Messages
680
Reaction score
1,336
Location
Orange County
Hello Paul
Why Project 44 „ground strap“?
Thanks Ulrich
@Ohmess is spot on. The alternator has a rubber bushing in the large mounting. This acts as an isolator. Grounding depends on the conduction between the alternator and it's mounting bracket. If that yoke is too wide you won't have a good ground. BMW used to fit a ground strap in this location. As the English would say this is a 'belt and braces' approach with high confidence of a good ground. If its not clear by now, I have a grounding fetish based on years of chasing electrical issues. The more high confidence ground circuits I have, the fewer electrical problems I have. You can never have enough ground circuits.
 

paul cain

Well-Known Member
Site Donor $$
Messages
680
Reaction score
1,336
Location
Orange County
I know you're still halfway, and it's likely on your list, but could it be that you are forgetting an essential part? Without it your car won't start and sound horrible ;-).

It's the round black plastic cap that goes inside the tube for the hood release cable to guide it. I think you may have missed that, as it requires a small hole in the tube to locate the plastic part. From your pic I think that the hole is missing as well.

Here's a pic of my car with the hole in the tube.
View attachment 178015
@eriknetherlands Re: "Without it your car won't start and sound horrible ;-)." I always thought that plastic bushing was to limit my top speed :)
Thanks for the reminder that it needs a hole in it. Recalling from an earlier post, this is a new pipe as the PO's body shop somehow omitted it during the body work. I'll start the search for that plastic bushing - so my car won't sound horrible!
 

Stevehose

Well-Known Member
Site Donor $$
Messages
13,011
Reaction score
5,686
Location
Sarasota, FL
@Ohmess is spot on. The alternator has a rubber bushing in the large mounting. This acts as an isolator. Grounding depends on the conduction between the alternator and it's mounting bracket. If that yoke is too wide you won't have a good ground. BMW used to fit a ground strap in this location. As the English would say this is a 'belt and braces' approach with high confidence of a good ground. If its not clear by now, I have a grounding fetish based on years of chasing electrical issues. The more high confidence ground circuits I have, the fewer electrical problems I have. You can never have enough ground circuits.
I went one further on the OCD scale and ran a ground wire from the battery to the alternator case then another from the case to the oil filter mount bolt. The metal tapping bolt used to secure the negative battery strap to the body isn't the most confidence-inspiring method.
 
Last edited:

mulberryworks

Mr. Fixity
Site Donor
Messages
1,245
Reaction score
614
Location
Jacksonville FL
@Ohmess is spot on. The alternator has a rubber bushing in the large mounting. This acts as an isolator. Grounding depends on the conduction between the alternator and it's mounting bracket. If that yoke is too wide you won't have a good ground. BMW used to fit a ground strap in this location. As the English would say this is a 'belt and braces' approach with high confidence of a good ground. If its not clear by now, I have a grounding fetish based on years of chasing electrical issues. The more high confidence ground circuits I have, the fewer electrical problems I have. You can never have enough ground circuits.
I found out the hard way that good grounds are essential. I had a 1983 MB 300SD with the 5-cylinder turbocharged Diesel engine. I thought it might have a poor ground as the starter would intermittently not work at all so I took the ground strap off the starter to clean it and add another when I decided to see what would happen with no ground if I tried to engage the starter. I expected it would be nothing, or maybe a click. Big mistake. With no ground strap, the electricity did its best to find a path to the starter and that turned out to be through the climate control system. Smoke started coming from the dash vents and didn't stop with the key off. I jumped out and disconnected the battery and the smoke abated. The climate controls had to be replaced. Ouch. And the starter was bad too.
 
Top