re-assembly-the nasty bits

Peter Coomaraswamy

Well-Known Member
Site Donor $$
Messages
3,787
Reaction score
896
Location
Austin, TX
Thanks

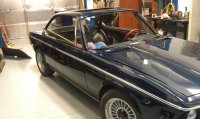
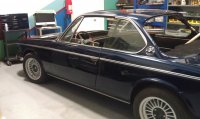
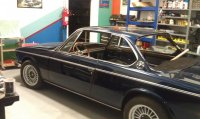
The color I was aiming for was Midnight Blue 040. The paint brand is PPG and we had to do a little "mixing". The base coat, then 1 coat of clear, wet sanded, followed by 3 coats of clear, sanded and buffed. The actual PPG color is mostly Indigo, but it was as close to 040 as we could get. The shop's paint computers are set up to use PPG products and since the primer was PPG I took the owners advice and stuck with the brand they use. We looked and could not find a specific combination for 040, and the BMW colors did not go back that far in all the color books the shop had. So, I guess the answer is 040, but it is probably just a little different than the true BMW "Midnight Blue". I'm not sure if that rings correct with the forum but I know nothing about paint-though I'm afraid to say I'm learning.
 

Peter Coomaraswamy

Well-Known Member
Site Donor $$
Messages
3,787
Reaction score
896
Location
Austin, TX
mirror-mirror

Hi folks, my 3.0 cs is a 1974 and it did not come with a passenger door mirror. I purchased one and now have to drill into the freshly painted door :???:. I have seen the mirrors mounted in "staggered" positions, i.e. the passenger's side slightly forward as on my 911. Is there a correct spot for the passenger mirror that differs from the driver's side. This is a LHD vehicle.

Any pictures or diagrams would help I'm sure.

Thanks!
 

Stevehose

Well-Known Member
Site Donor $$
Messages
13,023
Reaction score
5,707
Location
Sarasota, FL
This has been discussed somewhere before and I believe the majority voted on keeping the symmetry

Hi folks, my 3.0 cs is a 1974 and it did not come with a passenger door mirror. I purchased one and now have to drill into the freshly painted door :???:. I have seen the mirrors mounted in "staggered" positions, i.e. the passenger's side slightly forward as on my 911. Is there a correct spot for the passenger mirror that differs from the driver's side. This is a LHD vehicle.

Any pictures or diagrams would help I'm sure.

Thanks!
 

rsporsche

Moderator
Site Donor $$
Messages
10,688
Reaction score
3,721
Location
Atlanta, GA
yep - the consensus was that mirrors on euro cars were mounted at the very front of the door and us mirrors were mounted further back. i have a problem seeing out of the mirror that is mounted further back ... and while i'm a symmetrical guy, i like to be able to see out of the mirrors.
 

Stan

Well-Known Member
Site Donor $$
Messages
7,009
Reaction score
1,526
Location
Newmarket, New Hampshire
Mirror mounted Euro style

DSCN3471.jpg
 

Peter Coomaraswamy

Well-Known Member
Site Donor $$
Messages
3,787
Reaction score
896
Location
Austin, TX
Thanks guys

Thank you for the pictures. I like the symetry also and since I can't move the driver side mirror forward due to pre-existing holes I'll just match the passenger side.

Again thanks for the quick response(s)!
 

Peter Coomaraswamy

Well-Known Member
Site Donor $$
Messages
3,787
Reaction score
896
Location
Austin, TX
latest for today

Just pluggin' along. Found some really helpful pics on the forum of the grill assembly to fill in the blanks where I neglected to snap enough shots. Many thanks! Just need to buy a bunch of those little screw clips :)
 

Attachments

  • grill5.jpg
    grill5.jpg
    91.8 KB · Views: 147
  • grill6.jpg
    grill6.jpg
    93 KB · Views: 140

Peter Coomaraswamy

Well-Known Member
Site Donor $$
Messages
3,787
Reaction score
896
Location
Austin, TX
Choke question

I have a dual weber set up; when I first start the engine it revs around 1800 rpm's but shakes quite a bit. When the engine is warm and the chokes kick off it really purrs smoothly and pulls pretty strong (around the block- with no windshield, etc.). Again, due to my lack of photographic prowess I, 1.do not know where the electric lead from the choke(s) connect to, and 2. should I visually sync the choke springs on the side of the carbs or is there a more scientific process? I included an old picture of the set up for reference. Any help would be appreciated.
 

Attachments

  • bmw 3.0 005.jpg
    bmw 3.0 005.jpg
    90.1 KB · Views: 128

Stevehose

Well-Known Member
Site Donor $$
Messages
13,023
Reaction score
5,707
Location
Sarasota, FL
Sounds like they are out of synch, do you have a synchrometer to check the airflows at various rpms and adjust accordingly, and do you know how to set the idle mixture screws for best idle? The fuel lines look crusty, considering new ones from firewall to pump and both carbs?

I have a dual weber set up; when I first start the engine it revs around 1800 rpm's but shakes quite a bit. When the engine is warm and the chokes kick off it really purrs smoothly and pulls pretty strong (around the block- with no windshield, etc.). Again, due to my lack of photographic prowess I, 1.do not know where the electric lead from the choke(s) connect to, and 2. should I visually sync the choke springs on the side of the carbs or is there a more scientific process? I included an old picture of the set up for reference. Any help would be appreciated.
 

Peter Coomaraswamy

Well-Known Member
Site Donor $$
Messages
3,787
Reaction score
896
Location
Austin, TX
info please

Thanks Steve, that was a picture before I pulled the engine etc, included for reference, and yes, those fuel lines et al, are a mess. I wonder if there is a thread you could point me to that tells how to accomplish what you mention, synch and air mixture, also the proper sequence for performing a good "tune-up".

Thanks much,
 

Stevehose

Well-Known Member
Site Donor $$
Messages
13,023
Reaction score
5,707
Location
Sarasota, FL
This is for Zeniths but the theory is the same:

http://www.e9coupe.com/forum/showthread.php?t=10942

Thanks Steve, that was a picture before I pulled the engine etc, included for reference, and yes, those fuel lines et al, are a mess. I wonder if there is a thread you could point me to that tells how to accomplish what you mention, synch and air mixture, also the proper sequence for performing a good "tune-up".

Thanks much,
 

61porsche

Well-Known Member
Messages
1,732
Reaction score
28
Location
Dallas
Choke feed comes from a keyed fused line near the rear carb./ booster/ column. Originally a green wire. But your wires are backwards- meaning the cut off feed wire should be from the rear carb. Be careful to twist them a bit so they don't hit the main linkage bar.

Choke setting should be the same. Yours aren't. Yes, visually by the dot or mark.

In Austin, you won't need much choke. With the hood up on a cold engine watch which butterfly opens early and adjust that first so they both act the same. You just want enough to start easily.

Vacuum lines- can be a primary source of rough running if there's a leak and yours need replaced.
 

Peter Coomaraswamy

Well-Known Member
Site Donor $$
Messages
3,787
Reaction score
896
Location
Austin, TX
One thing to another

I don't know if there is an easy answer to this, but the headlamps worked yesterday but I could only get the high-beams to come on when I pulled the lever back. This was the same problem I had before I started the restoration. Today, when I pulled the regular headlamp switch to the on position the fuse immediately blew so I checked for anything I might have knocked around and, well, I've been through 3 fuses now. Any ideas where I might start checking?

Thanks
 

arnie

Well-Known Member
Messages
222
Reaction score
69
Location
Germany
if the fuse is blowing for sure there's a short circuit somewhere. First it's important to know which fuse is gone when you switch on the lights.

In principle it could be no. 1,2,3 or 6 when I take a look at the wiring plan. (btw : do you have such a plan ?).

I guess it will be no 6, right ?
So parklights will remain working then, if you don't switch the ignition, tail lights also, I guess.

This would mean, that there's a problem somewhere in the line between the main light switch and the head lamp. First I personally would check the wiring from the connection point to the lamp itself. It's a 2,5 mm cross section yellow white one, so quite thick and relatively easy to find and identify. Close to the fuse sockets there's a connection point of 5 wires. One of them is this yellow white head light wire.

Just disconnect this one and try to switch on the head lights. If the fuse is still blowing, you will have a problem in the line between the switch and the connection point, otherwise the wiring between the connection point and the lamp is the problem, I'd say.

good luck

Ingo
 

Peter Coomaraswamy

Well-Known Member
Site Donor $$
Messages
3,787
Reaction score
896
Location
Austin, TX
sunroof questions

I got the weather stripping for the sunroof and can't figure out how to glue it on :?:. 1974 3.0cs. Are there any local (forum) artists who can explain this as I don't want to get glue on the wrong side of everywhere. Or, if there is already a drawing that shows the exact position that would be helpful as well. I think I'm about 2 weeks out from her maiden voyage... finally!

Thanks all
 

Attachments

  • sunroof5.jpg
    sunroof5.jpg
    89.2 KB · Views: 118

Peter Coomaraswamy

Well-Known Member
Site Donor $$
Messages
3,787
Reaction score
896
Location
Austin, TX
Helps... though

Hi Chris, Older post by BluMax says affix larger piece to the roof, smaller piece to the sliding panel at rear, and rubber squeegie piece on top of flap which is easy since the panel is out of the car. Is this your understanding as well?

Thanks,
 

Peter Coomaraswamy

Well-Known Member
Site Donor $$
Messages
3,787
Reaction score
896
Location
Austin, TX
Winding down

Well, I'm not done quite yet but I wanted to say a big THANK YOU!! to everyone who has helped, and put up with me on the forum. My car is about a week out and I must say, in the words of Jerry Garcia- "what a long strange trip it's been". I can't believe how many rubber parts there are on the doors, and all the little screws. It took the better part of 2 hours to adjust the windows and the door on the driver's side and tomorrow I'm sure it will be quicker when I do the passenger side. I included some pictures and the interior should go in this week. I must say though, even though I’m quite tired after 18 months of rebuilding this thing- I can’t wait to drive it!

Cheers
 

Attachments

  • trim on0.jpg
    trim on0.jpg
    94.2 KB · Views: 156
  • trim on4.jpg
    trim on4.jpg
    90.5 KB · Views: 147
  • trim on5.jpg
    trim on5.jpg
    94.3 KB · Views: 154
  • trim on3.jpg
    trim on3.jpg
    91.9 KB · Views: 157
  • trim on.jpg
    trim on.jpg
    93.5 KB · Views: 147
Top