I am curious to know if there is a standard/known length for the Getrag 265 conversion. I seem to recall that @paul cain made a specific measurement and have seen the technical articles about +/- length to cut and re-balance OEM driveshafts. Apologies if noted elsewhere and I missed it.
You are using an out of date browser. It may not display this or other websites correctly.
You should upgrade or use an alternative browser.
You should upgrade or use an alternative browser.
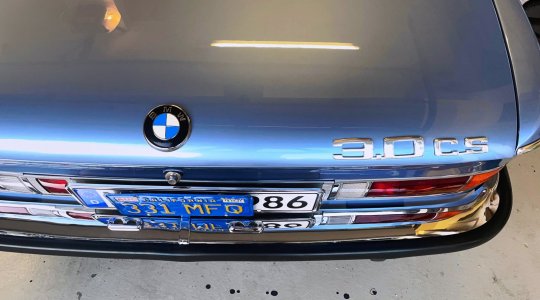
Patricia A. Mayer's 3.0 CS / Paul Cain's Fjord project / The 300 mile Test Drive / VIII / Final Punch List
- Thread starter paul cain
- Start date
-
- Tags
- restoration list
Per Carl Nelson's write up:I am curious to know if there is a standard/known length for the Getrag 265 conversion. I seem to recall that @paul cain made a specific measurement and have seen the technical articles about +/- length to cut and re-balance OEM driveshafts. Apologies if noted elsewhere and I missed it.
A custom unit must be fabricated, shorten a 4 speed by 3.75 inches or lengthen an automatic .75 inches, replace u-joints as necessary, replace center carrier bearing and renew hardy disc. This is custom work and very few shops can do it.
That's what I recall too, I was just wondering if there was known size that could be provided to the shop to build a fresh one. No worries if not...I will climb under and measure eventually!Per Carl Nelson's write up:
A custom unit must be fabricated, shorten a 4 speed by 3.75 inches or lengthen an automatic .75 inches, replace u-joints as necessary, replace center carrier bearing and renew hardy disc. This is custom work and very few shops can do it.
Per Carl Nelson's write up:
A custom unit must be fabricated, shorten a 4 speed by 3.75 inches or lengthen an automatic .75 inches, replace u-joints as necessary, replace center carrier bearing and renew hardy disc. This is custom work and very few shops can do it.
Not trying to steal this thread, just a caution. When I did our 5 speed conversion, there were two different methods on the forum. One was to cut the nose of the driveshaft and the end of the trans shaft off and the other was to shim between the guibo and the front driveshaft flange. I went with the shims which required the drivehaft to be cut shorter than the 3.75 inch by the thickness of the shims.I am curious to know if there is a standard/known length for the Getrag 265 conversion. I seem to recall that @paul cain made a specific measurement and have seen the technical articles about +/- length to cut and re-balance OEM driveshafts. Apologies if noted elsewhere and I missed it.
Last edited:
Sir,The damage caused by that C pillar drain tube never ceases to amaze me. My car was pretty much exactly the same as yours. The only rusted metal I had to replace was that same lower rear sill panel on both sides. One can’t help but wonder how so much water can get in through that C pillar vent as its opening is essentially pointed downward. So rain falling on the car while parked could not really get in there by gravity alone. It could only happen when the car was at speed in the rain and water was being sprayed upwards into that C pillar opening.
Nevertheless it seems that even on an otherwise dry car that area is always going to be have to be checked because it is a classic case of rusting from the inside and potentially invisible on the outside.
I am restoring a euro 72 3.0. How can I fix this drain issue. It would be wonderful if you could give me a ring. 210-710-6795.
Matt - take a look at this video from James Lurray at around 33:30. He's doing a 2000CS, but the principle is the same:Sir,
I am restoring a euro 72 3.0. How can I fix this drain issue. It would be wonderful if you could give me a ring. 210-710-6795.
The guy James mentions in his video as having taught him how to do this is Tom Baruch. Tom posts here as BMWSKI from time to time. I'll see him for dinner tonight; will mention your question to him.
Any reply to a technical question should always be made public here on the forum instead of by phone call so that everyone else can benefit. Also, unrelated questions should really be posted in a separate thread so as to not hijack the current one. But, just to get a couple of points across real quick:Sir,
I am restoring a euro 72 3.0. How can I fix this drain issue. It would be wonderful if you could give me a ring. 210-710-6795.
After having looked at the issue from many different angles, I now believe that I was wrong in thinking that rust at the bottom of the rear quarter panel has much if anything to do with the C pillar opening or its drain tube. There’s no way enough water can get in there to cause the damage we are seeing on even otherwise completely dry cars. I strongly believe that all the rust down there comes from a combination of deteriorating window seals and plugged drain holes at the bottom of those rear quarter panels. So those would be my top two areas to look at in order to prevent this problem.
Thank youMatt - take a look at this video from James Lurray at around 33:30. He's doing a 2000CS, but the principle is the same:
The guy James mentions in his video as having taught him how to do this is Tom Baruch. Tom posts here as BMWSKI from time to time. I'll see him for dinner tonight; will mention your question to him.
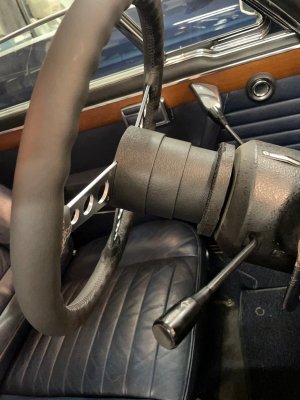
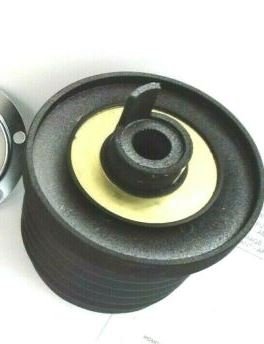
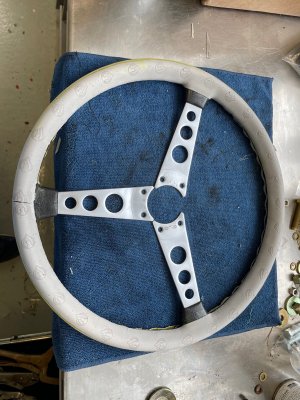
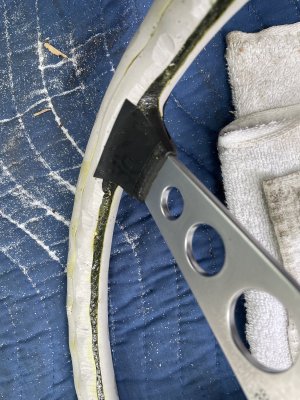
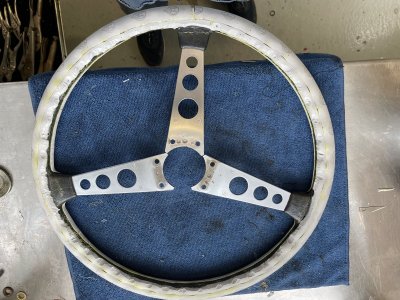
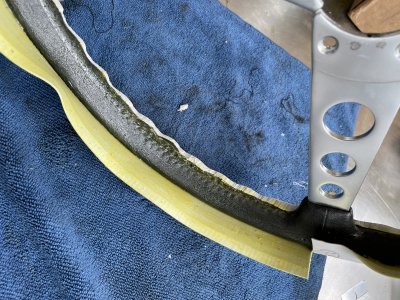
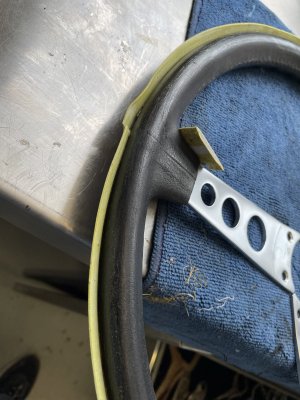
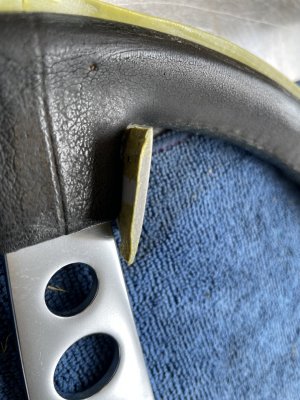
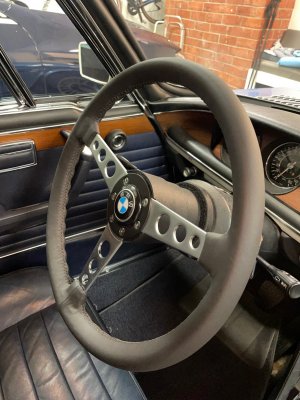
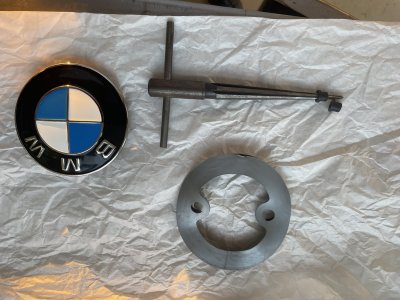
I finished the Petri wheel and installation tonight. This was a long journey. The three spoke wheel was originally a VW Sirocco wheel and it included the OEM engineered collapsible hub (see petri hub.jpg). This is a critical safety feature in the event of a frontal collision. When your torso starts accelerating towards the steering column in a collision, you want the wheel/hub assembly to collapse and not impale your jugular vein. To retain this OEM hub, I had to adapt it to the BMW Column. Apologies as I did not take photos of this machine work. It involved cutting off the lower base plate on the VW hub (removing the VW spline feature) and then machining a mating feature on the Momo hub. This involved facing off the front of the Momo hub. A hub centric step was machined into the Momo part an that was sized to fit the i.d. of VW hub (now without the VW spline feature). More dimensional trickery was required to re-step the Momo hub again, to sandwich in the black molded plastic hub cover. Four stainless Allen head bolts (6mm) now hold the VW hub to the Momo wheel.
Attachments
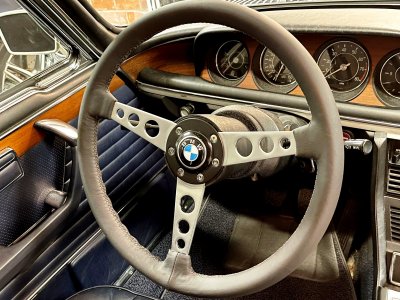
If the O.D. of the Petri wheel appears thicker than normal on a Petri 3 spoke wheel, it is because it is thicker.
I think Petri steering wheels are beautiful. However, by modern automotive standards, they are very thin to grasp. Not Jaguar E-type thin, but dated and too antiquey-thin when used on a daily basis.
Taking the best lightweight technology for the cycling world. I 'grew' the O.D. of the wheel by ~5mm by bonding on some tapered closed cell foam. (Handlebar tape). As follows: image 9578 shows the section view of this elegantly engineered handlebar tape. By using a very aggressive rubber cement, I glued this tape around the face of the wheel. I repeated this on the back side. It looks crude, but it was consistent. I used my Tennessee end mill to sculp out the finger indentations into the back side of the wheel. This is to retain both the look and feel of the original Petri. To transition the edges of foam tape back to the original surface, I used the very aggressive termination tape that came in the handlebar kit to feather it back into 0 height at the base of the three spokes.
Then it was of the steering wheel refinisher for a full leather re-wrap in black.
The (6) Allen headed fasteners on the face of the wheel are simply industrial stainless fasteners. They had stamped part no.s on their face. Some quick machining and then sanding and polishing brought them up to a full chrome look.
Attachments
Hi Paul! Love the steering wheel and the overall project. I have two questions; Can you provide the name of the company that re-wrapped your wheel in leather? Did you get my PM? ")
Thanks-
Thanks-
Last edited:
Vince look up Chris Scow at leather wheels.com. He loves to talk to people. He did 2 wheels for me, a gear shift knob and handbrake cover all stitched to match. I wanted something different and had them all done in red baseball stitching. He doesn't charge extra for thread color or type of stitch. His work is flawless and he is totally reasonable. Also a very quick turn around. Tell him I sent you. I have no financial relationship with him.
Now fully recovered from the lost bezel debacle. Thank you again to Gary @Bimmer 3.0 CS Getting the rubber gasket in place took 6 x tries and some aggressive rubber cement. Thanks Gary for saving the day!
Attachments

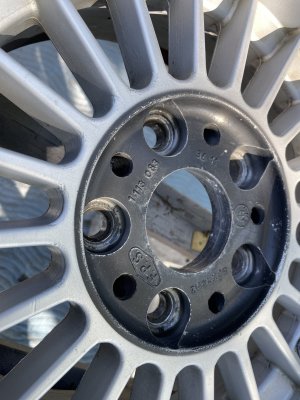
This is Patricia Mayer's original spare wheel.
After refinishing multiple sets of Alpina alloys, I've become accustomed to paying close attention to spraying the centers very carefully, using custom stencils. I was a bit shocked to see the quality of the original grey/black center paint work on this OEM F.P.S. wheel face. This dark edge finishes on the face of the wheel and it is off center and feathers like overspray. Another example where we have all incremented into over restoration. I just thought it was interesting.
After refinishing multiple sets of Alpina alloys, I've become accustomed to paying close attention to spraying the centers very carefully, using custom stencils. I was a bit shocked to see the quality of the original grey/black center paint work on this OEM F.P.S. wheel face. This dark edge finishes on the face of the wheel and it is off center and feathers like overspray. Another example where we have all incremented into over restoration. I just thought it was interesting.
Attachments
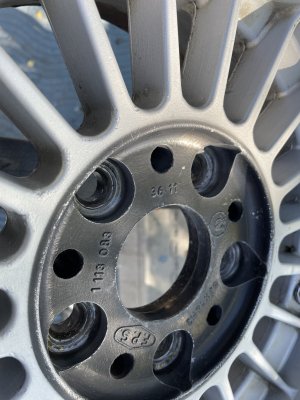
The irregular shape is also common on Alpinas.
Love what you did there Paul. No way around it, skinny steering wheels quickly become very uncomfortable on longer journeys. I guess that’s why many drivers in the day wore gloves.If the O.D. of the Petri wheel appears thicker than normal on a Petri 3 spoke wheel, it is because it is thicker.
I think Petri steering wheels are beautiful. However, by modern automotive standards, they are very thin to grasp. Not Jaguar E-type thin, but dated and too antiquey-thin when used on a daily basis.
Taking the best lightweight technology for the cycling world. I 'grew' the O.D. of the wheel by ~5mm by bonding on some tapered closed cell foam. (Handlebar tape). As follows: image 9578 shows the section view of this elegantly engineered handlebar tape. By using a very aggressive rubber cement, I glued this tape around the face of the wheel. I repeated this on the back side. It looks crude, but it was consistent. I used my Tennessee end mill to sculp out the finger indentations into the back side of the wheel. This is to retain both the look and feel of the original Petri. To transition the edges of foam tape back to the original surface, I used the very aggressive termination tape that came in the handlebar kit to feather it back into 0 height at the base of the three spokes.
Then it was of the steering wheel refinisher for a full leather re-wrap in black.
The (6) Allen headed fasteners on the face of the wheel are simply industrial stainless fasteners. They had stamped part no.s on their face. Some quick machining and then sanding and polishing brought them up to a full chrome look.
If you are suggesting that these are the original finish, -can tell you that they exactly match the weak finishing on the set of OEM F.P.S. turbine wheel set that came with my car. Always thought that they had been re-finished (poorly) by a previous owner or their kid based on that finish.This is Patricia Mayer's original spare wheel.
After refinishing multiple sets of Alpina alloys, I've become accustomed to paying close attention to spraying the centers very carefully, using custom stencils. I was a bit shocked to see the quality of the original grey/black center paint work on this OEM F.P.S. wheel face. This dark edge finishes on the face of the wheel and it is off center and feathers like overspray. Another example where we have all incremented into over restoration. I just thought it was interesting.
Also interested in the collapsible steering hub for the Petri wheel. What was the reason for using a VW Petri and did you ever consider keeping the '74, rectangular padded wheel that came with the car originally & that was added, presumably, for greater safety in a crash?
Eric,
Chris has my set of four turbines. I’ll ask him to document a few more pics of this spray painted edge.
let me get back to my desktop and I’ll reply on the steering wheel choices.
Chris has my set of four turbines. I’ll ask him to document a few more pics of this spray painted edge.
let me get back to my desktop and I’ll reply on the steering wheel choices.
@Erik thank you for these questions:
"What was the reason for using a VW Petri and did you ever consider keeping the '74"
Second question first: No, I find the factory 74 steering wheel to be pedestrian and cheep, it looks too much like the '77 320i wheel. And I am dubious that it offers much in the way of incremental crush zone protection.
Reason for the Petri hub......
In the middle of my career at TRW Automotive I was the air bag program manager for a number of OEM's during the initial growth period of driver and passenger air bags. TRW had a full sled test facility in Washington MI and we'd test every airbag inflator configuration before presenting the results to the customer. I became friends with one of the test engineers and he's show me the rogue's gallery of sled videos (25k frames per second as I recall). Most memorable was the unbelted 125th percentile males in 35 mph frontal crashes -torso accelerating from 0-35 mph straight into the steering column.
At this point the steering wheel itself is providing the protection of a looped coat hanger as it collapses immediately. Watching is cringe worthy even when you know its only and instrumented dummy. Think about your own ribcage as you re-watch the above clip. Sled footage of unrestrained children in the back seat is particularly hard to watch.
In summary, this experience has become exceedingly pivotal in the remainder of my driving career. Wear a seat belt. Seat belts are 100% effective. The deformable hub on VW petri wheel is a first generation attempt as supplemental measure to lower serious bodily injury. This hub design is the result of millions of dollars of development and testing. I have exceedingly high regard for those engineers at VW/Audi back in the day who developed this specific solution. And in the quality of it's construction. All OEM's have a FMVSS obligation to deliver increasing level(s) of crash worthiness. The aftermarket (hubs) have no such burden.
Paul - it took me a minute to understand what was going on with the steering wheel hub, but now I think I get it. Can you confirm that in the photos "petri hub" is the part that actually attaches the steering wheel to the steering column and "VW collapsible petri hub" is an ornamental cover that just hides the actual hub? If so, are the three different cylinders of the cover separate pieces that would slide down over each other in the event of an impact on the wheel?
The "petri hub" is a work of art in its own right. Too bad it isn't visible.
The "petri hub" is a work of art in its own right. Too bad it isn't visible.