E46 front suspension and E28 rear subframe retrofit

norcal-bav

Member
Site Donor
Messages
34
Reaction score
55
Location
Bay Area, CA
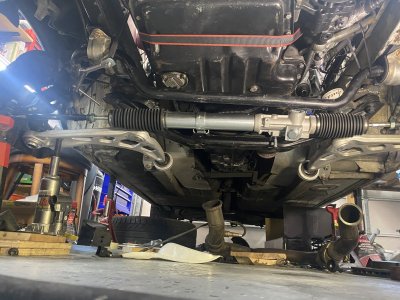
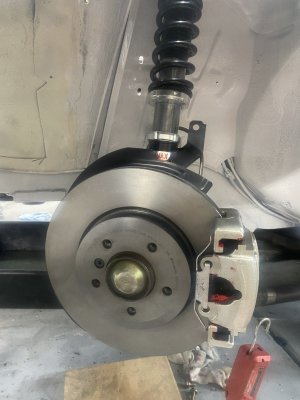
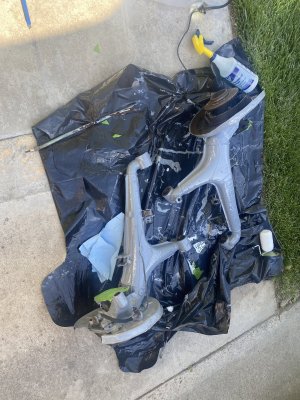
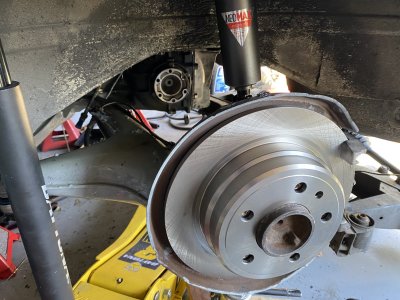
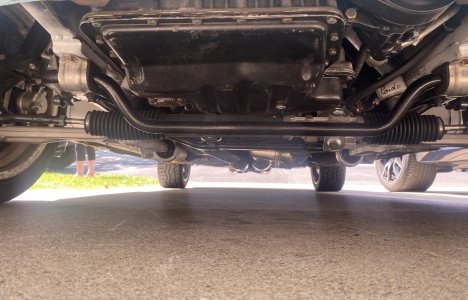
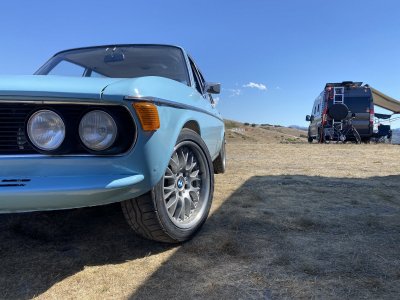
Hey all, I’m about mid-way through installing the front suspension from an E46 into my ‘71 E3.

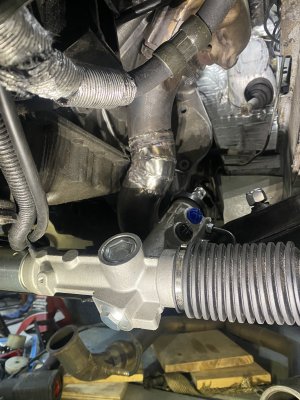
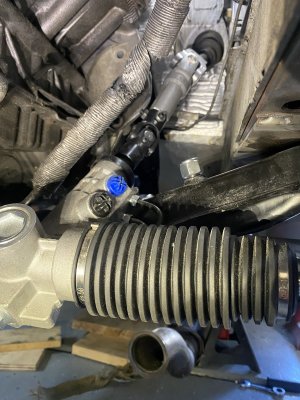
Why? I’ve wanted rack and pinion steering for a while and my steering box has developed a lot of play. I’ve spent a lot of time researching rack and pinion conversion options, but always ran into challenges that seemed hard to overcome. The e3 steering arms are very long, which requires a large amount of steering “throw” to maintain a decent turning circle. It is also “rear steer” which is less common for steering racks.

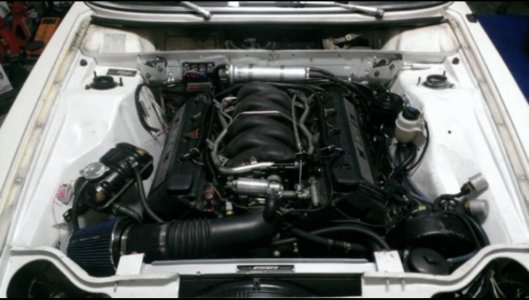
The car has a M62 V8 from an E39 installed and I think steering and suspension improvements would make it more engaging and confidence inspiring to drive. I also want to add air conditioning and the passenger side motor mount is in the way of where the compressor needs to fit. I also just like doing projects like this.

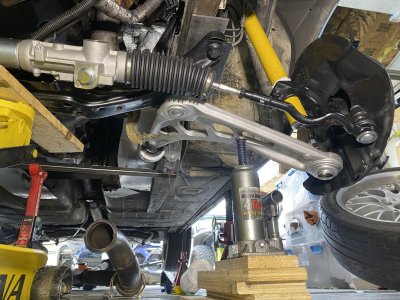
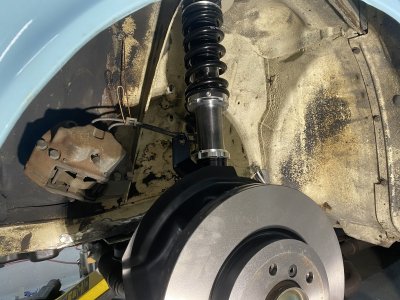
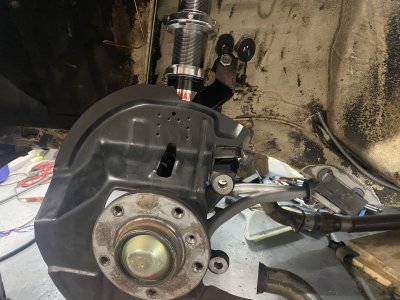
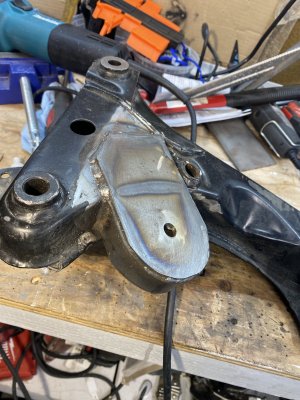
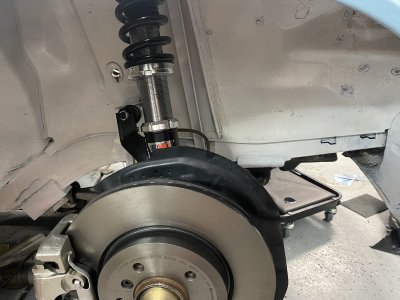
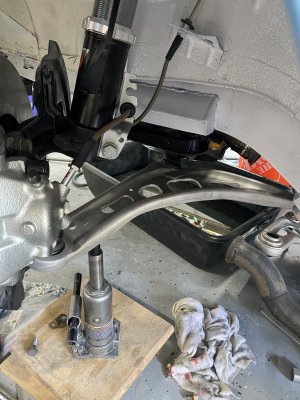
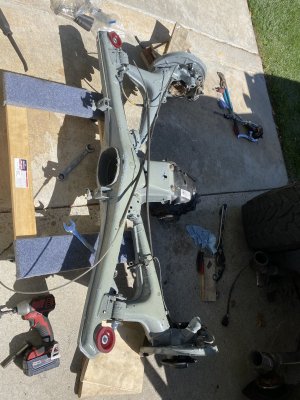
So, why E46 stuff. Using all the parts from the donor car will help ensure it all works together. It additionally has a relatively simple front suspension design, just a big lower control arm at each side. There is still a large aftermarket parts supply for the E46. I had actually test fitted E30 parts when I was working on the V8 swap about 10 years ago. The strut angle, or kingpin inclination is much steeper on the 3 series vs. the Bavaria (or the 5 and 7 series) The E30 parts won’t work because the strut towers would need to be far into the engine compartment for proper alignment.

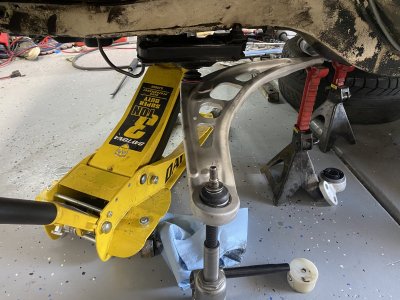
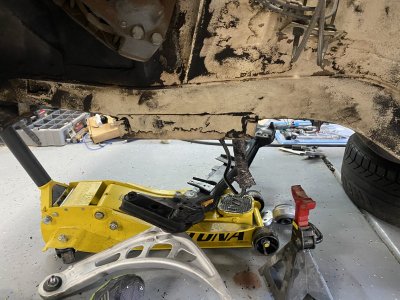
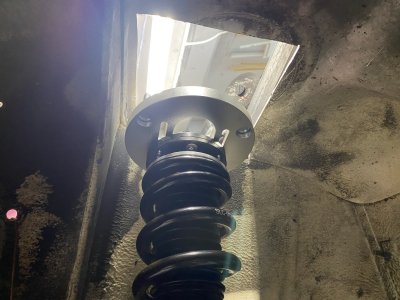
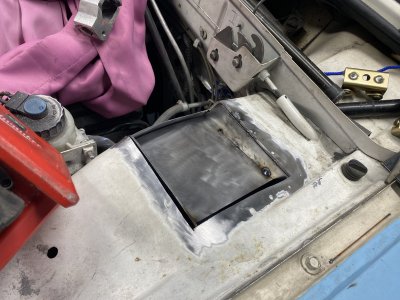
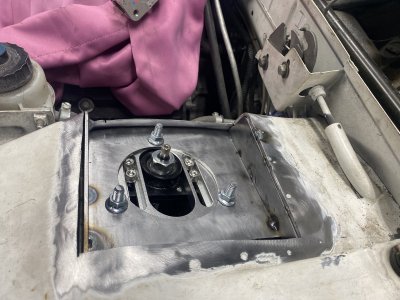
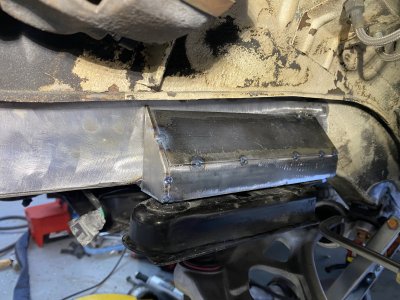
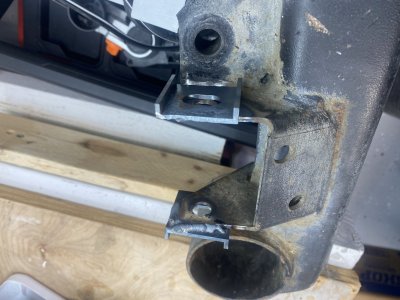
The dimensions are closer on the E46 since it’s a larger car than the E30. The biggest challenge is still the strut position and angle. The E46 strut center points are about 1.5 inches inboard of the stock E3 positions. The E46 strut towers are also angled towards the center of the car, where the E3 is almost flat.

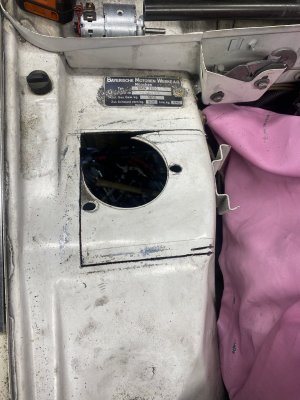
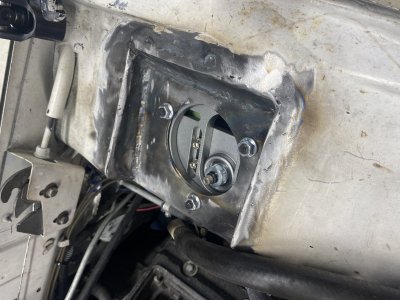
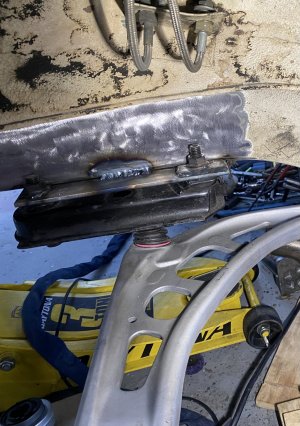
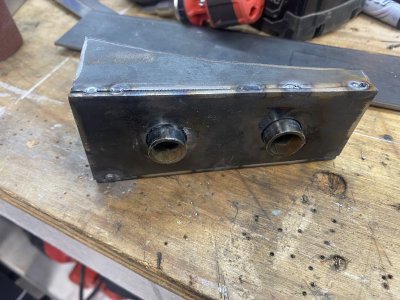
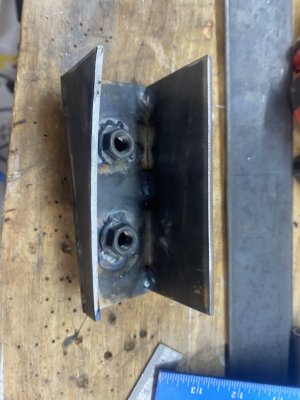
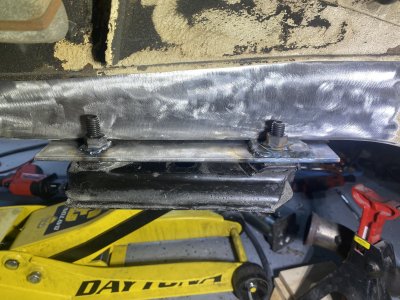
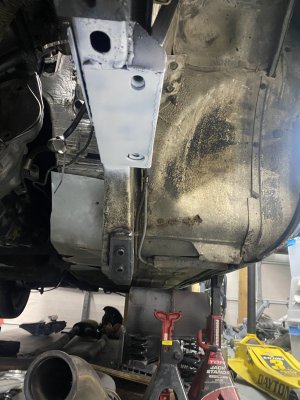
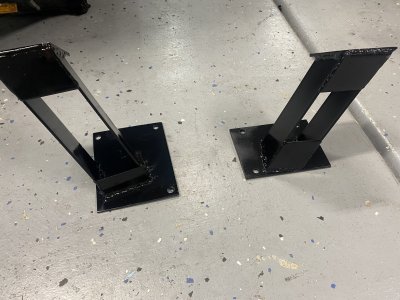
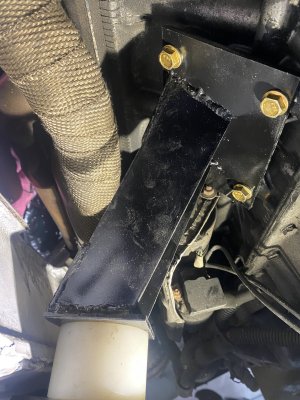
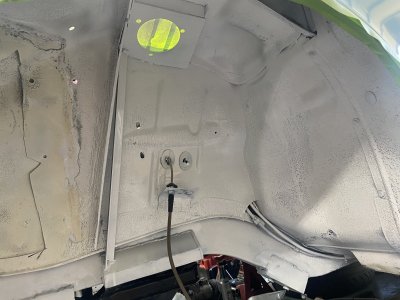
Modifying the E3 strut towers is by far the most labor intensive part of the project.

While I’ve already done a reasonable amount of the work, I’ll make some separate posts for more of a chronological style description of the project.
 

Attachments

  • IMG_9468.jpeg
    IMG_9468.jpeg
    524.2 KB · Views: 302
Last edited:

norcal-bav

Member
Site Donor
Messages
34
Reaction score
55
Location
Bay Area, CA
The first step is determining where to place the E46 subframe. This is a lot of eye balling and moving thing around.

The shape of the E3 frame is different of course. It’s about 3” narrower than the e46, which requires some mounts to put the mounting holes outside the E3 frame rails.

The three points to determine placement are the subframe fore and aft, the strut top location, and the rear lower control arm bushing location. The constraints are camber and caster angle.

The e46 subframe wants to sit further back on the chassis than is easily achievable when keeping the strut top near the same stock fore and aft location . The conflict is with the rear lower control arm bushing and the E3 frame rail, well and really the E3 floor.

To get an acceptable caster angle with that conflict requires moving the strut top location further forward. To achieve acceptable camber, the strut top location needs to be further onboard.
 

Attachments

  • IMG_9451.jpeg
    IMG_9451.jpeg
    375.6 KB · Views: 269
  • IMG_9450.jpeg
    IMG_9450.jpeg
    417.7 KB · Views: 242
  • IMG_9460.jpeg
    IMG_9460.jpeg
    430.8 KB · Views: 272

norcal-bav

Member
Site Donor
Messages
34
Reaction score
55
Location
Bay Area, CA
After eyeballing enough, it was time to start cutting. I first had to cut off the stock E3 subframe mount that sits below the frame rail. That allows the E46 subframe to sit higher. It would probably be better to move it higher by notching the frame rail.

Next is cutting the strut tower, the point of no return. I cut at the boundaries of the existing mounting holes and made a rough rectangle that would permit moving the strut forward. Also cutting down to allow for a steeper angle for the mount.

To determine the new mount location I assembled the new strut and roughly measured camber of the hub face while in rough position. I measured the angle of the strut top plate to set the angle of the new strut top mount plate.
 

Attachments

  • IMG_9490.jpeg
    IMG_9490.jpeg
    312 KB · Views: 226
  • IMG_9542.jpeg
    IMG_9542.jpeg
    357 KB · Views: 215
  • IMG_9499.jpeg
    IMG_9499.jpeg
    331.6 KB · Views: 206
  • IMG_9501.jpeg
    IMG_9501.jpeg
    334.1 KB · Views: 204
  • IMG_9475.jpeg
    IMG_9475.jpeg
    436.3 KB · Views: 213
  • IMG_9528.jpeg
    IMG_9528.jpeg
    456 KB · Views: 222
  • IMG_9573.jpeg
    IMG_9573.jpeg
    308.4 KB · Views: 221

norcal-bav

Member
Site Donor
Messages
34
Reaction score
55
Location
Bay Area, CA
For the new subframe mounts, the E46 bolt locations are about 1” wider on each side. I used 3” wide plate that is welded under the frame rail and extends outward about an inch. There is just enough clearance to add captive nuts on the outside of the frame to bolt the subframe up without cutting the frame rails. The rear subframe bolt location on the e46 has a boss that I used as the locating point for the subframe.

I built small enclosures with 1/8 in plate to enclose the extended mounts and add support since the mounts are now cantilevered outside the frame.

For the rear lower control arm mount, the position is essentially forced based on the location of the subframe. They need to be straight back from the ball joint pivot on the lower control arm. They have locating bosses that fit into the aluminum carrier for the bushing. I found some small diameter tube that fits perfectly into the carrier and keeps them in position. I built small boxes that mount on the side of the frame on the outside and are shaped like the frame rails on the inside. Using templates I was able to put them in the exact positions on each side.
 

Attachments

  • IMG_9534.jpeg
    IMG_9534.jpeg
    380.8 KB · Views: 223
  • IMG_9533.jpeg
    IMG_9533.jpeg
    333.3 KB · Views: 218
  • IMG_9532.jpeg
    IMG_9532.jpeg
    405.6 KB · Views: 205
  • IMG_9531.jpeg
    IMG_9531.jpeg
    374.1 KB · Views: 201
  • IMG_9530.jpeg
    IMG_9530.jpeg
    217.9 KB · Views: 202
  • IMG_9528.jpeg
    IMG_9528.jpeg
    456 KB · Views: 208
  • IMG_9576.jpeg
    IMG_9576.jpeg
    344.5 KB · Views: 211
  • IMG_9591.jpeg
    IMG_9591.jpeg
    340.1 KB · Views: 202

norcal-bav

Member
Site Donor
Messages
34
Reaction score
55
Location
Bay Area, CA
With all that mounted up, steering is next. The rack mounts into the E46 subframe, so nothing to figure out there. With the M62 oil pan location, there is tons of space for the rack.

I was very happy to find that the splines on the E3 steering shaft are the same as the E46. The positions of the rack and the steering shaft line up very well. I used the top portion of the E46 steering shaft and a a lower aftermarket u-joint that’s made for E46 engine swaps. The u-joint also gets rid the rubber coupler that’s located right above the steering rack. There is no space for that coupler in my setup. I had to shorten the E46 shaft quite a bit to fit my application.

I still need to add a support for the shaft, as I now have three u-joints inline. This allows the shaft to flop around slightly. I’ll use a heim joint mounted on the E3 side of the shaft that’s connected up to the firewall for support.

I also had to reshape the exhaust manifold on that side. I had made it to go around the E3 steering box but it interferes with the new steering shaft location. The clearances are really close on that side of the engine. The pipe is about 1/4” away from the engine and as far away from the steering shaft as possible. I’ll use header wrap and make a heat shield to hopefully mitigate the heat.
 

Attachments

  • IMG_9567.jpeg
    IMG_9567.jpeg
    371.6 KB · Views: 198
  • IMG_9565.jpeg
    IMG_9565.jpeg
    369.8 KB · Views: 203
  • IMG_9600.jpeg
    IMG_9600.jpeg
    322 KB · Views: 201
  • IMG_9574.jpeg
    IMG_9574.jpeg
    375 KB · Views: 217
Last edited:

norcal-bav

Member
Site Donor
Messages
34
Reaction score
55
Location
Bay Area, CA
Motor mounts are next. This was also one of the benefits of this project, moving the mounts rearward so I could fit the AC compressor on the engine. The compressor is mounted inside the passenger side motor mount on the E39. I can’t use that mount of course, but will cut it to make it work…later.

The stock mount locations on the E46 subframe are on the rear and way too far back to work with the M62 mount locations. I cut those off and added new mounts on the front side of the subframe.

I followed the same process of making the mounts as I did for the original engine swap. Mount the steel plates to the engine and the subframe then cardboard fitting to get a shape that will work for one side of the mount. Tack weld that between the points, then remove it and make the other pieces to complete the structure.
 

Attachments

  • IMG_9568.jpeg
    IMG_9568.jpeg
    352.9 KB · Views: 213
  • IMG_9569.jpeg
    IMG_9569.jpeg
    544.1 KB · Views: 222
  • IMG_9588.jpeg
    IMG_9588.jpeg
    370.6 KB · Views: 198
  • IMG_9593.jpeg
    IMG_9593.jpeg
    389.5 KB · Views: 185
  • IMG_9592.jpeg
    IMG_9592.jpeg
    401.2 KB · Views: 189

norcal-bav

Member
Site Donor
Messages
34
Reaction score
55
Location
Bay Area, CA
Cleaned up the wheel wells and torqued down the suspension for final assembly. Still working on the power steering connections. I also need to remake parts of the exhaust to increase clearance from the bushings.
 

Attachments

  • IMG_9598.jpeg
    IMG_9598.jpeg
    306 KB · Views: 192
  • IMG_9595.jpeg
    IMG_9595.jpeg
    276 KB · Views: 181
  • IMG_9596.jpeg
    IMG_9596.jpeg
    380.5 KB · Views: 192
  • IMG_9594.jpeg
    IMG_9594.jpeg
    337.6 KB · Views: 198

norcal-bav

Member
Site Donor
Messages
34
Reaction score
55
Location
Bay Area, CA
With the front essentially done, I have started on the E28 rear subframe swap.

I expect there is some improvement in handling with this swap.(?) It’s a more modern design, so I would assume they have made some geometry changes.

I won’t go into depth on this swap project, it’s mostly a bolt-on project and I think there have been write ups already.

I welded in the garagistic adjustable brackets on the E28 subframe.

The main driver for this swap is the availability of differential options. In particular my overall gear ratio is too high with the 6 speed getrag transmission. I am at -3k rpm on the highway and 1st gear is essentially unusable with the current 3.46 diff ratio.

I found a 3.15 diff with a Torsen limited slip that’s from a Z3. This will provide the same overall ratio that was in the E39 540i sport.
 

Attachments

  • IMG_9431.jpeg
    IMG_9431.jpeg
    443.9 KB · Views: 175
  • IMG_9430.jpeg
    IMG_9430.jpeg
    481.4 KB · Views: 172
  • IMG_9392.jpeg
    IMG_9392.jpeg
    275.8 KB · Views: 167

Ezz

Well-Known Member
Site Donor
Messages
170
Reaction score
112
Location
Arizona
this thread is my favorite thread so far!
I am in the middle of an E28 rear subframe swap as well.
I welded in the garagistic adjustable brackets on the E28 subframe.
How necessary is this? are these for toe angle adjustment?

thanks
 

norcal-bav

Member
Site Donor
Messages
34
Reaction score
55
Location
Bay Area, CA
The E28 subframe swap is mostly a bolt-in process as I mentioned. This will replace the E3 subframe, trailing arms, CV shafts, differential, rear suspension and brakes. I saw some confusion about how this works in older posts regarding this swap, you are not reusing any parts from the E3 rear axle assembly.

The chassis side subframe bushings on each side are spaced exactly the same between the E28 and E3. Or pretty close, I had to use some ratchet straps to coerce the long bolts into the subframe bushings. The rear diff mount bolted right up to the E3.

For the differential, while any “188” size (medium case) will bolt into the E28 subframe there are different input and output flanges depending on which chassis the diff is coming from. I needed to change both the input and output flanges in my case.

You also need the diff cover from an “early” E28 I believe, it has a centered mount that aligns perfectly with the E3 rear bushing mount.

The parking brake cables and brake lines are one area you need to modify.

For the parking brake cables I’m attempting to use the E3 cables, cutting off part of the E3 cable end at the trailing arm. (Will update if that doesn’t end up working)

The brake line situation seems fairly minor. The E28 has two flexible sections and one hardline that runs along the trailing arm for the rear brakes since they use a single piston sliding caliper.(vs. the single flexible section on each E3 trailing arm) You need the outer E28 flex lines for each side. I’ll reuse the inner E3 flexible lines that connect to the chassis, as I had already upgraded these to braided stainless. If you’re ordering parts for this, you must use the E3 drivers side flexible hose type. It has a male fitting that connects to the proportioning valve. The E28 line won’t work unless you added another hardline section.

The e28 hardlines and brackets are pointed the wrong direction where they need to connect to the chassis flex lines. I plan to reshape the hardlines and add on a new bracket to secure them in the correct orientation.
 

Attachments

  • IMG_9611.jpeg
    IMG_9611.jpeg
    420 KB · Views: 178
  • IMG_9612.jpeg
    IMG_9612.jpeg
    357.9 KB · Views: 182
Last edited:

norcal-bav

Member
Site Donor
Messages
34
Reaction score
55
Location
Bay Area, CA
this thread is my favorite thread so far!
I am in the middle of an E28 rear subframe swap as well.

How necessary is this? are these for toe angle adjustment?

thanks
Thanks! I don’t know how necessary it is. I have always had accelerated inside tire wear on my e3, probably from having it lowered a bit which increases camber. My reasoning is to reduce the rear camber and maybe toe, hopefully avoiding that inside tire wear. It’s kind of expensive for what it is really. (A few brackets and shims) They originally had cam bolts for adjustment, which are still available and less expensive. But, they now offer a set that comes with laser cut shims. I went with the shims as it seems like it may be more precise. (But it’s $176 for the brackets and shims, ouch)
 
  • Like
Reactions: Ezz

norcal-bav

Member
Site Donor
Messages
34
Reaction score
55
Location
Bay Area, CA
Finally got to drive it for a few quick test runs. It’s fantastic. Steering is very improved and it rides fairly softy I was worried the coilovers were going to be very stiff, but they are great. No drive pictures to share, haha. But did get some new tires installed today. Still a few things to finish up, but happy with how it’s turned out.
 

Attachments

  • IMG_9630.jpeg
    IMG_9630.jpeg
    412.7 KB · Views: 173

Ezz

Well-Known Member
Site Donor
Messages
170
Reaction score
112
Location
Arizona
For the parking brake cables I’m attempting to use the E3 cables, cutting off part of the E3 cable end at the trailing arm. (Will update if that doesn’t end up working)
I wonder what you ended up using for this. Thanks
 

norcal-bav

Member
Site Donor
Messages
34
Reaction score
55
Location
Bay Area, CA
Hey, I used the E3 cables. I cut off most of the end of the E3 mount thing to get the right length. I haven’t fully tested it honestly. It’s probably better to just use the e28 cables.
 

norcal-bav

Member
Site Donor
Messages
34
Reaction score
55
Location
Bay Area, CA
Finishing up a few little things. Rolling the rear fenders more, still a dust shield rubbing. But, it’s fantastic. major improvement. Super tight handling, good ride, very happy with how it’s turned out.
 

Attachments

  • IMG_9631.jpeg
    IMG_9631.jpeg
    267.7 KB · Views: 174
  • IMG_9633.jpeg
    IMG_9633.jpeg
    295.1 KB · Views: 179

norcal-bav

Member
Site Donor
Messages
34
Reaction score
55
Location
Bay Area, CA
Took the car out to a rally Saturday in the Calistoga area. First time really getting on it through canyon roads after the suspension swap. It’s such a huge improvement. The steering speed and precision compared to the stock box is fantastic. It’s very forgiving, difficult to get it out of balance. I do need to get the rear swaybar figured out and fab’ed up. But, it could definitely hang with the fast group of 993 Porsches
 

Attachments

  • IMG_9963.jpeg
    IMG_9963.jpeg
    764.4 KB · Views: 131
Top