Will have to start somewhere

Peter Coomaraswamy

Well-Known Member
Site Donor $$
Messages
3,787
Reaction score
896
Location
Austin, TX
Did I say I do everything twice?

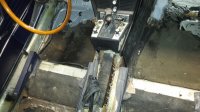
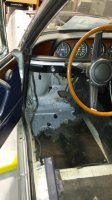
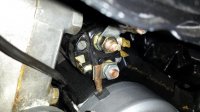
OK, well I did not have to do it all over again, but I dipped the front sub-frame down an inch and that was enough to wrestle the splined column into my neat new steering U-joint and with a little pushing and pulling she went together, now for all the little bits and pieces and other things I forgot to do :roll:

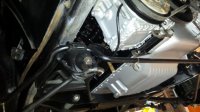
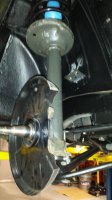
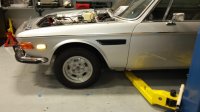
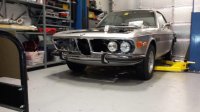
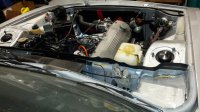
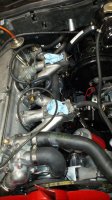
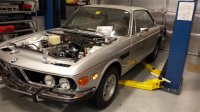
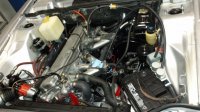
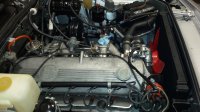
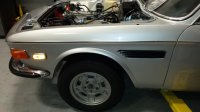
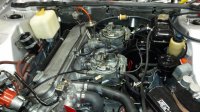
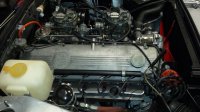
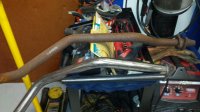
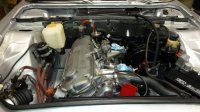
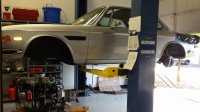
And, now that the engine is out of the way I can get to a bunch of other stuff that needs to go on. I took a couple of pictures saturday and attached them, we also started editing one of the videos today. The struts are up, which was really easy, and then I did something that was probably completely unnecessary but I cut down the spacers that go under the fender to about 1/4 inch and placed them there, my reason being that I think the tires I'm putting on are a little taller than stock, and Carl's springs will make the front sit a little lower. I did not want to roll the fenders so I thought it would be a fair compromise. They can be removed easily enough.... thoughts and even vicious comments are gladly accepted.
 

Attachments

  • engine in.jpg
    engine in.jpg
    83 KB · Views: 264
  • engine going in1.jpg
    engine going in1.jpg
    97 KB · Views: 230
  • engine going in2.jpg
    engine going in2.jpg
    91.8 KB · Views: 260
  • strut up1.jpg
    strut up1.jpg
    67.7 KB · Views: 237
  • strut up2.jpg
    strut up2.jpg
    97.6 KB · Views: 235
Last edited:

stphers

Well-Known Member
Messages
1,083
Reaction score
528
Location
Port Moody, BC ( near Vancouver, BC )
strut spacers

Hi Peter,

Great job that you are doing, if you want to use the spacers, make sure that you either paint them or powder coat them. One of the big problems with rust developing in that top area was because of those spacers corroding and aluminum and steel together, something is going to detoriate.

Good idea, if you want it to drop down at a later time, once everything is in the car and it;s loaded, they are easy to take out

Thanks, Rick
 

Peter Coomaraswamy

Well-Known Member
Site Donor $$
Messages
3,787
Reaction score
896
Location
Austin, TX
Thanks Jean Luc, here are some more shots- work went quickly at lunch today though I did have to put the rotor on twice (keeping with my theme) as I forgot the dust shield. The thing that makes me feel most professional is that when I took the car apart I put all the nuts, bolts, washers etc in bags, labeled them, de-gunked everything and soaked them in lithium grease- it made re-assembly so much easier (but I don't remember doing that). I can also see where I missed rust-proofing a few areas- no matter... just something else I'll have to do twice. An added bonus to being a space-cadet is that when I get older and lose my mind nobody will notice:)
 

Attachments

  • getting done.jpg
    getting done.jpg
    68.4 KB · Views: 216
  • getting done1.jpg
    getting done1.jpg
    68.7 KB · Views: 220
  • getting done2.jpg
    getting done2.jpg
    93.1 KB · Views: 216

Peter Coomaraswamy

Well-Known Member
Site Donor $$
Messages
3,787
Reaction score
896
Location
Austin, TX
more progress

I had to make a pair of brake lines for the passenger side, from the caliper to the flex lines. The bends were not too hard the tip formation even with the correct tool was not exact bit I think they'll work fine. this is one of those things where I won't know until I put in fluid and add pressure, I expect I'll be doing it again :-( I was happy to have her on the ground so I can get to the interior. The dash and wood are in awesome condition so the cleaning will be the hardest part. Finally seeing the light at the end of the tunnel.
 

Attachments

  • on all four1.jpg
    on all four1.jpg
    89.4 KB · Views: 203
  • on all four2.jpg
    on all four2.jpg
    91 KB · Views: 214
  • on all four3.jpg
    on all four3.jpg
    98.3 KB · Views: 219
  • on all four4.jpg
    on all four4.jpg
    100 KB · Views: 236
  • on all four6.jpg
    on all four6.jpg
    80.4 KB · Views: 219
  • on all four9.jpg
    on all four9.jpg
    95.6 KB · Views: 201
  • on all four7.jpg
    on all four7.jpg
    77.5 KB · Views: 212
  • on all four5.jpg
    on all four5.jpg
    96.1 KB · Views: 218
  • on all four8.jpg
    on all four8.jpg
    95.4 KB · Views: 222

Peter Coomaraswamy

Well-Known Member
Site Donor $$
Messages
3,787
Reaction score
896
Location
Austin, TX
Unsafe Condition

I found this interesting, thought I was on the home stretch then noticed a little leak- I cleaned this up on the wire wheel so I could get a better shot, but this is rust through- found on the forward most brake line coming out of the master. I'm getting pretty good at bending these things but I will inspect the remaining lines and do a splice around mid-car if the rest look OK. In the future I will replace every brake line (steel or rubber) regardless of the condition from the outside. It would be a major pain now but I will inspect every line and replace if there is corrosion.

Yes, I am embarrassed that I did not do a better job with such a critical component.
 

Attachments

  • bad line.jpg
    bad line.jpg
    53.9 KB · Views: 201

rsporsche

Moderator
Site Donor $$
Messages
10,702
Reaction score
3,736
Location
Atlanta, GA
the embarrassment would have been much greater on the maiden voyage when it blew out while driving after all the work. the good news is that you found it while you can easily do something about it ... rather than having to clean out your drawers while driving and not being able to stop. almost as bad would be watching all of the paint disappear due to the flying brake fluid.
 

Ohmess

I wanna DRIVE!
Site Donor $
Messages
4,905
Reaction score
2,739
Location
Aiken, SC
the embarrassment would have been much greater on the maiden voyage when it blew out while driving after all the work. the good news is that you found it while you can easily do something about it ... rather than having to clean out your drawers while driving and not being able to stop. almost as bad would be watching all of the paint disappear due to the flying brake fluid.

The feeling of having your brake pedal go to the floor with no noticeable effect on your rate of speed is not one you soon forget. I had worn the rear brake shoes down to where they allowed the seals to unseat from the rear cylinder, which in turn allowed all the brake fluid to leak out.

Ah, to be young again...
 

Peter Coomaraswamy

Well-Known Member
Site Donor $$
Messages
3,787
Reaction score
896
Location
Austin, TX
Making progress

Replaced a section of brake line and tightened up allot of lose things, still lots more-but I have a realistic list instead of a giant hairball. She seems to be holding the remainder of her vital fluids but we'll have to see upon start-up. I'm going to see how the Zenith's operate before rebuilding them (or having them rebuilt). Lots of messy wires, hoses and stuff to get nice and neat over the next month or so- couple of pics below :)
 

Attachments

  • almost ready engine.jpg
    almost ready engine.jpg
    97.6 KB · Views: 221
  • almost ready engine2.jpg
    almost ready engine2.jpg
    97 KB · Views: 207
  • almost ready on all fours.jpg
    almost ready on all fours.jpg
    88.1 KB · Views: 211

Peter Coomaraswamy

Well-Known Member
Site Donor $$
Messages
3,787
Reaction score
896
Location
Austin, TX
Anything look overly wrong?

I am getting ready to start the little girl "Hamleta"! She is holding all her bodily fluids now, water, brake fluid, power steering fluid etc, so far. I connected up the drive shaft using new hardware, and had the drive shaft re-U-jointed, CSB, Guibo, and a fancy paint job. I may need some help with the engine wiring if my manuals (thanks Ian) do not have the proper color codes. I'm not sure about the condition of the carbs but we'll see when I try to start. Anyway, I posted a couple of shots below and if anyone sees something on upside-down or incorrect please let me know. The engine bay is clean but not pristine since that is not the look I was going after. I hope this bit of faded glory meets with some approval... somewhere.

Thanks for looking and for any comments.
 

Attachments

  • engine comment1.jpg
    engine comment1.jpg
    101.2 KB · Views: 227
  • engine comments1.jpg
    engine comments1.jpg
    98.2 KB · Views: 221

Ohmess

I wanna DRIVE!
Site Donor $
Messages
4,905
Reaction score
2,739
Location
Aiken, SC
I am getting ready to start the little girl "Hamleta"! She is holding all her bodily fluids now, water, brake fluid, power steering fluid etc, so far. I connected up the drive shaft using new hardware, and had the drive shaft re-U-jointed, CSB, Guibo, and a fancy paint job. I may need some help with the engine wiring if my manuals (thanks Ian) do not have the proper color codes. I'm not sure about the condition of the carbs but we'll see when I try to start. Anyway, I posted a couple of shots below and if anyone sees something on upside-down or incorrect please let me know. The engine bay is clean but not pristine since that is not the look I was going after. I hope this bit of faded glory meets with some approval... somewhere.

Thanks for looking and for any comments.

Hi Peter - A couple of nits. You have a wire running across the top of the front carb, and the tab on the firewall that actuates the hood light needs to be turned upward so it is parallel to the hood when the hood is closed.
 

eludvigs

Well-Known Member
Site Donor $
Messages
184
Reaction score
31
Location
Pleasanton, CA
Great progress Peter. Appreciate your attention to detail and time taken explaining your process. It has helped me a lot.

Engine bay looks great and compared to my 3.5L bay, it looks spacious!
 

Peter Coomaraswamy

Well-Known Member
Site Donor $$
Messages
3,787
Reaction score
896
Location
Austin, TX
Electric questions

Ok, I have said before that I am "electrically challenged", so I provided some shots and would like to know if anyone can help tell me which wires go where on the starter. I have the manuals but the colors don't seem to match up. When I got the car it was "running" but there was more than 1 melted connection so I want to get it right before melting something else. Also, which is the best place to ground the engine? I have a lead coming off the battery to the body via a braided strap and then I assume the thick tan ground goes somewhere around the oil filter base?

I know you guys are shaking your heads, but I have a mental block against electric stuff.

Also included a shot of the header pipe I cleaned up. I have stainless pipes but I don't think they are going to fit that well so I may use the stock ones since I have a new original complete exhaust system and I'll be assured to get that ancient BMW sound.
 

Attachments

  • starter question.jpg
    starter question.jpg
    62.5 KB · Views: 195
  • wires to starter.jpg
    wires to starter.jpg
    65.4 KB · Views: 208
  • header pipe clean up.jpg
    header pipe clean up.jpg
    71.2 KB · Views: 213

rsporsche

Moderator
Site Donor $$
Messages
10,702
Reaction score
3,736
Location
Atlanta, GA
engine grounds

1. there should be a flat woven ground between the body and the tranny bellhousing - above the starter. look up coupe jewelry

2. HBChris says there should be a ground between the valve cover and the firewall at the bracket for the hood light switch

3. Stevehose recommends a ground from the body to the alternator ...

4. i have a flat woven ground from the brake fluid reservoir mount down to the oil filter housing
 

Stevehose

Well-Known Member
Site Donor $$
Messages
13,041
Reaction score
5,730
Location
Sarasota, FL
You're close, I have the valve cover to hood light bracket too :smile:

I believe that was installed by the dealer when the Becker went in, along with the hood bracket to wall strap, ignition coil suppressor, and regulator supressor, the latter 2 which I have yanked.

I also have the tranny to firewall strap, I guess I am well grounded so to speak!


okay, i'm 2.5 for 4 ... i got valve cover instead of the manifold
 
Top