Yeah, sorry, it just looked weird (the vin tag looks riveted in the picture). You do such nice work with a lot attention to detail, I fiquired you had a plan.
You are using an out of date browser. It may not display this or other websites correctly.
You should upgrade or use an alternative browser.
You should upgrade or use an alternative browser.
Will have to start somewhere
- Thread starter Peter Coomaraswamy
- Start date
-
- Tags
- restoration list
") I have a plan, I just need to "buy a clue" (according to my other half).
I have a plan, I just need to "buy a clue" (according to my other half). Regarding the progress, I have been cleaning up all the parts like the direction signal chrome pieces. Over the years wire splices, disintegrated electrical tape, corroded grounds and the like have popped up and I did purchase the SS bumper "rubber guides" (BTW is there a proper term for those things?) and none of that stuff is very exciting or photo worthy but I hope to make some decent progress soon and will be planning on separating the engine from the sub frame this Friday at lunch with the help of the company forklift.
Thank you all for the comments and answers, would never have attempted a second one without the crew here-
restart
Well-Known Member
Hi Peter,
Please if you can, tell how high exactly the engine is attached to the sub frame. iE, exactly what is the distance from bottom of subframe to top of engine?
I can make my own allowances for the surface I move the engine on. Slippery mat, plywood, wheeled flat dolly, whatever.
Thanks, carry on....
A
Please if you can, tell how high exactly the engine is attached to the sub frame. iE, exactly what is the distance from bottom of subframe to top of engine?
I can make my own allowances for the surface I move the engine on. Slippery mat, plywood, wheeled flat dolly, whatever.
Thanks, carry on....
A
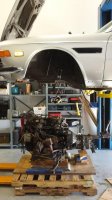
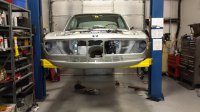
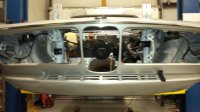
Engine height:
The measurement from the bottom of the sub frame to the top of the carbs is +- 28 inches, if you put the engine on a pallet add another 4 inches, which may be helpful since the suspension pieces will hang over by an inch or two. I have duplicated a shot below as an aid. Note, I have the equivalent of about 3 1/2 pallets under the engine. Hope it helps.
The measurement from the bottom of the sub frame to the top of the carbs is +- 28 inches, if you put the engine on a pallet add another 4 inches, which may be helpful since the suspension pieces will hang over by an inch or two. I have duplicated a shot below as an aid. Note, I have the equivalent of about 3 1/2 pallets under the engine. Hope it helps.
Attachments
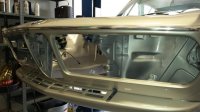
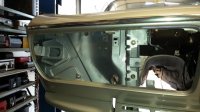
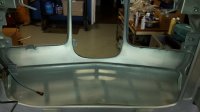
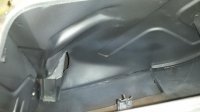
My kids joined me at the shop today mostly because I told them I had a suit like the dude in Breaking Bad and I think they thought I was going to make meth, but were relieved to know that I was just mixing and spraying paint. I am posting some shots and hope to start putting things back together and then start on the engine/transmission and front suspension and steering. I got a couple of runs in the clear but I hope no one ever sees where after she's put back together- it's just a little difficult getting a full size gun and hopper in there. So here goes
Attachments
Engine height:
The measurement from the bottom of the sub frame to the top of the carbs is +- 28 inches, if you put the engine on a pallet add another 4 inches, which may be helpful since the suspension pieces will hang over by an inch or two. I have duplicated a shot below as an aid. Note, I have the equivalent of about 3 1/2 pallets under the engine. Hope it helps.
Nice one. Thanks Peter.
My kids joined me at the shop today mostly because I told them I had a suit like the dude in Breaking Bad and I think they thought I was going to make meth, but were relieved to know that I was just mixing and spraying paint. I am posting some shots and hope to start putting things back together and then start on the engine/transmission and front suspension and steering. I got a couple of runs in the clear but I hope no one ever sees where after she's put back together- it's just a little difficult getting a full size gun and hopper in there. So here goes
Was wondering about the gun/hopper size and those very tough to cover areas.
But like Walter White, you improvised to find a solution.
Yes, I missed a couple of spots and will use a rattle can to fill them in. Just a note for those of you who have semi hidden areas that need attention; if you locate a local strictly automotive paint supply store you can purchase excellent primer and color in rattle cans that will be pretty close to what you need. In some of the larger outfits they can actually mix the color and put it in a rattle can. I had this done at Ellis Paint Co. in Los Angeles since I was the factory mechanic for one of their sister companies but that was about 25 years ago. Another hint for beginners like me; try to use a slightly contrasting color primer, for example, grey primer and Polaris is not the best combination because it is hard to see your coverage in some of the dark areas, likewise with rust color and red. I suppose better light would help but still it's hard to get in some of those spots. Pretty happy with the results though considering it cost about 300.00 for all the equipment and a couple of hours of You Tube watching!
Peter,
Looks great. Doing a great job. Wish I could do that. Do you also clear coat the engine bay, trunk wheel well and trunk overall, under the hood and under the trunk lid? I intend to get my car repainted soon but don't know if clear coating those areas is standard or if they are flat.
Looks great. Doing a great job. Wish I could do that. Do you also clear coat the engine bay, trunk wheel well and trunk overall, under the hood and under the trunk lid? I intend to get my car repainted soon but don't know if clear coating those areas is standard or if they are flat.
clear coating perhaps adds a few dollars to the paint job, but it keeps chemicals / oil / grease from destroying the paint finish ... i would think.
Well, I hope I did it right but the video's show that you should do 3 coats of color, waiting 5 minutes between coats and then wait no more than an hour (time to clean the gun) and do 3 coats of clear, again waiting 5 minutes between coats so that's what I did. On the bottom side I just prime and undercoat. On the Polaris coupe I have not decided on the undercoating, I tried the Wurth on a small part but I'm not happy with the result so I'll go down to the paint store and see what they have that is closer to the original. The undercoating gun is typically a 1 or 2 use device from what I have seen and sometimes comes free with the paint product. And for the record, none of the paints are cheap. I did not have to paint any part of the hood and hope not to have to. On an off-topic note, once I finish the Polaris I am doing a complete restoration on my purchasing manager's Volvo P1800 ES and I'll be painting that one as well, but from top to bottom so I'll get to see if I'm any good at it. If not he can go have it painted somewhere else because the body panels, engine and suspension will probably take about 6 months. :-(
Andre, I would have the entire car painted and clear-coated at the same time, hopefully you'll never have to do it again and the clear coat makes everything much easier to clean, that stuff is hard as a rock! I left some in the bottom of the mixing cup just to see what will destroy it, plus clear coating in 3 stages means you can polish most scratches out of it if need be.
Thanks for reading-
Last edited:
Fan and other questions
I hope I can get some direction on a couple of things, on the Polaris coupe I'm working on; the car has the original motor with about 79K on the clock and the original 1972 head and I'm concerned that in the Texas heat it may get too hot, especially with the A/C on. I do plan on completely flushing the block and re-coring the original radiator and all the basics. Someone mentioned that if done properly there should be no problem, but I have owned some 70's big 6's that have overheating issues so I am planning on using the stock fan bracket and mounting a better flowing (larger and with more blades) fan. Has anyone done this and if so can they suggest a brand.
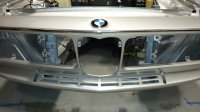
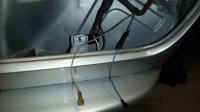
Next question; I included a picture of the colored wires going to the front blinkers, the connecting spades on the light holder is in its original position and if they are hooked up wrong the blinker will activate the wrong filament so I ask which color goes on the top and which on the bottom, then I can put in the headlamp holders.
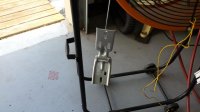
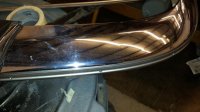
Also, coupguy's SS bumper guard guides came in so I attached one side.
I hope I can get some direction on a couple of things, on the Polaris coupe I'm working on; the car has the original motor with about 79K on the clock and the original 1972 head and I'm concerned that in the Texas heat it may get too hot, especially with the A/C on. I do plan on completely flushing the block and re-coring the original radiator and all the basics. Someone mentioned that if done properly there should be no problem, but I have owned some 70's big 6's that have overheating issues so I am planning on using the stock fan bracket and mounting a better flowing (larger and with more blades) fan. Has anyone done this and if so can they suggest a brand.
Next question; I included a picture of the colored wires going to the front blinkers, the connecting spades on the light holder is in its original position and if they are hooked up wrong the blinker will activate the wrong filament so I ask which color goes on the top and which on the bottom, then I can put in the headlamp holders.
Also, coupguy's SS bumper guard guides came in so I attached one side.
Attachments
Last edited:
As you know it's quite hot in NOLA also and I have same concerns running original head and engine. I have no overheating issues with a/c on in traffic. My rig is:
Recored triple radiator
71 degree t-stat
9 blade fan upgrade
german made water pump
new hoses including the thin rad to tank hose
Flushed block and high quality coolant
On the hottest days the gauge never goes above 3 o'clock in traffic or idling with a/c. With motion it drops to 4 o'clock and stays there.
Also, coup-king's SS bumper guard guides came in so I attached one side.
coupeking or coupeguy? they look good, so i thought i would check. i didn't see them on coupeking's site.
Steve, it gets pretty hot in NOLA, but it is really humid which makes the perceived temperature really hot. in mid-texas, it gets extremely hot, but not as humid.
Caliper Rebuild
I spent some time today rebuilding one of my front calipers so I thought I would share the process. As we all know these parts are becoming harder to find and more expensive too. On the blue coupe (my car) I spent 400.00 for calipers since one of the PO's put a solid rotor set up on there and I needed the wider calipers to accommodate the new vented discs. I digress... The rebuild kits are 11 to 25.00 so I bought a couple and went at it.
What you'll need:
Solvent
Air compressor
Disposable brush
320 sandpaper
steel wool 0000
rubber gloves (unless you're very manly)
a basin
wire brush
a pic
assembly lube
A vice
vice grips
2 hours of uninterrupted time.
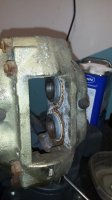
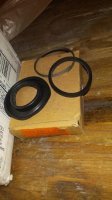
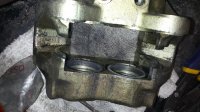
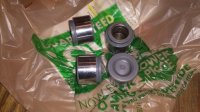
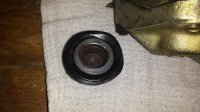
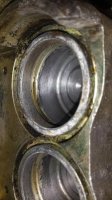
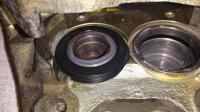
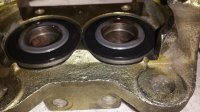
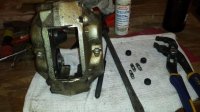
1. frozen caliper, 2. caliper kit, 3. Remove the pistons with compressed air but you may have to use vice grips to twist the pistons to free them up, then use compressed air through the brake line hose holes to remove the pistons. They will "pop" so if you can put a piece of wood in between the left and right side with 1/2 inch of play you could save a potential mess (AMHIK), also there is some force there. 4. Polish the pistons with steel wool. 5. Polish the bores with sandpaper and steel wool and use compressed air to blow our the caliper body completely after re-soaking it in solvent. 6. Coat the inner seals with lube and put them in the grooves, they will seem too big and squirmy when you try but they get easier after you do the first one. 7. stretch on the rubber seal to each piston. 8. Put a good coat of lube on the piston and the o-ring and push the piston in the bore. 8. Put on the retaining clip and repeat X4. Then you're basically done. Don't forget to blow out the bleed screws and clean them up too. I have not found any gold caliper paint so I was happy that the original coating was still there. Also, the second caliper is frozen worse than the first so i'm soaking those tonight.
As you can see I am no de Q but it "should" work. Please raise your hand if I am doing something wrong- It's been a while.
I spent some time today rebuilding one of my front calipers so I thought I would share the process. As we all know these parts are becoming harder to find and more expensive too. On the blue coupe (my car) I spent 400.00 for calipers since one of the PO's put a solid rotor set up on there and I needed the wider calipers to accommodate the new vented discs. I digress... The rebuild kits are 11 to 25.00 so I bought a couple and went at it.
What you'll need:
Solvent
Air compressor
Disposable brush
320 sandpaper
steel wool 0000
rubber gloves (unless you're very manly)
a basin
wire brush
a pic
assembly lube
A vice
vice grips
2 hours of uninterrupted time.
1. frozen caliper, 2. caliper kit, 3. Remove the pistons with compressed air but you may have to use vice grips to twist the pistons to free them up, then use compressed air through the brake line hose holes to remove the pistons. They will "pop" so if you can put a piece of wood in between the left and right side with 1/2 inch of play you could save a potential mess (AMHIK), also there is some force there. 4. Polish the pistons with steel wool. 5. Polish the bores with sandpaper and steel wool and use compressed air to blow our the caliper body completely after re-soaking it in solvent. 6. Coat the inner seals with lube and put them in the grooves, they will seem too big and squirmy when you try but they get easier after you do the first one. 7. stretch on the rubber seal to each piston. 8. Put a good coat of lube on the piston and the o-ring and push the piston in the bore. 8. Put on the retaining clip and repeat X4. Then you're basically done. Don't forget to blow out the bleed screws and clean them up too. I have not found any gold caliper paint so I was happy that the original coating was still there. Also, the second caliper is frozen worse than the first so i'm soaking those tonight.
As you can see I am no de Q but it "should" work. Please raise your hand if I am doing something wrong- It's been a while.
Attachments
-
 frozen caliper.jpg43.5 KB · Views: 186
 -
 caliper kit.jpg47 KB · Views: 188
 -
 clean the caliper.jpg99.5 KB · Views: 185
 -
 polish the pistons.jpg77.2 KB · Views: 169
 -
 rubber seal.jpg86.2 KB · Views: 167
 -
 polish the bores.jpg50.3 KB · Views: 172
 -
 o ring in.jpg84.7 KB · Views: 169
 -
 in the hole.jpg98.5 KB · Views: 177
 -
 clip on1.jpg94.8 KB · Views: 173
 -
 caliper done.jpg84.5 KB · Views: 187
Another caliper question
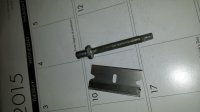
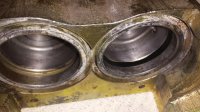
On the second caliper, the pistons were so frozen I had to take the halves of the caliper apart and there are 2 little rubber washers in there to prevent leaking between the halves; should not those little washers have come with the rebuild kit and if not where can I get them?
Thanks for all the comments!
No they do not come with the rebuild kits , one reason I never split them apart . Luckily My stubburn boss has always found a way to get the pistons out , Me , I order new ones , haha
hopefully someone will know where to get some orings that will work , I think a few months back there was a whole thread here on rebuilding calipers ?
good luck Peter
BD
hopefully someone will know where to get some orings that will work , I think a few months back there was a whole thread here on rebuilding calipers ?
good luck Peter
BD
There is a most excellent post on brake rebuilding by the reknown Porsche guy somewhere in this forum