help with dash wood

Peter Coomaraswamy

Well-Known Member
Site Donor $$
Messages
3,787
Reaction score
896
Location
Austin, TX
I'm getting this down a little, almost done with the first set, at least the veneering. I had to use some JB weld on one of the salvageable pieces, that was my guide for the ones I had to make- the long one in the shot is completely from scratch and I still have to drill the hole for the door pull but there was no way to cut around the veneer with a hole that small so I left it for later.

I did read the comment about cutting everything afterwords and it's a good idea but I screwed up so many pieces making the "blanks" that I passed on that but probably next time.

Working on Brandan's "black stain today- that should be fun, I'll post a shot of that later.
 

Attachments

  • dash wood19.JPG
    dash wood19.JPG
    82.8 KB · Views: 148
  • dash wood20.JPG
    dash wood20.JPG
    64 KB · Views: 130
  • dash wood21.JPG
    dash wood21.JPG
    80.7 KB · Views: 132

Peter Coomaraswamy

Well-Known Member
Site Donor $$
Messages
3,787
Reaction score
896
Location
Austin, TX
OK, I only have 1 more piece in this batch and that's the center console- non A/C.

there's a picture of the black veneer wood for Brandan here also but it needs work on the color formula-
 

Attachments

  • dash wood22.JPG
    dash wood22.JPG
    51.4 KB · Views: 131
  • dash wood23.JPG
    dash wood23.JPG
    57.9 KB · Views: 115
  • dash wood24.JPG
    dash wood24.JPG
    59.8 KB · Views: 152
  • dash wood25.JPG
    dash wood25.JPG
    70.7 KB · Views: 134

dave v. in nc

Well-Known Member
Site Donor $
Messages
3,038
Reaction score
1,213
Location
North Carolina, USA
Peter,
You remind me of my freshman college roommate, who convinced me to take skydiving as an elective in summer school...after classes and ground school, we walked out for our first ever jump, and he informs me that he had never been in an airplane before
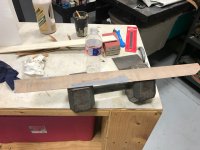
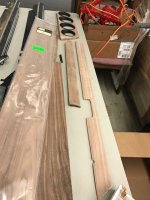
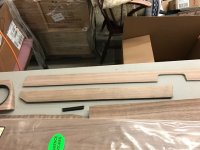
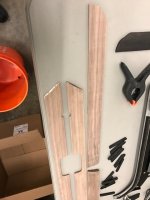
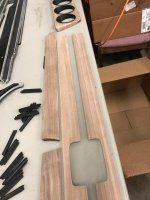
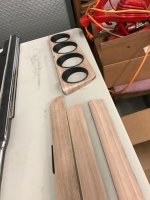
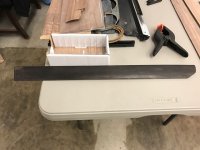
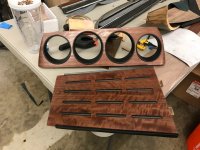
. I appreciate that you approached this project with a non-textbook approach (JB Weld), married with usual woodworking techniques, and nailed it. Always more than one way to skin a cat.
Dave V. in NC
 

Peter Coomaraswamy

Well-Known Member
Site Donor $$
Messages
3,787
Reaction score
896
Location
Austin, TX
My dad told me there were only two things that I could do to get him to disown me; shoot heroin and/or jump out of a perfectly good airplane- Happy to say that I have done neither.

Dave, you said the base piece had to be clean and strong so... there you have it :) Thanks again for all your advice and help, I wish my brain didn't get full so fast I could have learned much more. When it's all done and looks presentable (I hope) I am going to post the most ridiculous picture of one piece with about 5 clamps in all directions- it looks like a hairball- it was a desperation move as the glue was drying on the gauge piece but pretty sure it worked. I am a bit nervous about the final finish as I think the smooth sheen will show any imperfections in the job so fingers crossed.
 

Peter Coomaraswamy

Well-Known Member
Site Donor $$
Messages
3,787
Reaction score
896
Location
Austin, TX
center piece done- biggest hassle was putting the 2 pieces together, and then cutting those holes: still needs final sanding and the rubber inserts should cover any imperfections... I hope
dash wood26.JPG
 

Peter Coomaraswamy

Well-Known Member
Site Donor $$
Messages
3,787
Reaction score
896
Location
Austin, TX
I was going to ask what the difference between the American and French Walnut is then I looked at a bunch of pictures on line and it seems that it has allot to do with the "cut" of the wood as well as the type, so basically I'm totally confused and I'm hoping that although not "stock", the walnut will at least look good, but I can see that a less "figured"?? piece would look more original. Oh well, totally way too late now :) We'll just say Fritz was drinking when he signed for the shipment-
 

mulberryworks

Mr. Fixity
Site Donor
Messages
1,245
Reaction score
614
Location
Jacksonville FL
Good looking Walnut there Peter. If I needed to redo the wood in my car I was thinking I'd use Koa, since I bought the car from Hawaii. However it's hard to find Koa in sheets large enough for our dashes. Good thing I'm happy with my wood as is for now. There are a few cracks, but I'll just call it patina.

Ian
 

rsporsche

Moderator
Site Donor $$
Messages
10,685
Reaction score
3,714
Location
Atlanta, GA
Ian, you can bookmatch the veneers - for instance, flip it about the centerline - either lengthwise or horizontally (or both - center matched or diamond matched)

Peter, there is not a lot of difference between french, european and american walnut. there is an equal amount of difference in the woods of the same exact species. that being said ... i really like the walnut that you have - especially the figure. IMHO, i think a non-figured walnut looks less luxurious / less expensive. look at the price of great guitars - the highly figured veneers are more prized and more expensive.

that being said - on a coupe, i think a moderate amount of figure looks the best ... too much figure and it dominates the interior. what important with figure is to get the veneers aligned and appear for each of the wood pieces to look continuous
 

Peter Coomaraswamy

Well-Known Member
Site Donor $$
Messages
3,787
Reaction score
896
Location
Austin, TX
I'm learning so much, this is so cool! Per Dave, I'm using polyurethane for the top coat, has anyone tried shooting automotive clear coat on this? Much easier since the sanding time is so much less, or the time to dry is.

Two other things I'm picking up for the DIY'r, it's really hard- for me at least- to match the dash color, the closest I have gotten is a 9/5/2 mixture of red-yellow-dark oak. I took the dash apart that Koopman's friend sent me and sanded the finish on the wood with 220 using a store-bought 3M 220 pad for uniform flatness so I can use the same stain, brain full...more on that later
 

Peter Coomaraswamy

Well-Known Member
Site Donor $$
Messages
3,787
Reaction score
896
Location
Austin, TX
I picked out some interesting stuff for the tray- and the color is uniform- it's just the lights in the warehouse- if you look at the edges of the cluster you'll see that the color matches. The seemingly hardest things are the easiest and vice versa. One small door piece is done and 3 more need to be buffed out, then a little re-assembly and we're "done"... yay!!
 

Attachments

  • dash wood27.JPG
    dash wood27.JPG
    103.4 KB · Views: 128
Top