Paul, your reconstructed radio cutout in the a/c panel looks fabulous - extremely well done.
You are using an out of date browser. It may not display this or other websites correctly.
You should upgrade or use an alternative browser.
You should upgrade or use an alternative browser.
Finishing School for a Fjord 3.0 CS / 100 projects to improve a Coupe / Countdown
- Thread starter paul cain
- Start date
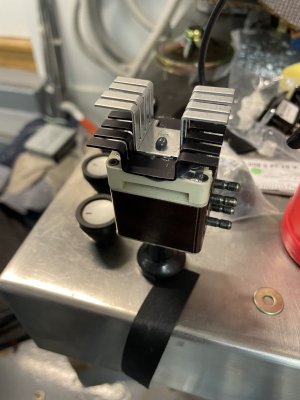
Project 65 Install heat sinks on the A/C fan speed switch. More epoxy holding the aluminum heat sinks in place. I stole this idea from Ron I. at Coast Motor Works. Because it is a brilliant idea to save the life of this overheated fan switch.
Thank you, as you know these are painful. Hours of adjusting and retriming the side panels and getting the shift surround to sit correctly. I think I have about 25 hours in this console. It's preposterous. But it is now bolted down solid and all the electrical functions work. (fingers crossed / for the moment). Thanks for chiming in!Paul, your reconstructed radio cutout in the a/c panel looks fabulous - extremely well done.
Attachments
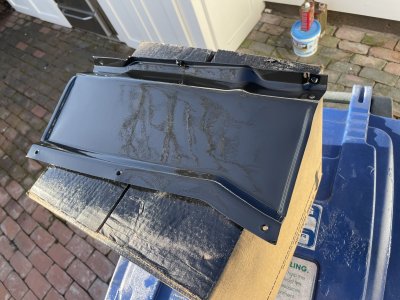
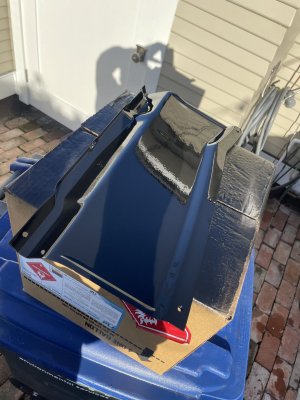
| Project 66: Properly restore the heater core splash shield |
Attachments
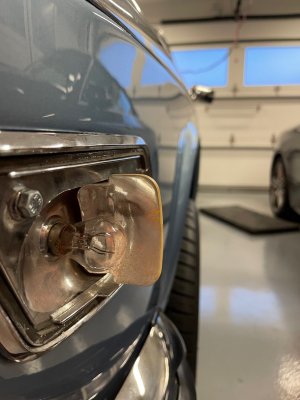
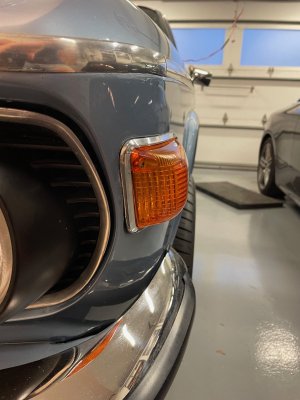
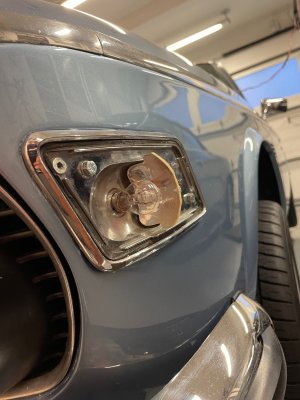
| Project 67: Install European front blinker lens' |
Attachments
I have no idea how that circuit works as I have no A/C, but there has to be an electrical solution besides the thermal solution. Perhaps replace the rheostat with a thyristor?Project 65 Install heat sinks on the A/C fan speed switch. More epoxy holding the aluminum heat sinks in place. I stole this idea from Ron I. at Coast Motor Works. Because it is a brilliant idea to save the life of this overheated fan switch.
Thank you, as you know these are painful. Hours of adjusting and retriming the side panels and getting the shift surround to sit correctly. I think I have about 25 hours in this console. It's preposterous. But it is now bolted down solid and all the electrical functions work. (fingers crossed / for the moment). Thanks for chiming in!
Breiti
Well-Known Member
I like the way you paint the Alpinas.
Perfect 4.5mm overlap.

Breiti
Perfect 4.5mm overlap.
Breiti
Love this, is there enough depth in the console for it to fit?Project 65 Install heat sinks on the A/C fan speed switch. More epoxy holding the aluminum heat sinks in place. I stole this idea from Ron I. at Coast Motor Works. Because it is a brilliant idea to save the life of this overheated fan switch.
Love this, is there enough depth in the console for it to fit?
Yes, it was a 'bolt in' no modifications necessary. Shocking that there was that much room behind the facia panel. It fit right in between the two fan squirrel cages.
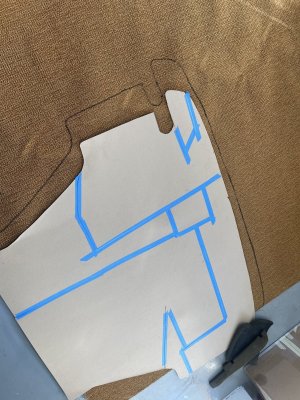
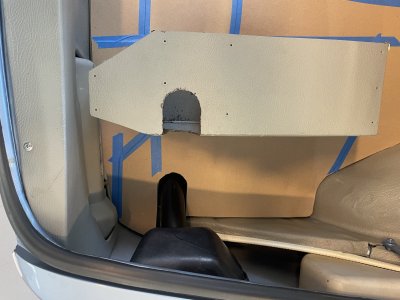
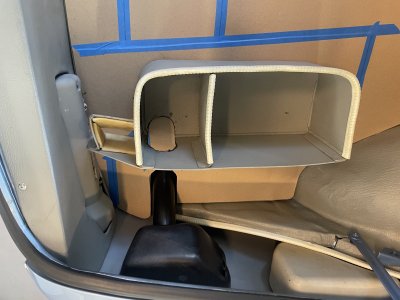
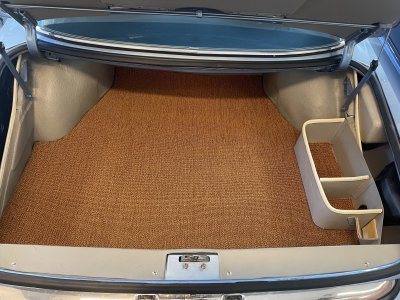
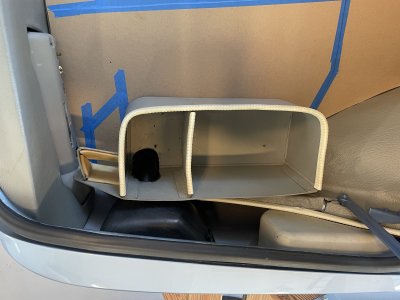
| Project 68: Fabricate trunk carpeting with tool caddy |
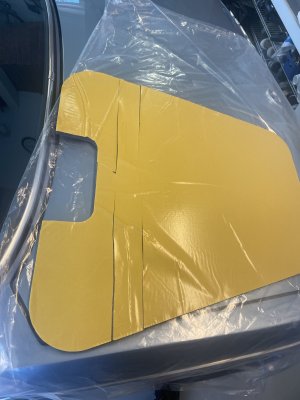
Today was fabricating the trunk floor carpeting. This is a pattern for the US / Federalized E9. I am done with this pattern. If anyone needs to make the same trunk carpeting, the pattern is free to you. Just pay shipping. Carpet will go out this week and get bound with the same edging / piping as the interior carpeting. Tool caddy will get a repaint in the same grey.
The '74 Coupe did not come with a trunk caddy because the triangulated 5 mph bumper brackets got in the way of the original caddy contour. This is the caddy out of an E3 with a small notching around the fuel filler neck. It now fits in the same spot as the original.
Attachments
- Messages
- 71
- Reaction score
- 33
PM sent
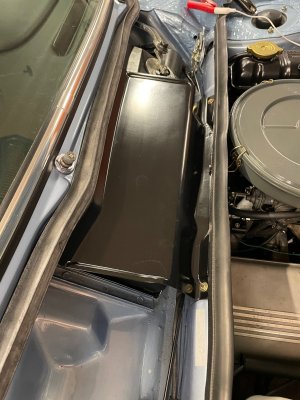
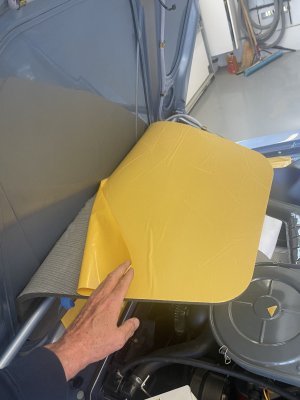
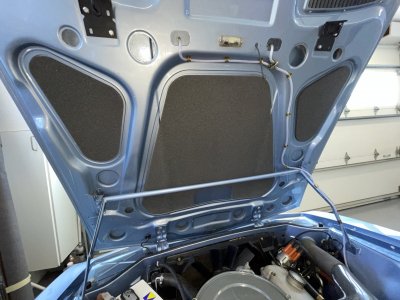
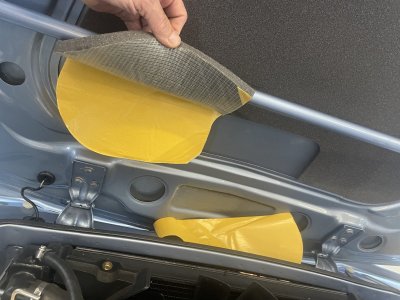
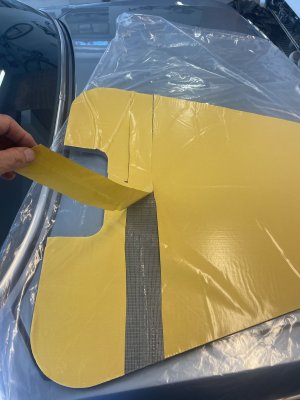
Project 69 Install new under hood insulation.
This is the W&N product with a very good die pattern to match the underhood cut outs. No trimming is required. This adhesive is extremely aggressive. You really need to be in the final position once the adhesive backing makes contact. Otherwise the lift and repositioning method makes a real mess in stretching the foam. Work slowly and never let the adhesive get in contact with itself (foldover).
SUGGESTED METHODOLOGY:
1) cut the backing (peel off) into three sections. The critical first section is what will be directly behind the torsion bar.
2) fold the corner / edge of each piece of backing to be able to start peeling away the material before you install the part.
3) place the center sections in the precise / centered location under the hood, hold with temporary tape.
4) lift the lower corner until you can grab the edge of the center section backing and slowing peel it away gently tamping down the foam in it's new permanent position.
Remove this entire section of backing material.
5) move on to the lower section. You can now lift the edge of the foam to get started. Peel and drop this entire section.
6) Last section I started at the bottom and peeled up and then across. Drop the center section first and then gently press to the outside edges. Done.
7) Small triangle sections were easy. Dry fit first to ensure they fit. I peeled off the entire backing material and started with the long straight edge being dropped first.
Attachments

Wow, I did the under hood foam insulation. It was so easy that it should not count as a project...
Now, removing the old foam without debris getting into bad places may count.
Now, removing the old foam without debris getting into bad places may count.
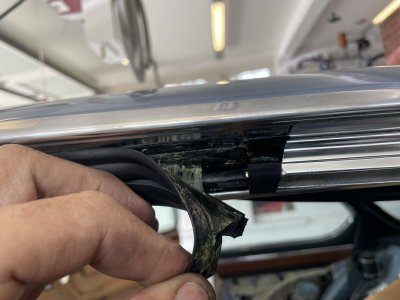
Project 70: Install E28 Rear window lift motors, realign glass, new weatherstripping and adjustments
The PO had simply reinstalled both original rear window lift mechanisms without cleaning or replacing the worn gaskets. Both new weatherstripping seals were installed on the inside and the outside of the glass. Cleaned all the slide channels and applied the E9 coupe forum suggested grease. The two E28 lift motors offered a substantial increase in performance and are a direct bolt in.
The PO had simply reinstalled both original rear window lift mechanisms without cleaning or replacing the worn gaskets. Both new weatherstripping seals were installed on the inside and the outside of the glass. Cleaned all the slide channels and applied the E9 coupe forum suggested grease. The two E28 lift motors offered a substantial increase in performance and are a direct bolt in.
Attachments
Project 69 Install new under hood insulation.
This is the W&N product with a very good die pattern to match the underhood cut outs. No trimming is required. This adhesive is extremely aggressive. You really need to be in the final position once the adhesive backing makes contact. Otherwise the lift and repositioning method makes a real mess in stretching the foam. Work slowly and never let the adhesive get in contact with itself (foldover).
SUGGESTED METHODOLOGY:
1) cut the backing (peel off) into three sections. The critical first section is what will be directly behind the torsion bar.
2) fold the corner / edge of each piece of backing to be able to start peeling away the material before you install the part.
3) place the center sections in the precise / centered location under the hood, hold with temporary tape.
4) lift the lower corner until you can grab the edge of the center section backing and slowing peel it away gently tamping down the foam in it's new permanent position.
Remove this entire section of backing material.
5) move on to the lower section. You can now lift the edge of the foam to get started. Peel and drop this entire section.
6) Last section I started at the bottom and peeled up and then across. Drop the center section first and then gently press to the outside edges. Done.
7) Small triangle sections were easy. Dry fit first to ensure they fit. I peeled off the entire backing material and started with the long straight edge being dropped first.
Excellent directions here Paul...
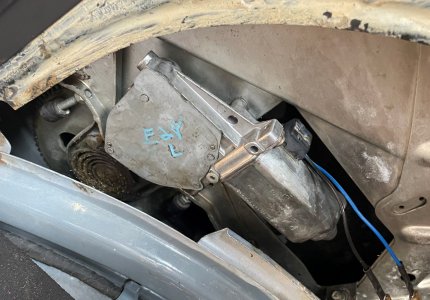
Project 71: Restore the functionality of the Engine Compartment lamp
A big thank you to @Stevehose for the link to Oil's bracket: https://oilsdesigngroup.com/product/support-for-hood-light-switch/ I rerouted the wiring in the hood, replaced the switch and installed the Oil's bracket. Then I discovered the PO had installed an LED bulb in the socket. Converted it back to the stock / warm incandescent blub. After a few tweaks to the bracket height I wanted to ensure the switch was engaging and lamp was going off with the hood latched. iPhone 14 to the rescue.
A big thank you to @Stevehose for the link to Oil's bracket: https://oilsdesigngroup.com/product/support-for-hood-light-switch/ I rerouted the wiring in the hood, replaced the switch and installed the Oil's bracket. Then I discovered the PO had installed an LED bulb in the socket. Converted it back to the stock / warm incandescent blub. After a few tweaks to the bracket height I wanted to ensure the switch was engaging and lamp was going off with the hood latched. iPhone 14 to the rescue.
Attachments
Looking nice Paul!
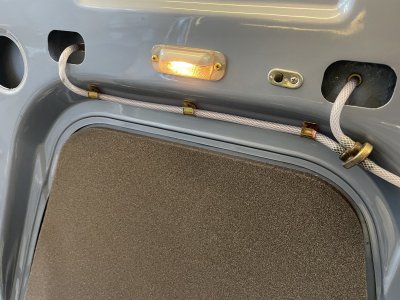
Is the under hood light different from the one in the trunk? It looks more like grey plastic vs the chrome I have in my trunk.
(My hood light is M.I.A.; I want to be able to source the right one)
Is the under hood light different from the one in the trunk? It looks more like grey plastic vs the chrome I have in my trunk.
(My hood light is M.I.A.; I want to be able to source the right one)
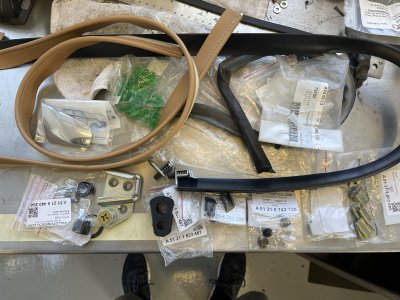
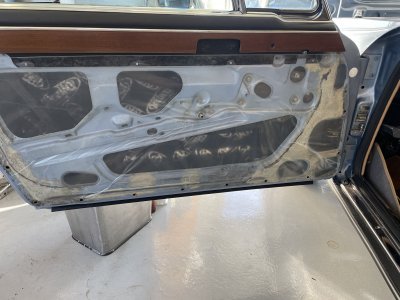
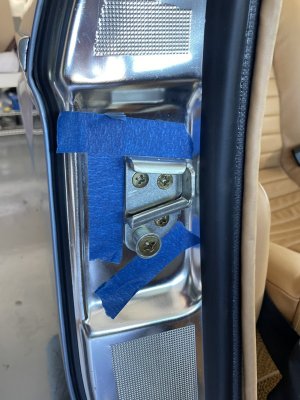
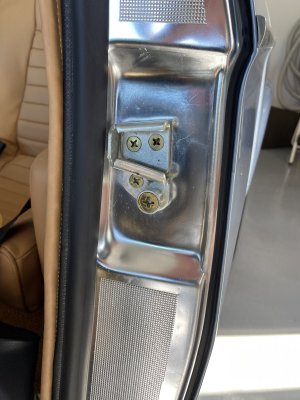
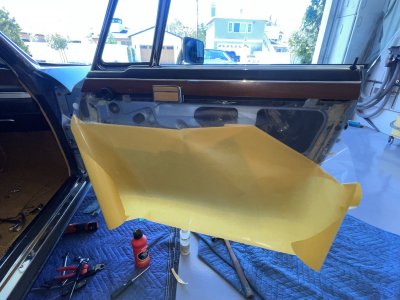
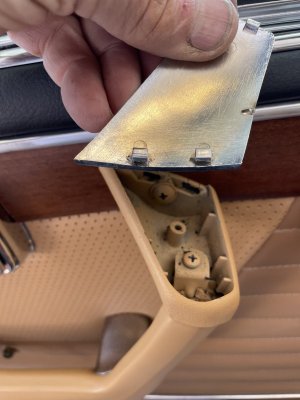
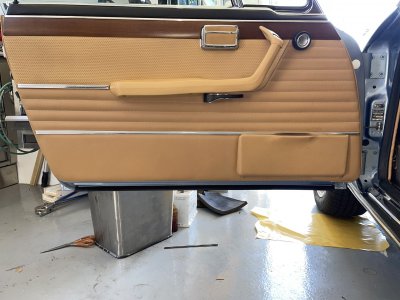
Project 72: Rebuild, clean, adjust and repair front door mechanisms. These are some of the replacement parts that are going in each door.
The W&N clear plastic membrane with adhesive is the final step in buttoning up the door. This skin for some reason adds substantially to a quiet and solid door close.
Next two images, how to hold the striker plate position while swapping it out for a freshly plated example.
Next: stretching the clear plastic skin over the door.
Somebody changed the design of the chrome cap on the arm rest pull. It use to be one self tapping screw from the bottom side. W&N now sells it with three barbs on the edges to hold the cap in place. Unfortunately this does not fit as there is no (female) barb feature on the mating part. Using a micro milling tip on the dremel I notched in the two ovals. It is now a very tight fit. The downside is that you'll have to destroy the part to get it off. Not a brilliant improvement.
Last image is the completed door panel.
As I recall, both the trunk and the engine compartment lamps were both 'all plastic' with a silver / grey paint sprayed on the inside. I don't recall them having the chrome trim, but I could easily be wrong.Looking nice Paul!
Is the under hood light different from the one in the trunk? It looks more like grey plastic vs the chrome I have in my trunk.
(My hood light is M.I.A.; I want to be able to source the right one)
Attachments

Last edited:
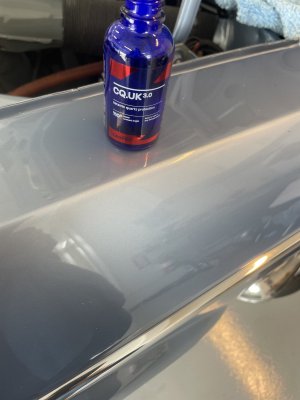
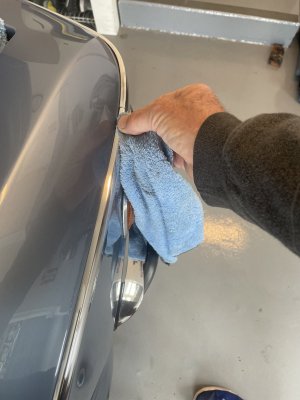
Project 73: Polish and Ceramic coat the belt line trim.
All of the belt line trim on the car had been simply polished with no protection. After a few years the raw aluminum gets dull. I was not about to remove all of the trim, have it repolished and Cerikote it. So I took the decision to polish it in place. After three rounds of polishing of all seven pieces, we tried an experiment. I coated it with Ceramic coating. The same product you would put on a finished paint job. I am hoping for a least a year of protection. For now it is bring and shiny.
All of the belt line trim on the car had been simply polished with no protection. After a few years the raw aluminum gets dull. I was not about to remove all of the trim, have it repolished and Cerikote it. So I took the decision to polish it in place. After three rounds of polishing of all seven pieces, we tried an experiment. I coated it with Ceramic coating. The same product you would put on a finished paint job. I am hoping for a least a year of protection. For now it is bring and shiny.
Attachments
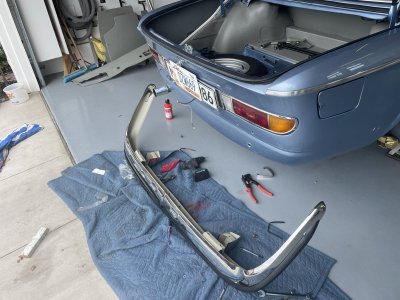
Occasionally you have to go backwards. Which I really try and avoid. In this case the rear bumper alignment was not perfect, the correct bumperette rubber covers had arrived along with the correct center seam chrome cover. All of this warranted dropping the bumper and reworking these items. Its now back on and looking much more factory correct.
Attachments
PaulProject 73: Polish and Ceramic coat the belt line trim.
All of the belt line trim on the car had been simply polished with no protection. After a few years the raw aluminum gets dull. I was not about to remove all of the trim, have it repolished and Cerikote it. So I took the decision to polish it in place. After three rounds of polishing of all seven pieces, we tried an experiment. I coated it with Ceramic coating. The same product you would put on a finished paint job. I am hoping for a least a year of protection. For now it is bring and shiny.
What did you use to polish the belt line? Did the beltline have a coating on it? I am assuing you just applied the cermic coating to the beltline with a towel?