decoupe
(deceased)
Maybe this has been posted by others previously but if not....
Most of this is obvious but only after you have done it so hopefully someone out there gets the benefit of my learning curve.
Before I ship these off to their new owner I wanted to cleanup as much of the chips, runs and blemishes since they were last done in 2000 - some 46,000 miles and one owner ago. The wheels were in very nice condition and it was hands and knees stuff to see the wear and tear of life on the road in Canada but I wanted to send them at their best.
First recommendation is to buy a 16" turntable (VersaSpin 360 in this case) - the best $30 time saving investment in your wheel refinishing. Buy two sheets each of wet dry sand paper in 200, 400 and 600 grit, 3M superfine (purple) scuff pad, 1/2" masking tape and two cans of single stage paint in rattle cans (custom matched to the existing wheel colour if you can't find Wurth Silver Wheel paint). Clean everything with varsol and then Simple Green followed by thorough rinsing. Hand sand the deeper marks/chips/runs with 200 and feather them out with 400. Scuff sand everything that will get paint with 600 - be consistent and avoid any contact with the black open lug area unless you want to double your project. The whole wheel surface and the surfaces of the the vanes should all be a uniform matt finish. Should take about 2-3 hours per wheel.
Rinse thoroughly with very warm water and dry with lint free cloth. You are ready to paint. Find some way to do this with some level of ventilation that is as dust/lint free as possible. I used a half bath in our shop with the fart fan running and stood in the doorway to do the painting. I also have a long standing impairment of reasoning from the late 60's and 70's so i hav nt notisd any efexts du toooo th voltiling sol vnts.
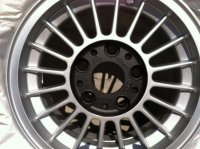
Cut out a paper disc slightly smaller than the black lug area and lay it in place - I used a couple of pieces of double sided tape to tack it in place. Tape off the line separating the silver wheel face and black lug - here's your chance to make a statement on what is the correct relief from the "corner" separating them. Make it easy on your self and tape so the black is just barley visible - fine pencil line - or it will be difficult to keep things level and consistent. You'll get much faster after you realize that you align the tape about a 1/4 to 1/2 inch at a time with one hand and press the tape to create that fine line with the other. Once the tape is on, anneal it by firmly running your thumbnail along the top edge of the tape to avoid any seepage. Also press the tape down onto the paper disc or you will get spray on the black lug area.
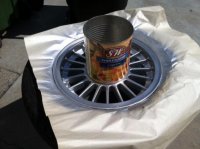
Now you are ready to paint. Elevate the wheel - I used a large waste barrel - on the turntable. The idea is not to spin and paint but to turn so you can apply the paint to specific areas in a consistent pattern. A LIGHT AND CONSISTENT SPRAY PATTERN. With every area you are working I recommend always starting at the valve hole so you don't lose your place.
Turning clockwise and with the can angled to face the inside surface of the vane, spray in brief (1 second-ish) sweeps. Do the reverse the same way to get the other face of the vanes. Then spray the "V" where the two surfaces of the vane meet - same 1 second burst/sweep and rotate to paint one V at a time. Now the vanes have all been done and the overlaps of the 3 faces should give some coverage at both the wheel barrel and the hub of the wheel. With a left right sweep motion and the same duration spray in each direction apply a light coat over an area of 3-5 vanes working your way around the wheel. Spray the hub area around the open lug centre in 3 or 4 overlapping passes - avoid over doing this area as a lot of paint will have landed here already. Last area I painted was the flat 2" lip and the bead edge and back of bead. Everything in left right overlaps in brief passes.
I did this in two coats to avoid runs and the painting is really quick. Think water colour in terms of application not oil paint - thin layers. Overlapping coverage not static spray patterns.


Most of this is obvious but only after you have done it so hopefully someone out there gets the benefit of my learning curve.
Before I ship these off to their new owner I wanted to cleanup as much of the chips, runs and blemishes since they were last done in 2000 - some 46,000 miles and one owner ago. The wheels were in very nice condition and it was hands and knees stuff to see the wear and tear of life on the road in Canada but I wanted to send them at their best.
First recommendation is to buy a 16" turntable (VersaSpin 360 in this case) - the best $30 time saving investment in your wheel refinishing. Buy two sheets each of wet dry sand paper in 200, 400 and 600 grit, 3M superfine (purple) scuff pad, 1/2" masking tape and two cans of single stage paint in rattle cans (custom matched to the existing wheel colour if you can't find Wurth Silver Wheel paint). Clean everything with varsol and then Simple Green followed by thorough rinsing. Hand sand the deeper marks/chips/runs with 200 and feather them out with 400. Scuff sand everything that will get paint with 600 - be consistent and avoid any contact with the black open lug area unless you want to double your project. The whole wheel surface and the surfaces of the the vanes should all be a uniform matt finish. Should take about 2-3 hours per wheel.
Rinse thoroughly with very warm water and dry with lint free cloth. You are ready to paint. Find some way to do this with some level of ventilation that is as dust/lint free as possible. I used a half bath in our shop with the fart fan running and stood in the doorway to do the painting. I also have a long standing impairment of reasoning from the late 60's and 70's so i hav nt notisd any efexts du toooo th voltiling sol vnts.
Cut out a paper disc slightly smaller than the black lug area and lay it in place - I used a couple of pieces of double sided tape to tack it in place. Tape off the line separating the silver wheel face and black lug - here's your chance to make a statement on what is the correct relief from the "corner" separating them. Make it easy on your self and tape so the black is just barley visible - fine pencil line - or it will be difficult to keep things level and consistent. You'll get much faster after you realize that you align the tape about a 1/4 to 1/2 inch at a time with one hand and press the tape to create that fine line with the other. Once the tape is on, anneal it by firmly running your thumbnail along the top edge of the tape to avoid any seepage. Also press the tape down onto the paper disc or you will get spray on the black lug area.
Now you are ready to paint. Elevate the wheel - I used a large waste barrel - on the turntable. The idea is not to spin and paint but to turn so you can apply the paint to specific areas in a consistent pattern. A LIGHT AND CONSISTENT SPRAY PATTERN. With every area you are working I recommend always starting at the valve hole so you don't lose your place.
Turning clockwise and with the can angled to face the inside surface of the vane, spray in brief (1 second-ish) sweeps. Do the reverse the same way to get the other face of the vanes. Then spray the "V" where the two surfaces of the vane meet - same 1 second burst/sweep and rotate to paint one V at a time. Now the vanes have all been done and the overlaps of the 3 faces should give some coverage at both the wheel barrel and the hub of the wheel. With a left right sweep motion and the same duration spray in each direction apply a light coat over an area of 3-5 vanes working your way around the wheel. Spray the hub area around the open lug centre in 3 or 4 overlapping passes - avoid over doing this area as a lot of paint will have landed here already. Last area I painted was the flat 2" lip and the bead edge and back of bead. Everything in left right overlaps in brief passes.
I did this in two coats to avoid runs and the painting is really quick. Think water colour in terms of application not oil paint - thin layers. Overlapping coverage not static spray patterns.