thehackmechanic
Well-Known Member
The Great M30 Sanden Compressor Bracket Mystery – Still A Bit of a Mystery
The aim of this post was to offer a solution to the problem of identifying a readily available bracket and related hardware that allows modern Sanden or equivalent a/c compressor to be used on the M30 engine of our cars. I fail in that aim. But it's the journey that matters.
NOTE THAT AS OF 6/23/2016 THIS HAS CHANGED -- SEE THE LAST PAGE OF THE POST
Luis and others have addressed the question in many posts. A link to Luis’ recent post is here:
http://www.e9coupe.com/forum/showthread.php?t=13163&highlight=luis+bracket
But First, A Short Tutorial on Belt Tightening
You need to understand that any compressor bracket on any car needs to do two things – mount the compressor securely to the engine, and provide a mechanism to tighten the compressor belt. This can occur in two ways:
1) The compressor is completely fixed to a bracket, and the belt is tightened by an idler pulley which is either adjustable (as it is on a BMW 2002 with a York setup) or mounted on a spring-loaded tensioner (as it is in just about every modern BMW).
2) The compressor is attached to a bracket at one point, but is free to rotate around that point. The act of rotation of the compressor about that point is what tightens the belt. The compressor is held at a given point of rotation by a bolt on a second straight or curved adjustment strip. This is exactly how mounting and belt-tightening on an old-school alternator works. With a compressor, though, there are usually two strips, one on each side of the compressor.
Okay, on to the bracket choices themselves.
The York Adapter Bracket
I include this one for completeness only. I don’t think anyone wants to use the York adapter bracket as a solution, but as Stevehose said, “Seems like sorting the damned bracket was the hardest for me part, which is why I adapted the York. I would have preferred to have scrapped it.”
If your car came new with a/c, it had a York compressor with a fairly complicated three-piece bracket. One piece of the bracket bolted to the side of the engine. A second piece bolted to the compressor. The two pieces were attached by a pair of pivot bolts in rubber bushings at the top, leaving the bottom of the piece attached the compressor free to swing outward and provide the tension adjustment. The third piece was the set of adjusting strips and bolts fixing the second piece in its pivot arc. These are visible at the bottom of the picture, and are referred to many times in this post.


If you want to replace the York with a Sanden and you have all of the pieces of the original bracket, there is a standard adapter bracket available on eBay, VintageAir, and other outlets. It is shown here:

Understand that this Sanden York adapter bracket is a universal bracket. It is not specific to mounting on a BMW M30 or any specific car. Thus it has no mechanism for belt tightening – it is assumed that belt tightening is handled by one of the above-described mechanisms as part of whatever the original York bracket was on your model car. In our case, the tensioning mechanism is the metal strips at the bottom of the York bracket. So, you need to:
--Bolt the Sanden to the adapter bracket.
--Bolt the adapter bracket to the part of the York bracket that the York was originally attached to (the large pivoting vertical piece).
--Make sure this bracket can pivot on the other piece mounted on the engine, and be tensioned by the strips.
So it’s a bracket bolted to a bracket that pivots on another bracket. Note that I’ve never used this on a BMW (though I did use it in my 911SC), but this is what Stevehose pictures in Luis’ original post.
Note that there’s another Sanden York adapter bracket that has belt tensioner tracks built into it. It is pictured below. I’ve never used it either. My assumption is that it would allow you to get rid of two of the three pieces of the York bracket.

Be gone, generic Sanden York adapter brackets! On to the main part of the game.
The No-Longer-Available (but you really want it) Air Products Bracket
I retrofitted air into my ’73 3.0CSi about 15 years ago. I believe the compressor is a Unicla, identical in dimensions to one of the Sandens. The bracket that’s on my E9 is identical to the one Luis shows in this photograph (originally from Glaive, who offered it for sale).


This bracket is shown as part of the kit below. This kit was readily available until about three years ago. More on this below.

Note that:
--This bracket has two holes that attach to the right side of the block and two holes that attach to the front of the block, behind the pulley / harmonic balancer (difficult but not impossible to reach).
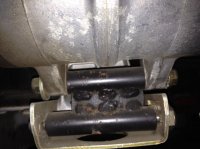
--This bracket has two holes (“bosses”), running front to back, one at the top and one at the bottom. The top one is just slightly narrower than the 3.28” Sanden ear spacing, so the ears go around it. This is the pivot mounting point. The bottom one is about 3 ¾” – wider than the Sanden ear-to-ear spacing. At first this threw me, but the ears don’t NEED to go around this part of the bracket. It’s the tensioner mounting point for a set of metal adjusting strips used to tension the belt. These strips are shown both in Luis’ photo, and in the photo of the kit shown below. Note that the rear adjusting strip bolts to the back of the compressor ear and the back of the lower bracket boss, but the front strip goes between the compressor ear and the boss.
--The adjusting strips each have a round hole and an elongated slot. The strips have to be positioned, as per the photo below, so that the end with the hole is attached to the compressor ear, and the end with the strip is attached to the bracket and points toward the engine. If you try it the other way, it won’t work – the strips hit the body of the compressor. Even with the strips correctly oriented, they may still hit the body of the compressor. Just take a grinder to the corners of the strips to make adequate clearance.
--The way the compressor is mounted on the bracket, the back of the compressor’s rear ears are flush with the back of the bracket, so one adjusting strip is bolted to the back of an ear and the back of the compressor. Because it’s a flush mount, this adjusting strip could have any thickness. However, the front adjusting strip mounts in the gap between the front of the bracket and the back of a compressor ear. So you need an adjusting strip the right size to bridge this gap. The adjusting strips supplied with the Air Products bracket were 0.235” according to my calipers. As it happens, this is also the size of the adjusting strips supplied with the York bracket.
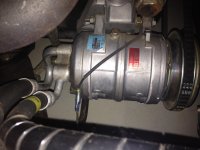
All of this is shown in the 15 year old installation in E9 below (yes, antifreeze drip, I know):

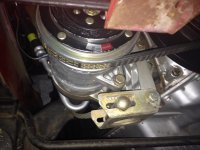
And in the brand-new installation in my Bavaria below:

The kit, assembled and marketed by “Air Products,” was widely available through WorldPac and other suppliers, as well as on Amazon (see the expired link below).
http://www.amazon.com/Air-Products-C.../dp/B001G394K2
I “traced this to ground,” as they say, and found this page from Air Products. It lists this kit as 0151A.
http://www.airproductsgroup.com/bmwkits.htm
I called Air Products and asked them about the kit. They say that they bought the bracket itself from another company and assembled the kit around it, but that that other company that manufactured the bracket itself has gone out of business. So that’s that. If you’re fortunate enough to find this kit, it’s new old stock.
The Air Products Group link shows other BMW bracket kits, but they are not arranged by BMW engine code in the way we’d like. If you look around on Amazon and eBay, you can find other kits that don't have the mounting holes in front. That's how you know they're not for an M30 engine.
HOWEVER, the Air Products Group link shows a 1841A kit listed for an ’88-’89 735i. If you look in the pic below, you’ll see that the bracket itself is identical to the one in the 0151A kit. It’s the bracket we want. It’s packaged, though, not with the straight adjusting strips, but with a more complex idler pulley setup. Why the late-model 735i needed this arrangement instead of the strips, I don’t know. But I just found one of these as new old stock on eBay and grabbed it.

Eagle-eye Luis noticed that this same kit is also sold on Amazon here:
http://www.amazon.com/Air-Products-...ie=UTF8&qid=1402321850&sr=1-22#productDetails
It does not list this as a "1841A" kit, but the bracket looks the same, though it's viewed from the reverse angle. And, if you use Amazon's "does this fit my car" wizard and type in "1989 BMW 735i," it comes up saying that it fits. As of this writing, Amazon lists there are 16 of these in stock. They may be the last 16 Air Products brackets.
I assembled the bracket, idler, and compressor stand-alone, and it looks like this:

I have test-fit this on my Bavaria and… there’s a minor issue. The idler pulley and arm are meant to line up with the outer groove of the pulley on a Sanden compressor, and an early engine uses the inner pulley. Huh? What? Let’s step back for a minute. Much has been written on this forum about the different pulley arrangements that host the belts for the alternator, power steering pump, and a/c compressor. To summarize:
--The original configuration had a single groove on the harmonic balancer for a belt that drove the alternator and water pump. The water pump pulley had a second groove for a belt that drove the power steering pump. A separate pulley bolted onto the front of the crankshaft and hosted a belt that ran the compressor.
--The later configuration (either retrofitted onto the original engine, or coming along for the ride on a later engine) ran the alternator and water pump the same way, but had a two-groove pulley on the crankshaft. The inner of these two grooves ran the power steering belt. This put the a/c compressor belt on the outermost groove.
The Sanden compressor has a pulley with two grooves. The Air Products Bracket mounts the compressor such that, if your car has the original configuration, you use the inner grove, and if your car has the later configuration, you use the outer groove. So the issue with the 1841A kit is that, while the bracket will work with either, the pieces that position the idler pulley are meant for the later configuration – they orient the idler pulley parallel with the outer groove. If you have an early configuration, there are two solutions:
1) Use the bracket but don’t use the idler pulley. Again, the bracket is correct. Instead, use the adjusting strips that came with the original York bracket. This is what I did. If you’re doing a from-scratch install and you don’t have the adjusting strips, buy or make some. The part number is 64518745208. They show up as “AC Tensioner,” listed as available, price $1.54.
2) Modify the idler mounting setup to put the idler pulley parallel with the inner groove. I have not tried to do this.
So… if you find an 0151A kit, or an 1841A kit, grab it. It’s the solution everyone used to use until they went NLA. But getting lucky isn’t a solution most of us can rely on. So now we get into the complex topic of:
Using Another Standard BMW Compressor Bracket
If you’re comfortable with using a late wing-cell compressor (four round ears) and the late bracket, it solves a multitude of problems. Everything’s available both new and used, and the compressor and bracket are designed to work together. But for cost reasons, many folks want to use a Sanden, can’t find the Air Products bracket, and wonder if they can use an OEM bracket. This was maddeningly confusing, but I think I’ve gotten to the bottom of it.
Others have pointed out (http://forums.bimmerforums.com/forum/showthread.php?1521628-Sanden-compressor-help!!!!) that there appear to be at least three different compressor brackets used on M30 engines:
--The large swashplate compressor used on the E12. As you can see from the pic, this used an external idler wheel as a tensioner.

--The “wing cell” compressor with round ears on the bottom and square ears on the top. In this configuration, the top-mounted slotted bracket provides the tensioner mechanism.

--The “wing cell” compressor with four round ears. In this configuration, the bottom-mounted piece with the toothed nut provides the tensioner mechanism. Nifty.

Below is a pic from Sven showing this latter bracket and tensioner installed on his engine.

Below is a pic from Sven showing the wing-cell compressor on the bracket and tensioner.

Let’s hone in on this late bracket for a moment. Realoem lists the part -- #1 in the above diagram – as 64521284953, used on the E23, E24, E28, E32, and E34. Getbmwparts.com lists the price of the part as $93, but it comes up for sale on eBay for between $20 and $50. It is sometimes listed on eBay as an M3 bracket, but this does not jive with realoem.
Note that, in many ways, the whole “which modern compressor do I use in my E9” issue is easier if you don’t use a Sanden and instead use the late wing-cell compressor with four rounded ears and this bracket. This is, in fact, what CoupeKing shows on his web site (http://www.coupeking.com/?post_type=parts&p=5110 ). I place no value judgment on this one way or another. However, new wing-cell compressors list at something like eight hundred bucks. Rebuilt compressors are cheap, but they appear to be like rebuilt alternators, which is to say you may be getting something that’s truly been rebuilt, or may be getting something with little more than a fresh coat of silver paint. In contrast, new Chinese-made Sanden compressors (or Sanden copies) are inexpensive ($120-$150), and appear to have a a good reputation. The a/c retrofit/rejuvenation process is lengthy and expensive enough that many folks want to start with a new compressor, and Sandens fit the bill at a good price point. But by all means, if you’re comfortable with a pick-and-pull wing cell and its bracket, go that route and stop reading right now.
So… can you use the wing cell bracket with a Sanden?
The short answer is "I tried as an academic exercise, but had the Air Products bracket anyway so I abandoned the exercise."
The site BigCoupe.com has many posts saying “yes, you can – you just need to fabricate some mounting ears,” but I could not find a single photo. So, determined to take one for the team, I ordered bracket part number 64521284953 to find out for myself. I found one on eBay, $30 shipped. Just the #1 piece that bolts to the block, not the gold tensioner on the bottom.
And… it’s not a great solution.
Here’s the issue. In Sven’s first pic of the bracket only, it is obvious that the two mounting bosses are different widths – the top one is much narrower than the bottom. The inside ear-to-ear spacing on the Sanden is 3.28”, but the inside ear-to-ear spacing on the top of the wing-cell compressor where the ears straddle the bracket is 2 1/16”. So you know in advance that a Sanden compressor is not going to bolt up to the bracket in exactly the same way as the wing cell.
BUT… as luck would have it, the ear-to-ear spacing on the wing cell at the bottom, where the bracket bolts to the tensioner, is 3.25”. BMW guru Ben Thongsai confirms this, saying "It's the lower mounting point [on the wing-cell compressor] that is this [3.25"] width, though -- the upper one in a bit narrower at right around 2". Looking at a Sanden M30 bracket, it mounts off of the top ears and tensions off of the lower ones. I think you would have to reverse that with the BMW bracket. But it looks like it should work with minimal fabrication."”
Well, it’s more complicated than that. The Sanden ear-to-ear spacing, as I keep saying, is 3.28”. The width across the top boss is much narrower – 2.05”. And the bottom boss of the bracket is slightly wider – 3.30. So it doesn’t fit, as per the pic below.

So I sanded it and took a little off so it fit between the compressor’s ears. I bolted it up to the block:

And then tried to hang the compressor off it. And it doesn’t work, because the compressor hits the sway bar, and because the angle of the bracket is such that you can’t get the hole in the bracket to line up with the holes in the ears.

This means you need to use the upper boss on the bracket the pivot point, not the lower one, as Ben surmised. So I hung the compressor off the upper boss by passing a long bolt through the short boss and the ears. But those ears are 3.28” apart, and the boss is only 2.05”. I can see how, if you wanted, you could use a boatload of washers, or some metal stand-offs, to take up the difference, but that’s a big gap to bridge.
Further, the holes in the compressor ears are larger than the holes through the bosses – that is, the compressor is meant to take a larger pivot bolt. If you use the smaller bolt necessary to pass it through the bosses, it’s going to have a fair amount of wobble through the compressor ears, which is going to make it easy for the compressor to be slightly skewed relative to the pulley.
Speaking of the pulley, you need to line up the grooves in both pulleys. I visually lined up the front groove in the compressor with the groove in the crankshaft pulley, and determined that, with washers, alignment didn’t seem to be an issue. But this was on an early engine. I didn’t test it with the later pulley configuration.
But…even if you hung it nice and tight and true, and lined it up with the crankshaft pulley groove, you’d have the challenge of how to connect the adjusting strips. Recall that the Air Products bracket is designed so the back of the bracket is flush with the back of the compressor ears, so one adjustment strip bolts to the back of both, and the front of the bracket is about 0.235” in front of the ears, so an adjustment strip fits precisely between them. Since the width of the bosses at the top and bottom of the wing-cell bracket don’t place the strips cleanly in front or behind the compressor ears, fabricating / using strips is less trivial than it is with the Air Products bracket.
For all these reasons, I abandoned the project, installed the Air Products bracket I'd already bought, and see why CoupeKing recommends the wing-cell compressor/bracket as a pair. I have to say, if I had to do it again, I'd seriously consider this path.
That's it. I do have a life you know.
The aim of this post was to offer a solution to the problem of identifying a readily available bracket and related hardware that allows modern Sanden or equivalent a/c compressor to be used on the M30 engine of our cars. I fail in that aim. But it's the journey that matters.
NOTE THAT AS OF 6/23/2016 THIS HAS CHANGED -- SEE THE LAST PAGE OF THE POST
Luis and others have addressed the question in many posts. A link to Luis’ recent post is here:
http://www.e9coupe.com/forum/showthread.php?t=13163&highlight=luis+bracket
But First, A Short Tutorial on Belt Tightening
You need to understand that any compressor bracket on any car needs to do two things – mount the compressor securely to the engine, and provide a mechanism to tighten the compressor belt. This can occur in two ways:
1) The compressor is completely fixed to a bracket, and the belt is tightened by an idler pulley which is either adjustable (as it is on a BMW 2002 with a York setup) or mounted on a spring-loaded tensioner (as it is in just about every modern BMW).
2) The compressor is attached to a bracket at one point, but is free to rotate around that point. The act of rotation of the compressor about that point is what tightens the belt. The compressor is held at a given point of rotation by a bolt on a second straight or curved adjustment strip. This is exactly how mounting and belt-tightening on an old-school alternator works. With a compressor, though, there are usually two strips, one on each side of the compressor.
Okay, on to the bracket choices themselves.
The York Adapter Bracket
I include this one for completeness only. I don’t think anyone wants to use the York adapter bracket as a solution, but as Stevehose said, “Seems like sorting the damned bracket was the hardest for me part, which is why I adapted the York. I would have preferred to have scrapped it.”
If your car came new with a/c, it had a York compressor with a fairly complicated three-piece bracket. One piece of the bracket bolted to the side of the engine. A second piece bolted to the compressor. The two pieces were attached by a pair of pivot bolts in rubber bushings at the top, leaving the bottom of the piece attached the compressor free to swing outward and provide the tension adjustment. The third piece was the set of adjusting strips and bolts fixing the second piece in its pivot arc. These are visible at the bottom of the picture, and are referred to many times in this post.
If you want to replace the York with a Sanden and you have all of the pieces of the original bracket, there is a standard adapter bracket available on eBay, VintageAir, and other outlets. It is shown here:
Understand that this Sanden York adapter bracket is a universal bracket. It is not specific to mounting on a BMW M30 or any specific car. Thus it has no mechanism for belt tightening – it is assumed that belt tightening is handled by one of the above-described mechanisms as part of whatever the original York bracket was on your model car. In our case, the tensioning mechanism is the metal strips at the bottom of the York bracket. So, you need to:
--Bolt the Sanden to the adapter bracket.
--Bolt the adapter bracket to the part of the York bracket that the York was originally attached to (the large pivoting vertical piece).
--Make sure this bracket can pivot on the other piece mounted on the engine, and be tensioned by the strips.
So it’s a bracket bolted to a bracket that pivots on another bracket. Note that I’ve never used this on a BMW (though I did use it in my 911SC), but this is what Stevehose pictures in Luis’ original post.
Note that there’s another Sanden York adapter bracket that has belt tensioner tracks built into it. It is pictured below. I’ve never used it either. My assumption is that it would allow you to get rid of two of the three pieces of the York bracket.
Be gone, generic Sanden York adapter brackets! On to the main part of the game.
The No-Longer-Available (but you really want it) Air Products Bracket
I retrofitted air into my ’73 3.0CSi about 15 years ago. I believe the compressor is a Unicla, identical in dimensions to one of the Sandens. The bracket that’s on my E9 is identical to the one Luis shows in this photograph (originally from Glaive, who offered it for sale).
This bracket is shown as part of the kit below. This kit was readily available until about three years ago. More on this below.
Note that:
--This bracket has two holes that attach to the right side of the block and two holes that attach to the front of the block, behind the pulley / harmonic balancer (difficult but not impossible to reach).
--This bracket has two holes (“bosses”), running front to back, one at the top and one at the bottom. The top one is just slightly narrower than the 3.28” Sanden ear spacing, so the ears go around it. This is the pivot mounting point. The bottom one is about 3 ¾” – wider than the Sanden ear-to-ear spacing. At first this threw me, but the ears don’t NEED to go around this part of the bracket. It’s the tensioner mounting point for a set of metal adjusting strips used to tension the belt. These strips are shown both in Luis’ photo, and in the photo of the kit shown below. Note that the rear adjusting strip bolts to the back of the compressor ear and the back of the lower bracket boss, but the front strip goes between the compressor ear and the boss.
--The adjusting strips each have a round hole and an elongated slot. The strips have to be positioned, as per the photo below, so that the end with the hole is attached to the compressor ear, and the end with the strip is attached to the bracket and points toward the engine. If you try it the other way, it won’t work – the strips hit the body of the compressor. Even with the strips correctly oriented, they may still hit the body of the compressor. Just take a grinder to the corners of the strips to make adequate clearance.
--The way the compressor is mounted on the bracket, the back of the compressor’s rear ears are flush with the back of the bracket, so one adjusting strip is bolted to the back of an ear and the back of the compressor. Because it’s a flush mount, this adjusting strip could have any thickness. However, the front adjusting strip mounts in the gap between the front of the bracket and the back of a compressor ear. So you need an adjusting strip the right size to bridge this gap. The adjusting strips supplied with the Air Products bracket were 0.235” according to my calipers. As it happens, this is also the size of the adjusting strips supplied with the York bracket.
All of this is shown in the 15 year old installation in E9 below (yes, antifreeze drip, I know):
And in the brand-new installation in my Bavaria below:
The kit, assembled and marketed by “Air Products,” was widely available through WorldPac and other suppliers, as well as on Amazon (see the expired link below).
http://www.amazon.com/Air-Products-C.../dp/B001G394K2
I “traced this to ground,” as they say, and found this page from Air Products. It lists this kit as 0151A.
http://www.airproductsgroup.com/bmwkits.htm
I called Air Products and asked them about the kit. They say that they bought the bracket itself from another company and assembled the kit around it, but that that other company that manufactured the bracket itself has gone out of business. So that’s that. If you’re fortunate enough to find this kit, it’s new old stock.
The Air Products Group link shows other BMW bracket kits, but they are not arranged by BMW engine code in the way we’d like. If you look around on Amazon and eBay, you can find other kits that don't have the mounting holes in front. That's how you know they're not for an M30 engine.
HOWEVER, the Air Products Group link shows a 1841A kit listed for an ’88-’89 735i. If you look in the pic below, you’ll see that the bracket itself is identical to the one in the 0151A kit. It’s the bracket we want. It’s packaged, though, not with the straight adjusting strips, but with a more complex idler pulley setup. Why the late-model 735i needed this arrangement instead of the strips, I don’t know. But I just found one of these as new old stock on eBay and grabbed it.
Eagle-eye Luis noticed that this same kit is also sold on Amazon here:
http://www.amazon.com/Air-Products-...ie=UTF8&qid=1402321850&sr=1-22#productDetails
It does not list this as a "1841A" kit, but the bracket looks the same, though it's viewed from the reverse angle. And, if you use Amazon's "does this fit my car" wizard and type in "1989 BMW 735i," it comes up saying that it fits. As of this writing, Amazon lists there are 16 of these in stock. They may be the last 16 Air Products brackets.
I assembled the bracket, idler, and compressor stand-alone, and it looks like this:
I have test-fit this on my Bavaria and… there’s a minor issue. The idler pulley and arm are meant to line up with the outer groove of the pulley on a Sanden compressor, and an early engine uses the inner pulley. Huh? What? Let’s step back for a minute. Much has been written on this forum about the different pulley arrangements that host the belts for the alternator, power steering pump, and a/c compressor. To summarize:
--The original configuration had a single groove on the harmonic balancer for a belt that drove the alternator and water pump. The water pump pulley had a second groove for a belt that drove the power steering pump. A separate pulley bolted onto the front of the crankshaft and hosted a belt that ran the compressor.
--The later configuration (either retrofitted onto the original engine, or coming along for the ride on a later engine) ran the alternator and water pump the same way, but had a two-groove pulley on the crankshaft. The inner of these two grooves ran the power steering belt. This put the a/c compressor belt on the outermost groove.
The Sanden compressor has a pulley with two grooves. The Air Products Bracket mounts the compressor such that, if your car has the original configuration, you use the inner grove, and if your car has the later configuration, you use the outer groove. So the issue with the 1841A kit is that, while the bracket will work with either, the pieces that position the idler pulley are meant for the later configuration – they orient the idler pulley parallel with the outer groove. If you have an early configuration, there are two solutions:
1) Use the bracket but don’t use the idler pulley. Again, the bracket is correct. Instead, use the adjusting strips that came with the original York bracket. This is what I did. If you’re doing a from-scratch install and you don’t have the adjusting strips, buy or make some. The part number is 64518745208. They show up as “AC Tensioner,” listed as available, price $1.54.
2) Modify the idler mounting setup to put the idler pulley parallel with the inner groove. I have not tried to do this.
So… if you find an 0151A kit, or an 1841A kit, grab it. It’s the solution everyone used to use until they went NLA. But getting lucky isn’t a solution most of us can rely on. So now we get into the complex topic of:
Using Another Standard BMW Compressor Bracket
If you’re comfortable with using a late wing-cell compressor (four round ears) and the late bracket, it solves a multitude of problems. Everything’s available both new and used, and the compressor and bracket are designed to work together. But for cost reasons, many folks want to use a Sanden, can’t find the Air Products bracket, and wonder if they can use an OEM bracket. This was maddeningly confusing, but I think I’ve gotten to the bottom of it.
Others have pointed out (http://forums.bimmerforums.com/forum/showthread.php?1521628-Sanden-compressor-help!!!!) that there appear to be at least three different compressor brackets used on M30 engines:
--The large swashplate compressor used on the E12. As you can see from the pic, this used an external idler wheel as a tensioner.
--The “wing cell” compressor with round ears on the bottom and square ears on the top. In this configuration, the top-mounted slotted bracket provides the tensioner mechanism.
--The “wing cell” compressor with four round ears. In this configuration, the bottom-mounted piece with the toothed nut provides the tensioner mechanism. Nifty.
Below is a pic from Sven showing this latter bracket and tensioner installed on his engine.
Below is a pic from Sven showing the wing-cell compressor on the bracket and tensioner.
Let’s hone in on this late bracket for a moment. Realoem lists the part -- #1 in the above diagram – as 64521284953, used on the E23, E24, E28, E32, and E34. Getbmwparts.com lists the price of the part as $93, but it comes up for sale on eBay for between $20 and $50. It is sometimes listed on eBay as an M3 bracket, but this does not jive with realoem.
Note that, in many ways, the whole “which modern compressor do I use in my E9” issue is easier if you don’t use a Sanden and instead use the late wing-cell compressor with four rounded ears and this bracket. This is, in fact, what CoupeKing shows on his web site (http://www.coupeking.com/?post_type=parts&p=5110 ). I place no value judgment on this one way or another. However, new wing-cell compressors list at something like eight hundred bucks. Rebuilt compressors are cheap, but they appear to be like rebuilt alternators, which is to say you may be getting something that’s truly been rebuilt, or may be getting something with little more than a fresh coat of silver paint. In contrast, new Chinese-made Sanden compressors (or Sanden copies) are inexpensive ($120-$150), and appear to have a a good reputation. The a/c retrofit/rejuvenation process is lengthy and expensive enough that many folks want to start with a new compressor, and Sandens fit the bill at a good price point. But by all means, if you’re comfortable with a pick-and-pull wing cell and its bracket, go that route and stop reading right now.
So… can you use the wing cell bracket with a Sanden?
The short answer is "I tried as an academic exercise, but had the Air Products bracket anyway so I abandoned the exercise."
The site BigCoupe.com has many posts saying “yes, you can – you just need to fabricate some mounting ears,” but I could not find a single photo. So, determined to take one for the team, I ordered bracket part number 64521284953 to find out for myself. I found one on eBay, $30 shipped. Just the #1 piece that bolts to the block, not the gold tensioner on the bottom.
And… it’s not a great solution.
Here’s the issue. In Sven’s first pic of the bracket only, it is obvious that the two mounting bosses are different widths – the top one is much narrower than the bottom. The inside ear-to-ear spacing on the Sanden is 3.28”, but the inside ear-to-ear spacing on the top of the wing-cell compressor where the ears straddle the bracket is 2 1/16”. So you know in advance that a Sanden compressor is not going to bolt up to the bracket in exactly the same way as the wing cell.
BUT… as luck would have it, the ear-to-ear spacing on the wing cell at the bottom, where the bracket bolts to the tensioner, is 3.25”. BMW guru Ben Thongsai confirms this, saying "It's the lower mounting point [on the wing-cell compressor] that is this [3.25"] width, though -- the upper one in a bit narrower at right around 2". Looking at a Sanden M30 bracket, it mounts off of the top ears and tensions off of the lower ones. I think you would have to reverse that with the BMW bracket. But it looks like it should work with minimal fabrication."”
Well, it’s more complicated than that. The Sanden ear-to-ear spacing, as I keep saying, is 3.28”. The width across the top boss is much narrower – 2.05”. And the bottom boss of the bracket is slightly wider – 3.30. So it doesn’t fit, as per the pic below.
So I sanded it and took a little off so it fit between the compressor’s ears. I bolted it up to the block:
And then tried to hang the compressor off it. And it doesn’t work, because the compressor hits the sway bar, and because the angle of the bracket is such that you can’t get the hole in the bracket to line up with the holes in the ears.
This means you need to use the upper boss on the bracket the pivot point, not the lower one, as Ben surmised. So I hung the compressor off the upper boss by passing a long bolt through the short boss and the ears. But those ears are 3.28” apart, and the boss is only 2.05”. I can see how, if you wanted, you could use a boatload of washers, or some metal stand-offs, to take up the difference, but that’s a big gap to bridge.
Further, the holes in the compressor ears are larger than the holes through the bosses – that is, the compressor is meant to take a larger pivot bolt. If you use the smaller bolt necessary to pass it through the bosses, it’s going to have a fair amount of wobble through the compressor ears, which is going to make it easy for the compressor to be slightly skewed relative to the pulley.
Speaking of the pulley, you need to line up the grooves in both pulleys. I visually lined up the front groove in the compressor with the groove in the crankshaft pulley, and determined that, with washers, alignment didn’t seem to be an issue. But this was on an early engine. I didn’t test it with the later pulley configuration.
But…even if you hung it nice and tight and true, and lined it up with the crankshaft pulley groove, you’d have the challenge of how to connect the adjusting strips. Recall that the Air Products bracket is designed so the back of the bracket is flush with the back of the compressor ears, so one adjustment strip bolts to the back of both, and the front of the bracket is about 0.235” in front of the ears, so an adjustment strip fits precisely between them. Since the width of the bosses at the top and bottom of the wing-cell bracket don’t place the strips cleanly in front or behind the compressor ears, fabricating / using strips is less trivial than it is with the Air Products bracket.
For all these reasons, I abandoned the project, installed the Air Products bracket I'd already bought, and see why CoupeKing recommends the wing-cell compressor/bracket as a pair. I have to say, if I had to do it again, I'd seriously consider this path.
That's it. I do have a life you know.
Last edited: