Tach has fallen away from the instrument cluster

coupelady

Well-Known Member
Messages
215
Reaction score
34
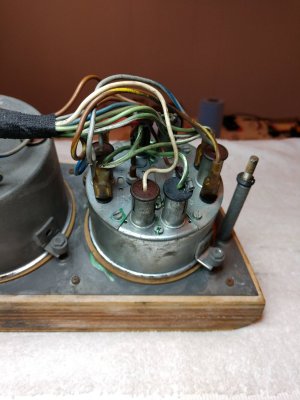
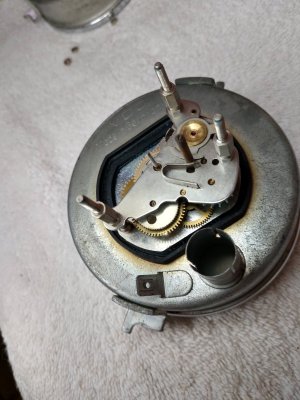
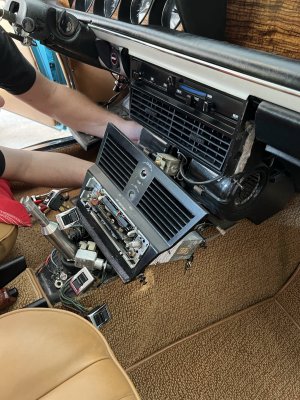
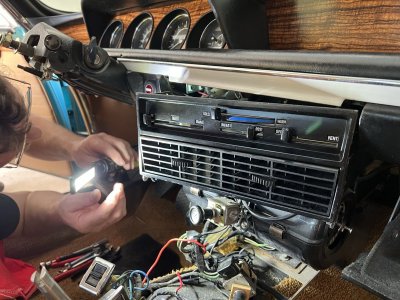
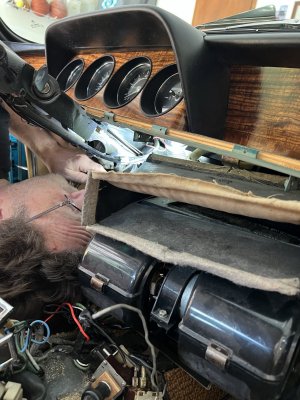
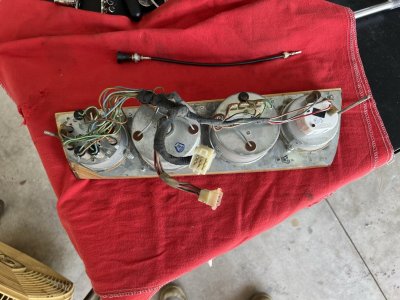
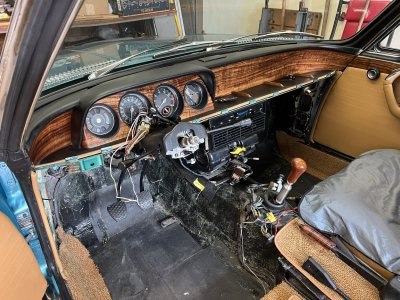
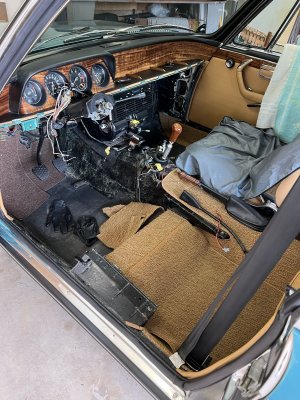
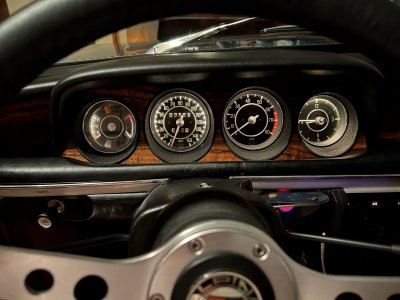
Luckily it is caught up in what is behind it but it definitely looks terrible and not secure. My trusted technician worked with it awhile being careful not to force any of the old materials. He says that there were 2 rods that hold it to the bezel, they are too long for him to insert back without taking out the dash. Yup we halted right there, really will avoid taking out the dash of course. Love to hear how to rectify this problem from those of you who might have had this situation. The tach still works just not in place. Amy
 

HB Chris

Well-Known Member
Site Donor $$
Messages
19,418
Reaction score
8,759
Location
Huntington Beach, CA
It is held to the two bolts/rods by small metal thumb screw nuts. When installing you tighten the nuts on the rods so they will almost prevent the tach from rotating before inserting the tach, then you twist it under the two nuts, then tighten them. The tach has two short fingers which slip under the nuts which you never remove.
 

Thomas76

Well-Known Member
Site Donor $
Messages
1,249
Reaction score
704
Location
Michigan, USA
This isn't the tach, but all gauges mount the same way. Pay attention to metal ears in pics, they are what fits under the nuts. Slide in place, then rotate gauge. Tough to do in car but not impossible
 

Attachments

  • IMG_20220319_164017046.jpg
    IMG_20220319_164017046.jpg
    211.5 KB · Views: 107
  • IMG_20220226_103710645_HDR.jpg
    IMG_20220226_103710645_HDR.jpg
    247.7 KB · Views: 113

coupelady

Well-Known Member
Messages
215
Reaction score
34
It does appear that they are long rods. Not sure why they would have let go now 30 years after the restoration. Thank you for the picture, that surely does help.
 

HB Chris

Well-Known Member
Site Donor $$
Messages
19,418
Reaction score
8,759
Location
Huntington Beach, CA
See the two small L shaped brackets, that is what the small nuts attach too. The long rods hold the cluster to the dash.
 

Ohmess

I wanna DRIVE!
Site Donor $
Messages
4,892
Reaction score
2,714
Location
Aiken, SC
Amy - The technician needs to remove the lower dash cover and work up through the space to the right of the steering wheel.

As Chris notes, you need to adjust the knurled nuts that hold the little ears so that they are just tight enough to hold the ears, insert the gauge, and then tighten the nuts. Alas, I was never able to reach the upper nut with the tach in place, so I adjusted both nuts through the tach opening with very little play in the top nut, and with the lower nut a little looser. I then tightened up the lower nut once the tach was in place.
 

mulberryworks

Mr. Fixity
Site Donor
Messages
1,245
Reaction score
614
Location
Jacksonville FL
I haven't gotten behind my dash yet, but I'm reminded that small hands can fit such cramped places better than full-sized male hands. I don't know if Amy feels like having a go herself or has a young family member who could more easily reach the nuts. Just a suggestion.
 

Gransin

Well-Known Member
Site Donor
Messages
1,529
Reaction score
1,273
Location
Vasa, Finland
I removed the driver seat last time I had to remove/install a gauge, add some blankets to the floor, lay on your back with your feet on the backseat, and it's actually quite comfortable to play around with the gauges. Having another set of hands helping with the gauge fitment from the top side makes it even easier since you don't have to crawl up and down so much.
 

Ohmess

I wanna DRIVE!
Site Donor $
Messages
4,892
Reaction score
2,714
Location
Aiken, SC
I removed the driver seat last time I had to remove/install a gauge, add some blankets to the floor, lay on your back with your feet on the backseat, and it's actually quite comfortable to play around with the gauges. Having another set of hands helping with the gauge fitment from the top side makes it even easier since you don't have to crawl up and down so much.
Yes, you may well need to be face up on the floor to do this installation. With the seat in place, you are working with your lower body outside the car and the frame rail pressing into your back. Removing the seat puts your lower body in the car, and is much more comfortable.
 

Drew Gregg

Well-Known Member
Site Donor
Messages
1,574
Reaction score
1,210
Location
Ft. Lauderdale
Amy--You showed me your fallen tach last May at the Vintage. I had my clock take a voltage surge last November at Hilton Head LOTA. My tech has extensive experience in assembling almost all parts of the E9. In order to remove the clock (right next to the tach),he said the instrument cluster needed to be removed. And there were fasteners in the center console that had to be removed first. Because of other things I wanted to R&R, the center console,steering wheel, and the driver's seat were removed. The previous posts by very experienced owners are valuable in fixing your fallen tach. But your tech needs to find out why it caved in before securing it back on the posts. Here are pics of my project and the back of the instrument cluster so you can see how all of the gauges are connected. I also recommend that you change the 2-watt bulbs lighting all of the large gauges to 4-watt bulbs. The new look is shown in a photo.
 

Attachments

  • IMG_1382.jpg
    IMG_1382.jpg
    453.4 KB · Views: 96
  • IMG_1384.jpg
    IMG_1384.jpg
    388.1 KB · Views: 101
  • IMG_1386.jpg
    IMG_1386.jpg
    344.8 KB · Views: 90
  • IMG_1387.jpg
    IMG_1387.jpg
    332.2 KB · Views: 95
  • IMG_1389.jpg
    IMG_1389.jpg
    342.7 KB · Views: 95
  • IMG_1629.jpg
    IMG_1629.jpg
    498.9 KB · Views: 93
  • IMG_1685.jpg
    IMG_1685.jpg
    530.4 KB · Views: 100
  • IMG_1809.jpg
    IMG_1809.jpg
    226.4 KB · Views: 98

Bmachine

Well-Known Member
Site Donor $
Site Donor $$
Messages
3,534
Reaction score
1,792
Location
Northern California coast
But your tech needs to find out why it caved in before securing it back on the posts.
These gauges are only held in place by the pressure from these knurled knobs. It is fairly easy to imagine that after 30 years of vibrations these knobs (which may not have been tightened enough last time) may have come slightly loose and it only takes 2 or 3° of rotation for the whole gauge to come loose.
 

jmackro

Well-Known Member
Messages
2,463
Reaction score
728
Location
San Juan Capistrano, Ca.
When I changed my clock, I removed the tach and worked through the tach hole to install the clock. The tach can be installed without removing the dash.
Yup, that's what I was going to suggest. The two knurled nuts for the fuel/temp gauge are easy to get at. So you loosen those two first and pull the gauge out through the hole. Then reach you hand into the fuel/temp gauge hole and do the same thing with the speedometer (yes, you'll need to disconnect the cable and trip meter reset shaft to pull the speedo out). Now you can get at the knurled nuts holding the tach.

Sounds like a lot of work, but believe me, it's WAY easier than removing the dash. Plus, you can work sitting upright on the seat, instead of upside-down beneath the dash.
 

coupelady

Well-Known Member
Messages
215
Reaction score
34
I now feel more confident as I know what it looks like behind the cluster. This forum is such a valuable resource but it would be nothing without the knowledgeable members that care to spend the time to send posts to people they have never met. A big thank you shout out to all of you!
 

coupelady

Well-Known Member
Messages
215
Reaction score
34
Lastly I guess the brain teaser is what screw fit that L shaped bracket? I bet mine is lost, I really don't remember seeing one on the carpet along the years but my memory is very "slippery" these days......
 

autokunst

Well-Known Member
Site Donor $$
Messages
3,610
Reaction score
2,623
Location
Milwaukee, WI
I now feel more confident as I know what it looks like behind the cluster. This forum is such a valuable resource but it would be nothing without the knowledgeable members that care to spend the time to send posts to people they have never met. A big thank you shout out to all of you!
Just an anecdotal story. In May, Amy and I were trailing you on our drive from the Foundation in SC back up to the Clarion in Asheville for The Vintage. Our hope was to meet you, but we couldn't keep up. Couldn't agree more that this community is invaluable!
 

Ohmess

I wanna DRIVE!
Site Donor $
Messages
4,892
Reaction score
2,714
Location
Aiken, SC
Just an anecdotal story. In May, Amy and I were trailing you on our drive from the Foundation in SC back up to the Clarion in Asheville for The Vintage. Our hope was to meet you, but we couldn't keep up. Couldn't agree more that this community is invaluable!
Seeking to catch Amy once she gets rolling is not a good plan. Think ahead and get to her destination before she does.

Amy - the knurled nuts are usually intact on the posts behind the dash. It is unlikely that they would come off given the amount of thread involved. As Bo said, it is far more likely that the tachometer shifted a couple of degrees - just enough to release from under the nuts. If you look closely at the bottom of Thomas76's first picture, you can see the tab underneath the knurled nut on the gas/temp gauge. The portion of the tab you see toward the bottom of the picture is the "finger" Chris references in his post. Each tab has only one finger - the opposite side is open to facilitate removal. If the gauge shifts toward the finger, it will not come out. If the gauge moves away from the finger far enough, it will fall out. This is likely what happened to your gauge.
 

coupelady

Well-Known Member
Messages
215
Reaction score
34
Amy--You showed me your fallen tach last May at the Vintage. I had my clock take a voltage surge last November at Hilton Head LOTA. My tech has extensive experience in assembling almost all parts of the E9. In order to remove the clock (right next to the tach),he said the instrument cluster needed to be removed. And there were fasteners in the center console that had to be removed first. Because of other things I wanted to R&R, the center console,steering wheel, and the driver's seat were removed. The previous posts by very experienced owners are valuable in fixing your fallen tach. But your tech needs to find out why it caved in before securing it back on the posts. Here are pics of my project and the back of the instrument cluster so you can see how all of the gauges are connected. I also recommend that you change the 2-watt bulbs lighting all of the large gauges to 4-watt bulbs. The new look is shown in a photo.
 
Top