As we mentioned in our recent post,
 e9coupe.com
about certain window weatherstripping being no longer available, we decided to take a stab at recovering and in the case of the rear windows, making them from scratch.
First locating suitable material. The front and rear inner and outer fuzzy portion of the weatherstripping basically consists of a thin black material that looks somewhat perforated with a fuzzy strip attached. We found what seems to be suitable material Hobby Lobby and Amazon.
The black material from Hobby Lobby is cheap

The fuzzy strip from amazon also cheap

First we did the easier one, the front window outer one.
51211816761 Brush
Believe this is the part number
Here is the piece after we stripped away the old covering.

So cut a strip of the black material and glue it onto the cleaned metal sub-straight.

We use a vinyl cement

trim the material to be pasted inside so it just fits in the leg. Use a putty scraper to work the material inside before glue sets.

After glue dries trim around the cutouts and then apply the fuzzy strip, The fuzzy strip comes with a very strong stick-on adhesive after peeling off the paper backing. Get it lined up as one it is pushed on it really sticks. We suppose time will tell how it weathers and if it can withstand the window sliding against it. A lot will depend on making sure the window is subsequently aligned properly.

Finished items. In like manner the inner fuzzy weatherstripping could be recovered in the same way.

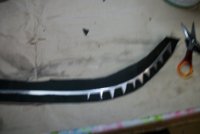
The rear window fuzzy strips are completely made as new.
Again reference our prior (above) post about the rear window part numbers. It appears the curved sub-straight is the same for both the inner and outer strips. It just depends on which side peel and stick fuzzy strip will be applied. We took the best of the removed strips and used as a pattern. (could recover it, but ours were a bit rusted). The sub-straight is approximately .020" thick. We had some pieces of galvanized AC house ducting material laying around and it is about the same thickness. One could go to local Home AC installation companies and they would probably give you excess cutoffs. Using the old sub-straight new pieces were cut with tin snips, a bit wider than needed. Then they were trimmed on a bench belt sander to get them to match the original as close as possible. Suppose thin Aluminum could be use but don't want it to be too flexible.

Then its just a matter of gluing the black material on the piece and peel and sticking the fuzzy strip.

The fuzzy strip will have to be snipped about 1/3 or so of the way through in places to allow it to bend to fit the curve.

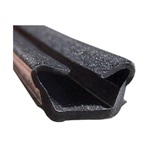
Final product that will fit into the still available outside rubber squeegee strip. The pieces fit into a similar guide on the inside. Of course holes have to be punched to fit onto the metal holders.

As mentioned, we have no assurance of how long the fuzzy strip adhesive will stay on. Looks like the originals were all molded together. But it sure seems like the adhesive is quite strong.
We acknowledge others have used alternative materials with success to help us keep our classics on the road.
Dimensionally the rear ones we made are very close in thickness to the originals. But before fitting we will take a close look at whether they might need to be shimmed on the back side to ensure the fuzzy just touches the window.
Thanks
jjs2800cs
Part number interchangeability for inner and outer rear window felt strips (fuzzy piece)
RealOem shows the inner felt fuzzy strips available for 146.20 each https://www.realoem.com/bmw/enUS/showparts?id=3432-EUR---E9-BMW-3.0CS&diagId=51_3452 51367740135 left 51367740136 right Maximillian does not show them available as I called and are waiting on more research by them...
about certain window weatherstripping being no longer available, we decided to take a stab at recovering and in the case of the rear windows, making them from scratch.
First locating suitable material. The front and rear inner and outer fuzzy portion of the weatherstripping basically consists of a thin black material that looks somewhat perforated with a fuzzy strip attached. We found what seems to be suitable material Hobby Lobby and Amazon.
The black material from Hobby Lobby is cheap
The fuzzy strip from amazon also cheap
First we did the easier one, the front window outer one.
51211816761 Brush
Believe this is the part number
Here is the piece after we stripped away the old covering.
So cut a strip of the black material and glue it onto the cleaned metal sub-straight.
We use a vinyl cement
trim the material to be pasted inside so it just fits in the leg. Use a putty scraper to work the material inside before glue sets.
After glue dries trim around the cutouts and then apply the fuzzy strip, The fuzzy strip comes with a very strong stick-on adhesive after peeling off the paper backing. Get it lined up as one it is pushed on it really sticks. We suppose time will tell how it weathers and if it can withstand the window sliding against it. A lot will depend on making sure the window is subsequently aligned properly.
Finished items. In like manner the inner fuzzy weatherstripping could be recovered in the same way.
The rear window fuzzy strips are completely made as new.
Again reference our prior (above) post about the rear window part numbers. It appears the curved sub-straight is the same for both the inner and outer strips. It just depends on which side peel and stick fuzzy strip will be applied. We took the best of the removed strips and used as a pattern. (could recover it, but ours were a bit rusted). The sub-straight is approximately .020" thick. We had some pieces of galvanized AC house ducting material laying around and it is about the same thickness. One could go to local Home AC installation companies and they would probably give you excess cutoffs. Using the old sub-straight new pieces were cut with tin snips, a bit wider than needed. Then they were trimmed on a bench belt sander to get them to match the original as close as possible. Suppose thin Aluminum could be use but don't want it to be too flexible.
Then its just a matter of gluing the black material on the piece and peel and sticking the fuzzy strip.
The fuzzy strip will have to be snipped about 1/3 or so of the way through in places to allow it to bend to fit the curve.
Final product that will fit into the still available outside rubber squeegee strip. The pieces fit into a similar guide on the inside. Of course holes have to be punched to fit onto the metal holders.
As mentioned, we have no assurance of how long the fuzzy strip adhesive will stay on. Looks like the originals were all molded together. But it sure seems like the adhesive is quite strong.
We acknowledge others have used alternative materials with success to help us keep our classics on the road.
Dimensionally the rear ones we made are very close in thickness to the originals. But before fitting we will take a close look at whether they might need to be shimmed on the back side to ensure the fuzzy just touches the window.
Thanks
jjs2800cs
")