LAN my renewed engine M30B30 Running in process

deQuincey

Quousque tandem...?
Site Donor
Messages
8,451
Reaction score
2,469
Location
BIO - 43°15'46.5"N 2°56'03.7"W
Howdy.
This is the kind of things that i do best, providing useful hands-on documentation for people that love the emotion to have dirty hands and white smiles in their faces while taking care of their e9 coupes or e3 sedans

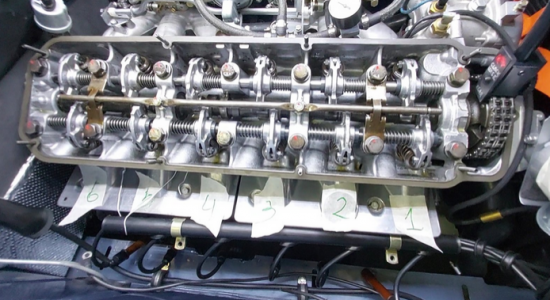
I take the information comming from the blue books, and bring my own experience to this, as always with some pics to clarify the evolution. Because as i said 14 years ago i think that wen you see that someone has done it you feel that you can do it too.
 
Last edited:

deQuincey

Quousque tandem...?
Site Donor
Messages
8,451
Reaction score
2,469
Location
BIO - 43°15'46.5"N 2°56'03.7"W
engine was completely redone and completed in March 2023.

while being on the engine stand i took advantage and made a valve gap adjustment

34114400-FAF5-48AC-AB83-2E884791474D.jpeg
88CFD88F-4C8B-4C14-AEE9-4DB6515B67F9.jpeg
00546608-D144-41A9-BFFB-6C4C78AFBBDF.jpeg
 
Last edited:

deQuincey

Quousque tandem...?
Site Donor
Messages
8,451
Reaction score
2,469
Location
BIO - 43°15'46.5"N 2°56'03.7"W
set static ingintion timing by means of a probe light

place 1st cyl in OT and check the front mark in the wheel balancer,


1697482796161.png


connect ignition, rotate the dizzy anti clockwise, and now slowly rotate the dizzy clockwise until light is on,

5B38D290-E622-4AAE-B999-13B2C2B74EB0.jpeg


and gave life with a first start


then dynamic ignition setting with an strobo light to find the ball in window


EEBD8ED0-11BB-42A8-81C3-1483708E951D.jpeg


and here it is the way I do it, an stroboscopic light is needed


finally the carburetor tuning and synchro is required,…in this case a gas tester for CO% is needed


.
 
Last edited:

deQuincey

Quousque tandem...?
Site Donor
Messages
8,451
Reaction score
2,469
Location
BIO - 43°15'46.5"N 2°56'03.7"W
we have covered 1000km following the running in procedures as found in the running in decal

C412767E-D818-467C-ABBE-3DD46D6429E6.jpeg
52639659-4406-41A0-8BC8-B463E68ACCEC.jpeg


time has come for a Head Bolts Retorque


i have used an old school head gasket from Goetze so retorque is the right thing to do now

1697482734923.png


1705662214601.png
 
Last edited:

deQuincey

Quousque tandem...?
Site Donor
Messages
8,451
Reaction score
2,469
Location
BIO - 43°15'46.5"N 2°56'03.7"W
prepared some documentation for my own check and control of the process;

i plan to do a complete procedure:

- retorque head bolts
- valve gap adjustment
- ignition dynamic
- carbs synchro

i will share my own instructions
 
Last edited:

deQuincey

Quousque tandem...?
Site Donor
Messages
8,451
Reaction score
2,469
Location
BIO - 43°15'46.5"N 2°56'03.7"W
the process:

FIRST PART: HEAD BOLTS RETORQUE


1697544084366.png


so first thing is to go for a drive to warm up the engine,

then you have to prepare everything and wait for it to cool down until 35 cels

B657895C-FDE5-4C0B-8D08-3900D9303D4B.jpeg


I left these red marks when I prepared the engine that was the three stages torque

EB412436-FB0C-4B82-AC48-19A77230B914.jpeg


now I add blue marks to remember starting position point for each bolt

388F2E9A-17A5-484F-8CF5-10141E1489D6.jpeg


check temperature

1AE0A9E7-09B1-43DE-8571-C63E63857A45.jpeg


ready…

8F03F72F-22F2-4095-A4B7-A2B3B26167B8.jpeg


Now it is time to proceed with bolts retorque.
 
Last edited:

deQuincey

Quousque tandem...?
Site Donor
Messages
8,451
Reaction score
2,469
Location
BIO - 43°15'46.5"N 2°56'03.7"W
the sequence for the bolts is in the manual


1697544116339.png


I prepare the torque wrench with 70 N.m

3CDBDD19-4E7D-4F54-BFF9-982649AB0BD6.jpeg


the process must first set the bolt in a certain condition, as torque should be dynamic, not static, I mean if you apply torque to a bolt that is static you are getting a wrong result as bolt is stuck (fixed) in its position, you need to loosen that bolt only 1/8 of a turn in order to be able to apply proper torque

here it is the whole process…


the video ends checking the before and after position of the bolts in terms of turn angle, to my best understanding bolts number 10 (front) and 11 and 12 (rearmost position on the head) needed and additional 10º, rest of the bolts came to the same position.

here it is the proof:

bolt 10 = 10deg
1698082940780.png


bolt 11 = 10 deg

1698083035552.png


bolt 12 = 10 deg
1698083128342.png


with this operation head bolts are ok until next normal maintenance period.
 
Last edited:

deQuincey

Quousque tandem...?
Site Donor
Messages
8,451
Reaction score
2,469
Location
BIO - 43°15'46.5"N 2°56'03.7"W
and so we are in there now...

1698925857848.png


open the box, and find the things that were supposedly to be there, what is good...

1698925879447.png


using the tool to rotate the camshaft to place the cylinders at their TDC one at a time (thanks to @halboyles )

1698925906399.png


the tools...

1698925944091.png


and the plan, ...finally i decided to change the gauge from 0,20mm to 0,25mm (placed at the camshaft lobe / against the rocker pad)

1698925964361.png


engine must be rotated clockwise (looking at it from the front)

1698925993124.png


the 0,25mm gauge

1698926014019.png


and the process: slacken the nut...

1698926031660.png


place the gauge

1698926047919.png


put everything in contact by means of the bent tool

1698926063956.png


tightening the nut while keeping the pressure

1698926083971.png


finally applying 10N.m torque to the nut, using the right wrench

1698926107754.png


and final check of the gap at the valve this time, such as 0,25 pass freely, and 0,30 can´t
check all the cylinders both valves.


1698926134553.png

..
 

Attachments

  • 1698925926092.png
    1698925926092.png
    526.6 KB · Views: 39
Last edited:
Top