Inspiration Photographs

Patton

Well-Known Member
Site Donor $
Messages
757
Reaction score
646
Location
Atlanta GA
After looking at some of the photographs from a vehicle that was for sale at bring a trailer, I can only tell you that the impression from those pictures was not so good.

Let’s not dwell on that one.

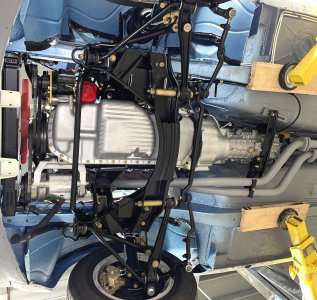
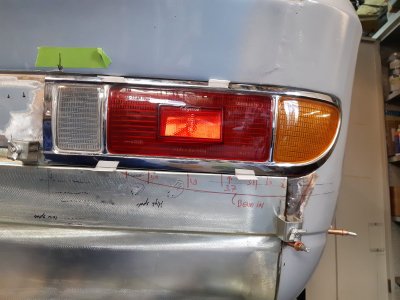
There have been some fantastic photographs from the audience of workmanship you’ve done. I call it inspiration.

Let’s have a little bit of fun and show off your E9 with a picture that will inspire others.

Let me see if I can find one. Thanks to all, RP.
 

Patton

Well-Known Member
Site Donor $
Messages
757
Reaction score
646
Location
Atlanta GA
IMG_0399.jpeg

3 inch oval pipe goes into 3 inch round pipe to a magna flow exhaust.

I can’t take credit for the work, Tommy at Blue Maxx is an artist with his welding and stainless steel.
 

JMinPDX

Well-Known Member
Site Donor
Site Donor $
Messages
1,269
Reaction score
1,311
Location
Portland OR
Nice work!
As someone once said:
“It ain’t bragging if you can do it”.
 

eriknetherlands

Moderator
Site Donor
Messages
2,775
Reaction score
2,008
Location
Netherlands, Eindhoven area
Hope this one inspires: I chopped out a rusted rear valance; rust inside the seams to the floor, rust at the bumper holes, rust on the side edges where flange-pinch welded to the side QP's. Then refitting the tail light lenses and making sure the gap and flushness is better then when it left the factory.

Nasty looked like this under 10 mm (1/3rd inch) of bondo:
20190528_105602.jpg
20190528_105452.jpg


20210129_153349.jpg
20210305_224009.jpg

first fit, showing original gap to rear quarter panel. Then fill with lead and shave to correct depth (flushness):
20210417_114210.jpg
20210409_100349.jpg

And fill and shave for a consistent correct gap; i choose 2mm (0.08 inch):

20210410_172345.jpg

et voila:

20210410_172249.jpg


Took me around 200 hours over 3 months - I never did it such serious welding & lead filling before...
(let me know if you have some improvement suggestions!)
 

Attachments

  • 20210221_102142.jpg
    20210221_102142.jpg
    325.7 KB · Views: 73
Last edited:

paul cain

Well-Known Member
Site Donor $$
Messages
681
Reaction score
1,341
Location
Orange County
Hope this one inspires: I chopped out a rusted rear valance; rust inside the seams to the floor, rust at the bumper holes, rust on the side edges where flange-pinch welded to the side QP's. Then refitting the tail light lenses and making sure the gap and flushness is better then when it left the factory.

Nasty looked like this under 10 mm (1/3rd inch) of bondo:
View attachment 180413 View attachment 180412

View attachment 180399 View attachment 180401
first fit, showing original gap to rear quarter panel. Then fill with lead and shave to correct depth (flushness):
View attachment 180402 View attachment 180403
And fill and shave for a consistent correct gap; i choose 2mm (0.08 inch):

View attachment 180405
et voila:

View attachment 180404

Took me around 200 hours over 3 months - I never did it such serious welding & lead filling before...
(let me know if you have some improvement suggestions!)
Extremely impressive effort. Few understand that so much of the quality on a beautiful paint job is done at this metal stage. This is a vivid example where few will appreciate the tight gap to the edge of the taillamp frame. Most shops would achieve this gap with more bondo. When it is finished, to the masses, it just overall looks like quality but they couldn't tell you why.

Note also the tight gap from the rear valence to the rear fender (Low center of photo). Its perfect.

Also notice right edge of photo where Erik is similarly torturing himself with future bumper fit. Especially when you return the first two images Erik posted.

Belissima!
 

Breiti

Well-Known Member
Messages
167
Reaction score
187
Location
Mainz Germany
Ok,
got one here.
What do you think first?
......

Breiti
 

Attachments

  • 0020240330_110529 (002).jpg
    0020240330_110529 (002).jpg
    190.4 KB · Views: 52

Patton

Well-Known Member
Site Donor $
Messages
757
Reaction score
646
Location
Atlanta GA
IMG_0446.jpeg

All holes for side trim were welded. I thought it would look good without the trim.

It doesn’t/didn’t.

Trim was added back with 3M double stick tape.The tape really helps with alignment.After 2 years the tape hasn’t lifted, good stuff.
 

otter74

Well-Known Member
Messages
100
Reaction score
30
Location
Chicago, IL
Hope this one inspires: I chopped out a rusted rear valance; rust inside the seams to the floor, rust at the bumper holes, rust on the side edges where flange-pinch welded to the side QP's. Then refitting the tail light lenses and making sure the gap and flushness is better then when it left the factory.

Nasty looked like this under 10 mm (1/3rd inch) of bondo:
View attachment 180413 View attachment 180412

View attachment 180399 View attachment 180401
first fit, showing original gap to rear quarter panel. Then fill with lead and shave to correct depth (flushness):
View attachment 180402 View attachment 180403
And fill and shave for a consistent correct gap; i choose 2mm (0.08 inch):

View attachment 180405
et voila:

View attachment 180404

Took me around 200 hours over 3 months - I never did it such serious welding & lead filling before...
(let me know if you have some improvement suggestions!)
Man, that is some nice work!
 
Top