Engine rebuild and engine bay resto thread - 2240284 '72 CS

Stevehose

Well-Known Member
Site Donor $$
Messages
13,034
Reaction score
5,726
Location
Sarasota, FL
We need new a/c stickers like yours, none of the repops say 2.2 LBS. if you had your manifolds and valve cover vapor honed (it looks like they were sand blasted) you would be amazed at nice they will look. They will be a bit bright but just shoot matte clear ceramic on them.
Good idea on the vapor hone, but like @bluecoupe30! mentions, the skilled shops/servoces are getting hard to find here, I have been unable to find a vapor honer in the area, and so far I am reluctant to box and ship more parts. You Californians have it good, here in FL, vapor honing means driving fast in the rain!
 

sfdon

Well-Known Member
Site Donor
Site Donor $$
Messages
8,303
Reaction score
4,666
Location
sfbay area
Never ever media blast a valve cover without first removing the baffle plate.

1690735133213.jpeg
 

Stevehose

Well-Known Member
Site Donor $$
Messages
13,034
Reaction score
5,726
Location
Sarasota, FL
Today the engine bay paint prep went another 6 hours of scraping and sweating. The hood was in the way of my relentless mission creep so off it went (I drilled alignment holes in the hinges) and I will likely clean up inside the front clip as best as possible and either paint or silver por-15 it:

IMG_3777.jpg


Keen eyes will notice I decided to remove the tar insulation to see what lurks below, I am able to remove the original decals so I will save those and put them back on a new set from CS Werk.

IMG_3782.jpg


Happily, my fenders look pretty darn good for 51 untouched years. The previous 3 owners never daily drove the car or in foul weather (according to them), and when I bought the car I cavity waxed the bejesus out of it. I scraped off the residual tar and cavity wax and will finish getting it off and cleaning more tomorrow and will re-wax the seams before priming. The folded seams of the E9 fender design is ridicuous, no wonder this can be a horror show underneath:

IMG_3756.JPG


Next up will be to finish sanding, rust convert any bare metal, then prime. A quick forensic glance indicates these cars were primed, then the tar insulation installed, then on went the paint. Pistons are due in any day now for the awaiting machinist and more parts arrive daily. My go-to suppliers have been Belmetric, FCP Euro, Autohaus AZ, Walloth, and eBay.

Slow but very satisfying progress, the more I get into this the more I realize how much it's needed.
 
Last edited:

Frederick

Well-Known Member
Site Donor $$
Messages
374
Reaction score
287
Location
Park City,UT
I have to say, doing the engine bay was the worst. Wear gloves, lots of nicked fingers and knuckles. Oh so many tight little places and it never seems to be just right . Always some little crevice left to sand. But, the reward is great.
People have made a big deal of the tar installation, but it comes off easily enough with the scraper and heat gun, better yet, a map gas cylinder torch. A little tar vapor never hurt anyone and that’s all it is.
And, of course, you’ve gotta get all those little fiddly bits to the zinc guy.
I don’t know about the coops, but removing the hood makes everything a lot easier. Mine went back on fairly easily on a trial run.
I plan on installing the engine from the bottom, attaching it to the sub frame and jacking it in. Dropping the sub frame is fairly easy. If you’ve got the time, the E3 has 4 bolts attaching it to the frame and of course you’ve got the shocks. I’ve done the shoe horn approach, and it ain’t easy with the tranny attached. And attaching the tranny after you’ve got the motor in is even less fun.
I’m sure you’ll do just fine. Fun with cars.
 

Stevehose

Well-Known Member
Site Donor $$
Messages
13,034
Reaction score
5,726
Location
Sarasota, FL
Dropping the sub frame is fairly easy.
That's a looming mission creep. But I will have to put it back in in order to wheel the car out into the driveway to get the engine in. Yes, with the hood off I will be able to mount the clutch on the engine stand which is better than doing it on my back with it 4 inches from my face, among other benefits.
 
Last edited:

deQuincey

Quousque tandem...?
Site Donor
Messages
8,442
Reaction score
2,462
Location
BIO - 43°15'46.5"N 2°56'03.7"W
Today the engine bay paint prep went another 6 hours of scraping and sweating. The hood was in the way of my relentless mission creep so off it went (I drilled alignment holes in the hinges) and I will likely clean up inside the front clip as best as possible and either paint or silver por-15 it:

View attachment 166546

Keen eyes will notice I decided to remove the tar insulation to see what lurks below, I am able to remove the original decals so I will save those and put them back on a new set from CS Werk.

View attachment 166548

Happily, my fenders look pretty darn good for 51 untouched years. The previous 3 owners never daily drove the car or in foul weather (according to them), and when I bought the car I cavity waxed the bejesus out of it. I scraped off the residual tar and cavity wax and will finish getting it off and cleaning more tomorrow and will re-wax the seams before priming. The folded seams of the E9 fender design is ridicuous, no wonder this can be a horror show underneath:

View attachment 166547

Next up will be to finish sanding, rust convert any bare metal, then prime. A quick forensic glance indicates these cars were primed, then the tar insulation installed, then on went the paint. Pistons are due in any day now for the awaiting machinist and more parts arrive daily. My go-to suppliers have been Belmetric, FCP Euro, Autohaus AZ, Walloth, and eBay.

Slow but very satisfying progress, the more I get into this the more I realize how much it's needed.


a practice that you might find useful, Steve

A friend was very concerned and had a lot of doubts as to install or not the sound deadening pieces and then paint or what to do

here it is a possible way

545E3B4E-04F5-4AC6-B996-BA87355DFD31.jpeg


first paint the body


and then separately paint the sound deadeners


finally place the sound deadeners on top

9F2542D8-4275-403E-8445-9D5BC89F33B0.jpeg
 

merdad

Well-Known Member
Site Donor $
Site Donor $$
Messages
482
Reaction score
323
Location
Tehran, Iran
a practice that you might find useful, Steve

A friend was very concerned and had a lot of doubts as to install or not the sound deadening pieces and then paint or what to do

here it is a possible way

View attachment 166558

first paint the body


and then separately paint the sound deadeners


finally place the sound deadeners on top

View attachment 166560
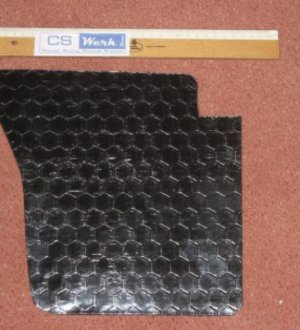
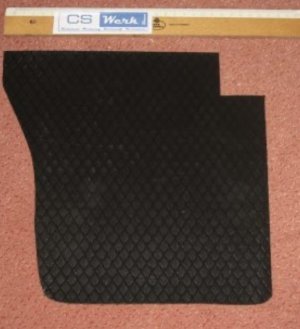
I personally prefer the car without sound deadeners.
 

rsporsche

Moderator
Site Donor $$
Messages
10,702
Reaction score
3,734
Location
Atlanta, GA
Steve, this is looking great! you are really helping an already wonderful coupe become amazing. keep it up. i am with @merdad on the deletion of the sound deadeners. so which firewall insulation are you using? are you making your own, buying from CS Werk or Coupeking? i seem to remember you were going to make your own. as somebody who has seen your coupe multiple times, i am really looking forward to seeing it when this is complete
 

merdad

Well-Known Member
Site Donor $
Site Donor $$
Messages
482
Reaction score
323
Location
Tehran, Iran
Sorry to ask this on Steve’s tread. What is the correct deadening pattern for the e9 years?
 

Attachments

  • IMG_3454.jpeg
    IMG_3454.jpeg
    194.9 KB · Views: 76
  • IMG_3453.jpeg
    IMG_3453.jpeg
    175.4 KB · Views: 63
Last edited:

Stevehose

Well-Known Member
Site Donor $$
Messages
13,034
Reaction score
5,726
Location
Sarasota, FL
Steve, this is looking great! you are really helping an already wonderful coupe become amazing. keep it up. i am with @merdad on the deletion of the sound deadeners. so which firewall insulation are you using? are you making your own, buying from CS Werk or Coupeking? i seem to remember you were going to make your own. as somebody who has seen your coupe multiple times, i am really looking forward to seeing it when this is complete
Sound deadening still TBD, I am leaning towards replacing it, especially since my repaint is not being done at a high end body shop. And I'd like to keep the orginal look. I dunno yet. Thanks for the encouragement, this is a pita.
 

Drew Gregg

Well-Known Member
Site Donor
Messages
1,580
Reaction score
1,213
Location
Ft. Lauderdale
Steve--There is a guy in the Ft.Lauderdale area that is an airplane mechanic that also does vapor blasting. He did my valve cover and then painted it satin black.
 

Drew Gregg

Well-Known Member
Site Donor
Messages
1,580
Reaction score
1,213
Location
Ft. Lauderdale
I can get his contact info. if you're interested -- Vapor Blast Specialties in Pompano. He is also a BMW owner and does nice work.
 

merdad

Well-Known Member
Site Donor $
Site Donor $$
Messages
482
Reaction score
323
Location
Tehran, Iran
I asked Christoph about the sound deadening and his reply:

Hello Mehrdad,
we also thought about it for a long time here in the Coupe Club.
In the case of coupes that have been restored and come from the same year of
construction, different surfaces of the bitumen came to light.
So we think that the bitumen that the supplier was able to run was installed
by BMW...

Rg Chris
 

coupe2800cs

Well-Known Member
Messages
162
Reaction score
15
Location
Oakland California
Update 1 of the project - engine out day:

I removed the tranny, belhousing and flywheel so nothing much left on the block, I took @sfdon 's advice and left the hood on, I figured with the block stripped as it was that it was roomy enough to do so, and it was:

View attachment 161704

View attachment 161705

View attachment 161706


And now on the stand ready for stripping entirely and then off to the machine shop:

View attachment 161707

Special shout out to @jjs2800cs for lending me the picker and engine stand, this is my first time yanking an engine and couldn't have done this without his advice. Onward!!
What engine is this 3.2L ?
 
Top