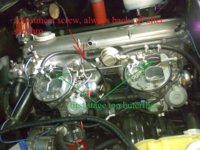
3.0 cs Engine tuning tutorial with videos

Peter Coomaraswamy

Well-Known Member
Site Donor $$
Messages
3,787
Reaction score
896
Location
Austin, TX
"So I guess there are two kind of members watching you, the once with comparable skills not learning anything new hear, and the once with my technical skills, having know idea what is going on and can only dream of once understanding this. Neither are really in a position to write comments.:("

There is another type of member as well, guys like me who think they know what they're doing and are afraid to watch De Q's videos because it will show us how little we actually do know and now we have to go back and do everything again. There Philippe, so now I am in a position to comment :)
 

bluecoupe30!

Well-Known Member
Site Donor
Messages
2,148
Reaction score
1,298
Location
Delta, British Columbia, Canada
These videos are extremely helpful. I have recently been experiencing Weber carb "mysteries" and Stevehose recommended the very synchronometre you use here. I now have one, but really should have 2 to do this tune correctly. Nice to see a master at work! Especially helpful to be able to see/read the dial. Thanks for posting. Mike
 

deQuincey

Quousque tandem...?
Site Donor
Messages
8,418
Reaction score
2,431
Location
BIO - 43°15'46.5"N 2°56'03.7"W
These videos are extremely helpful. I have recently been experiencing Weber carb "mysteries" and Stevehose recommended the very synchronometre you use here. I now have one, but really should have 2 to do this tune correctly. Nice to see a master at work! Especially helpful to be able to see/read the dial. Thanks for posting. Mike
hi Mike you are welcome
it is always good to compare, i look forward to watch videos from others and compare
so that inspired me to make the videos
glad that you liked them
 

jabloomf1230

Well-Known Member
Messages
96
Reaction score
15
Location
Voorheesville, NY
deQ,

Great videos. I do have one question. Where did you get those black adapters that let the "snails" fit so well? I made my own adapters out of two plastic kitchen storage containers (Tupperware circa 1975?) that just happened to be the correct outside diameter. I'm always afraid that my DIY adapters are going to finally split and then I'll have to figure something out else.

J
 

deQuincey

Quousque tandem...?
Site Donor
Messages
8,418
Reaction score
2,431
Location
BIO - 43°15'46.5"N 2°56'03.7"W
deQ,

Great videos. I do have one question. Where did you get those black adapters that let the "snails" fit so well? I made my own adapters out of two plastic kitchen storage containers (Tupperware circa 1975?) that just happened to be the correct outside diameter. I'm always afraid that my DIY adapters are going to finally split and then I'll have to figure something out else.

J

hi J, i recall i bought them from the same source that sells the "snails", they were not expensive, it was some years ago in a shop in the dusseldorf classic remise
but i had been working with those tuppeware containers too, i had to addapt them though as mines were not the exact size but they worked well
 

deQuincey

Quousque tandem...?
Site Donor
Messages
8,418
Reaction score
2,431
Location
BIO - 43°15'46.5"N 2°56'03.7"W
There is another type of member as well, guys like me who think they know what they're doing and are afraid to watch De Q's videos because it will show us how little we actually do know and now we have to go back and do everything again. There Philippe, so now I am in a position to comment :)
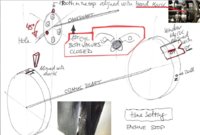
when another e9 is not just a few blocks down the road videos are a great tool to compare engine sound, smoothness, setups, and the sort of things that we do on these cars, your "rusty" video was my inspiration, i am not as good actor as you, though ;-)
 

Stevehose

Well-Known Member
Site Donor $$
Messages
13,003
Reaction score
5,679
Location
Sarasota, FL
I went to Home Depot and made mine out of a rubber 6" pipe reducer with hose clamps and a pvc reducer. The real deal can be found:

http://www.toolspot.nl/midlock-as-001-adapter/

http://www.racetep.com/manufacturer...cal-info/ste-adapters/synchronizing-tool.html

CPmi-vyIijSbitfXkkhuqRJTMwFyZT5i62A9yyK7lsL_w8JsPDO19gLTRK3i1DokZAOgGtrsGqjTCmvEzCCAxR8hjb6muCPExUusbYg8RKGqQVH5BZPhey09vhdNItbqNvkuwl44E-T_FBu8AvqqXw1Eia8H68xWdFdHoUpCYeK9t2OQKH4l_p-SM_YanpJx6rOeu_COxJ0q7hs3CklztmNms46U1KXd_NWj2fn0ZRFTXBuddqNlMxL2-MYRqC1Z6p2i5ALt9lVlLRkLrCDI2KYsgtHSEyhy7slGzkT2GaD1Irs2FYyXF768hJ7pQzlbU4KVH07DtqHSb3f6sy6fTnOJatSDkCyIwCzZe_lHM7OMXByvx5dGeXP5mqccacOUxKqiBrUX7WLbc1PJJ3Pl_cBiSFGpApWZrt7ovljjW15vtJENy8Ys-iRvb02wuayUWJoeqJrY9t8INxberRmaaLrAOBBki0uoFUFOlHYUt3CH_Fh5pgZCIGufDT84-2ONXlghKNI7XPDbK3nJl4-_-wKpxCFc7Rbl66PRFSYrDfJYYwRP2T19Mwf2lKLB5JtPy49nDQZ2yi4ihHYuU_rUiOMwFdgBNEvfFIaXkI-T6vSa0tZC=w1028-h771-no


deQ,

Great videos. I do have one question. Where did you get those black adapters that let the "snails" fit so well? I made my own adapters out of two plastic kitchen storage containers (Tupperware circa 1975?) that just happened to be the correct outside diameter. I'm always afraid that my DIY adapters are going to finally split and then I'll have to figure something out else.

J
 
Last edited:

Honolulu

Well-Known Member
Messages
1,918
Reaction score
226
Location
Honolulu Hawaii
Hello, late to the party, but how do you assess and ensure that:

1. the secondary butterflies are both properly closed at idle?
2. they open at the same time?
3. that your two synchronizers are synchronized to each other? I believe I know the answer but asking anyway for your method.

Question 2 has come up a few times before, but I've never seen a proper response (IIRC).
 

deQuincey

Quousque tandem...?
Site Donor
Messages
8,418
Reaction score
2,431
Location
BIO - 43°15'46.5"N 2°56'03.7"W
Hello, late to the party, but how do you assess and ensure that:

1. the secondary butterflies are both properly closed at idle?
2. they open at the same time?
3. that your two synchronizers are synchronized to each other? I believe I know the answer but asking anyway for your method.

Question 2 has come up a few times before, but I've never seen a proper response (IIRC).


i do not understand your questions fully, i wonder if there is a mistake when you ask for the secondary butterflies and you were referring to the primary ones

1. if your question is about the primary top butterflies, the choke spring makes both butterflies close when in a cold engine you kick the accel pedal, they close completely and stay there until you start the engine and the vacccum makes them open, the regulating screw on the small membrane stablishes the limit for that opening at 3mm
2. then the bimetallic spring on the choke box, by means of hot temp comming from the coolant and from the electric solenoid, forces them to open completely, to do this at the same time you should rely on healthy bimetallic springs and in the same setup for those springs which operation can be regulated by turning the complete choke box towards rich or lean
3. you hire any good wind tunnel facilties and you go through a nice testing campaign using lewis hamilton or other renowned F1 driver to hand hold your flowmeters, ;-) ...if you do not have the time or the money you can swap the flowmeters between front and rear carbs and check for variations

to have the secondary butterflies closed at iddle is a matter of the initial settings when carbs are out from the car including a 0,5mm gap and a preload of 0,3mm (i recall) using a springed bolt to assure there do not get stuck, but those butterflies do not open at iddle during warming operation but they open when acceleration once the big membrane gets enough vaccuum to set them free
 

Stevehose

Well-Known Member
Site Donor $$
Messages
13,003
Reaction score
5,679
Location
Sarasota, FL
1. A simple check is to put the Synchronmeter on the secondary barrel to verify that it is barely pulling any air, if it is then it must be adjusted as DeQ says, it stays open a fraction of a mm to prevent binding. When you floor the pedal when driving you'll know whether they open or not. Vacuum controlled by the round module on the side of the carb, make sure the diaphragm inside is not torn and the linkage isn't binding. There are adjustment specs in the Zenith manuals.
 

deQuincey

Quousque tandem...?
Site Donor
Messages
8,418
Reaction score
2,431
Location
BIO - 43°15'46.5"N 2°56'03.7"W
setting IGNITION TIMING,

1- preparation:

- remove the air cleaner housing,
- disconnect and cap the vacuum advance and retard lines from distributor
- cap the 2 hoses that go from the lower section of the carbs to the air cleaning housing (usually these two hoses are joined together with a "T" and they come in only one hose to the air cleaning housing

the best thing you can do is to prepare yourself a tool like the one you can see seconds 11 to 22 in this video:

2- loose the screw that fix and prevents the distributor rotate
3- start the engine
4- turn in the screw on the connecting linkage between the two carbs to bring RPM´s up to 1700
5- use your stroboscopic gun and set advance timing to zero (set advance to zero in your gun), now aim the light to the window in the rear part of the engine so you can see the flywheel
6- you should see the "ball" aligned with the pointer set in the middle of the window (this will mean that ignition is at 22º BTDC)
7- If you can not see the "ball" aligned you must rotate de distributor until it is done


2201200777330.jpg


8- now fix the distributor screw
9- put things back to the origin:

- backoff the srew on the connecting linkage between the two carbs to bring RPM´s back to 900 (screw end must not touch the base plate)
- reconnect he vacuum advance and retard lines to distributor

and you are done for the next step
 
Last edited:

eriknetherlands

Moderator
Site Donor
Messages
2,768
Reaction score
2,006
Location
Netherlands, Eindhoven area
Hi DeQuincey,

Nice work, for sure much appreciated, although I can't yet put it into practice.
I am storing your descriptions and video's locally to be sure I have them on hand when I come to that point. It also makes sure that when images or video go offline, I still have them.

No bigger frustration then having something disassembled on your workbench, knowing that a DQ tutorial about it is out there, but the pictures are lost in a 'photobucket dilemma' of some sort.

Regards, Erik.
 
Last edited:
Top