4310316 begins

aearch

Well-Known Member
Site Donor $
Messages
4,117
Reaction score
589
Location
pleasant hill , ca
so this is a serious job
i just redid them today
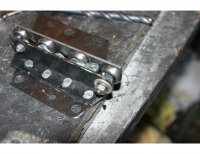
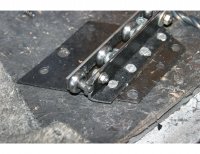
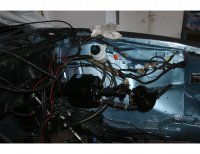
so what it takes is to remove the rear runner bracket
then drill out the rivets.
then you need to grind down the slider bracket to bare minimum
just above top and lower bolt holes
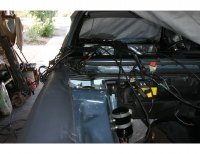
i will measure the correct position as its critical to get the
window TO CLOSE AT THE TOP
so you redrill and the revit at the correct dimension.
 

aearch

Well-Known Member
Site Donor $
Messages
4,117
Reaction score
589
Location
pleasant hill , ca
more adjustment today
not for the faint hearted so when you set it for the bottom to clear the top of course is higher
so when it goes all the way up --- the top mounting bolt hits the top of the door
so i cut the sucker off and the top of the bracket then redrilled a new attactment point lower
the roller is pressed in really stong so it isnt going anywhere
was going to lower it but it was too difficult to remove
worked out it didnt need to move anyway
so now they top out and drop below the trim
im satisfied.
 

Attachments

  • we.jpg
    we.jpg
    684.2 KB · Views: 276
  • we1.jpg
    we1.jpg
    814 KB · Views: 295

aearch

Well-Known Member
Site Donor $
Messages
4,117
Reaction score
589
Location
pleasant hill , ca
updated the grill w/ the new 100 year emblem and
the paris backup the original is being refinished.
set the front bumper to see the new position w/ the tucked struts
it at 3" to match the back . all aluminum was stripped of the anodizing and polished
going to have to keep boxes of mothers alum polish around but shines like chrome
im satisfied w/ the finish
hopefully ill get the harness soon he messed be up by taking 4 months so i cant make monterey this year.
 

Attachments

  • F1.jpg
    F1.jpg
    604.4 KB · Views: 310
  • F2.jpg
    F2.jpg
    540 KB · Views: 314
  • F3.jpg
    F3.jpg
    743.8 KB · Views: 299

Gary Knox

E9 Member Emeritus
Site Donor $$
Messages
1,821
Reaction score
743
Location
West Chester, Pennsylvania
Alan,

Polishing the bumper makes a world of difference. Still prefer the Original (European) bumper, but your '74 is much better looking than the OE '74 was!
 

aearch

Well-Known Member
Site Donor $
Messages
4,117
Reaction score
589
Location
pleasant hill , ca
need some help
where does the white round plug go?
finally after 4 months i got the wiring harnesses back from being merged
the oem and the super eta for the megasquirt unit
now comes the fun part yikes.
may have a bunch of questions.
thanks
 

Attachments

  • W1.jpg
    W1.jpg
    618.9 KB · Views: 277
  • W2.jpg
    W2.jpg
    663.2 KB · Views: 278
  • W3.jpg
    W3.jpg
    814.6 KB · Views: 288
  • W4.jpg
    W4.jpg
    585.5 KB · Views: 274

Layne

Well-Known Member
Site Donor
Messages
292
Reaction score
73
I don't see a white round plug in your photos.... Where is it?
 

aearch

Well-Known Member
Site Donor $
Messages
4,117
Reaction score
589
Location
pleasant hill , ca
SORRY BOUT THAT IN THE RIGHT FRONT NOSE BY THE HEADLIGHT
MAYBE I WRAPPED THE HARNESS WRONG AND IT GOES SOMEWHERE ELSE BUT ITS OEM BROWN BLACK AND GREEN FEMALE
BULLITS
NOT YELLING just had caps on by accident
 

Layne

Well-Known Member
Site Donor
Messages
292
Reaction score
73
SORRY BOUT THAT IN THE RIGHT FRONT NOSE BY THE HEADLIGHT

Oooh that one. Funny I just discovered it on the harness I'm working on today. I noticed it because the harness was wrapped twice, from the factory. They added a green/white wire to the outside of the harness and then taped the whole thing again. The wire goes to that very connector. So it must be important, but I didn't figure out where it goes yet. You do have it in the right location.
 

aearch

Well-Known Member
Site Donor $
Messages
4,117
Reaction score
589
Location
pleasant hill , ca
setting up all the electrical and plumbing before i set it in
cleaning and repainting the dirty parts
then have to finish all the engine bay stuff
then i can get the hoist out.
had serious trepadation about cutting the fender well but it is the cleanest way to route the additional harness
used the oem radio amp mount and redid the kdata box to fit in the upper recess fit just right.
ill make a fender well sheild and seal it all in place
i have some really good grommets for the inner and outter fender.
 

Attachments

  • N1.jpg
    N1.jpg
    821.6 KB · Views: 272
  • N2.jpg
    N2.jpg
    783.4 KB · Views: 279
  • N3.jpg
    N3.jpg
    688.1 KB · Views: 295
  • N4.jpg
    N4.jpg
    769.2 KB · Views: 290
  • N5.jpg
    N5.jpg
    727.9 KB · Views: 263
  • N6.jpg
    N6.jpg
    743.6 KB · Views: 271
  • N7.jpg
    N7.jpg
    815.4 KB · Views: 261
  • N8.jpg
    N8.jpg
    639.3 KB · Views: 292
  • N10.jpg
    N10.jpg
    805.4 KB · Views: 260
  • N11.jpg
    N11.jpg
    752.6 KB · Views: 278

aearch

Well-Known Member
Site Donor $
Messages
4,117
Reaction score
589
Location
pleasant hill , ca
huge day set the motor in the engine bay
and you do need to recess the firewall about one in for the corner of the valve cover
progress shots on http://www.bmwalan.com/
 

Attachments

  • e1.jpg
    e1.jpg
    752 KB · Views: 259
  • e2.jpg
    e2.jpg
    648.2 KB · Views: 274

Layne

Well-Known Member
Site Donor
Messages
292
Reaction score
73
where does the white round plug go?

I think I cracked the mystery. I traced the green wire in the mystery plug back to the headlight dimmer stalk. If you pull back on the stalk while the high beams are on, the green wire gets power. It must be for the headlight wipers.
 

aearch

Well-Known Member
Site Donor $
Messages
4,117
Reaction score
589
Location
pleasant hill , ca
ENGINE SECURED
took all day balancing it to line up
it seems the dimple in the firewall is only required to get it in
for there is plenty of clearance in running position.
not i have to figure out how to clear the radiator w/ the fan
waxed the valve cover to keep of all the dust
may have to slot the motor mount to move it back as much as possible without
compromising the structure
 

Attachments

  • IN1.jpg
    IN1.jpg
    838.2 KB · Views: 286
  • IN2.jpg
    IN2.jpg
    811.1 KB · Views: 266
  • IN3.jpg
    IN3.jpg
    813.5 KB · Views: 263

aearch

Well-Known Member
Site Donor $
Messages
4,117
Reaction score
589
Location
pleasant hill , ca
just thinkin of what i did with the coupe so far
outside of everything new or refurbished
power antenna
csl 7.5 oem wheels
speakers under front seat
alternate face plate i made so as not to ruin oem one
bmw radio e/ the logo o the cassette only one made the pioneere 83zmb
oem cd in trunk
battery to trunk
tuck the bumpers 3"
euro front turn signals
h1 headlights
cruise control
short shifter
5 speed overdrive
center console
emergency brake and light upgrades
slotted and drilled rotors
ferado brakes
lowered the front windows
e28 window motors
2002TIIl brake booster to fit the s38
dropped the body 1" w/ a;ternate springs from the bavaria
bilsteins
motorsport c pliiar emblem
csl rear duck tail
maga squirt kdata unit
thrre core oem radiator
9 blade black fan
m5 alternater
euro snakes
all for now
redoing the alt and oem power steering mount today to dial it all in for final
redoing the glass adjustment
busy busy
 

aearch

Well-Known Member
Site Donor $
Messages
4,117
Reaction score
589
Location
pleasant hill , ca
adjusted all the mounts took a while but got the engine back the needed inch
made a mount for the oem steering pump
shaved the fan mount to clear the radiator
 

Attachments

  • e1.jpg
    e1.jpg
    784.3 KB · Views: 272
  • e2.jpg
    e2.jpg
    636.8 KB · Views: 263
  • e3.jpg
    e3.jpg
    562.7 KB · Views: 258
  • e4.jpg
    e4.jpg
    759.7 KB · Views: 262

aearch

Well-Known Member
Site Donor $
Messages
4,117
Reaction score
589
Location
pleasant hill , ca
TEST FIT THE AIR BOX
the raised numbers just touch the tii booster
so ill have to shim it out to the right
luckily the booster mount is already offset to the right
so i can slot the mounting holes and then shim the inside mounts that will give me about an inch for the motor torque travel.
As there has been no actual facts on the installation of this motor
most of it is trail and error, which by this account will never happen again
one point is the motor setting
the oem mounts work fine except since they have a notch and bolt
the right side mount has to be reversed and the notch grinded off
then they mount on the centers of both brackets
also the firewall should be tapped back on both sides of the mound in the center as the
intake plenum is way to close for engine movement
The engine harness, mine is the super eta merged w/ the oem for the kdata,
has to sit 1-1/2" below the top of the firewall as the
front strut bar aligns w/ the top of the firewall and the insulation there must be removed.
i need to lower the coil as the eta harness is just 4" short to reach
and i dont want to splice that wire as it is sheilded.

for the brake booster vacuum i tapped and drilled in the center plenum and
used the 74 oem smog tube with that super nice bend in it
simple solution.
 

Attachments

  • F1.jpg
    F1.jpg
    725.5 KB · Views: 261
  • F2.jpg
    F2.jpg
    661.9 KB · Views: 248
  • F3.jpg
    F3.jpg
    692.7 KB · Views: 267
Last edited:

aearch

Well-Known Member
Site Donor $
Messages
4,117
Reaction score
589
Location
pleasant hill , ca
the gauge location and bracket
gosh i have a lot of cleaning to do
 

Attachments

  • g1.jpg
    g1.jpg
    629.8 KB · Views: 284
  • g2.jpg
    g2.jpg
    648.5 KB · Views: 254
  • g2.jpg
    g2.jpg
    648.5 KB · Views: 250
  • g3.jpg
    g3.jpg
    496.6 KB · Views: 278

aearch

Well-Known Member
Site Donor $
Messages
4,117
Reaction score
589
Location
pleasant hill , ca
finally feel like ive accomplished something i repulled all the wiring under the dash to set it all correctly and finally
it all sits very well and out of the way and "noshorts"
i know the darn wiring diagram by heart now
i had the light wires reversed front toback
and the interior light wired backward shorting out all the lights
funny
so i can hook up the battery tomorrow and check all the accessories.
im not going to hook up the computer till all is well.!!
then i can send it to the exhaust shop.
set engine mount forward braces- both sides
also had to coordinate the super eta harness for megasquirt w/ the oem and
a lot of plumbing to get it all to look like it belongs there
 
Last edited:
Top