1972 3.0CSi - Riviera Blau Puzzle Project

Cyrano

Member
Messages
14
Reaction score
28
Location
France
Hi there !


After a quick presentation (https://e9coupe.com/forum/threads/new-member-e9-3-0-csi.45031/), here is the thread for the restoration of my E9 3.0CSi from 1972. I do not have a lot of history about this car except that it was stopped in 1983 and bought in 2015 by the previous owner for a restoration project (which was aborted). Car has been almost completely dismantled a few years ago and this is how I bought the car.

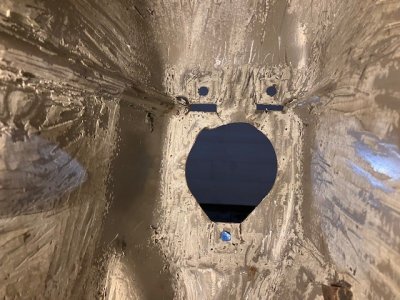
The risk of buying a dismantled car is not minor. This is a bit crazy but I believe this car was worth it. The good point is that it was possible to see and inspect the body. It is not in great condition, but this seems manageable.

I have spent the last few months sorting, identifying, and cleaning all the dismantled parts (engine, interior and exterior trims). God, there are a lot of parts!

The CS part manual was very useful and a great help. As I did not find the manual very practical to use for my case, I reported the manual into a spreadsheet. It recaps all the Euro CSi parts pre 1973 for ease of reference and follow-up.

Now that I am clear on what I have and what I am missing, I will start working on the body.

A lot of talking, now the pictures!


Car being towed on the truck. A van was needed to collect all the parts. That was such a long day that I forgot to take a picture of the big Tetris!

IMG_1733.JPG

The car at home!
IMG_1736.JPG


The sill and front fender are a bit rusty... No surprise!

IMG_1399.JPG


IMG_1391.JPG

IMG_1392.JPG
 

Pittraider18

Active Member
Messages
49
Reaction score
37
Location
Seattle, Wa
That is indeed a mighty endeavor but I am glad to see your enthusiastic about the project! Very much looking forward to seeing the progress and updates.
 

Cyrano

Member
Messages
14
Reaction score
28
Location
France
Hi there!

Before going into the depth of the rust, I decided to reinstall the car doors, hood and trunk just to see how they fit and verify the alignment (at least to spot any big misalignment).


Trunk: Everything looks good, with great fit. One welded screw for hinge installation is broken. Probably a rusted bolt... I manually installed the chrome trim just to double check. Fitting pretty well!


IMG_3125.JPGIMG_3162.JPGIMG_3161.JPGIMG_3166.JPG


Hood: That was a tough one! Alignment is quite complicated because one of the fenders has been unwelded, so it is not exactly into its original location (a few mm appart). It seems that the right hinge support is misaligned but I do not feel that it has been unwelded. Any thoughts?
We reinstalled the locking mechanism and the torsion support too. The torsion support has one of the arms bent, so we could not close properly the hood. In “closed” position, the support was butting against the left inner fender, so the support could never reach its full closed position. I’ll work on that later.
Finally, the support was removed, and hood was put in its supposedly end position.


IMG_3177.JPG

Alignment on both sides:
IMG_3172.JPGIMG_3176.JPGIMG_3175.JPG

Alignment on the front
IMG_3211.JPG


Doors: The overall alignment with the rear fender is ok but a few things must be corrected.
First issue: The "vertical" shapes of the rear fender and the door are not exactly matching.
Second issue: There is almost no gap between the door and the front right fender. I may have to adjust something to increase the gap.

Gap verification from top to bottom, between door and rear fender (same gap on left and right doors):
IMG_3219.JPGIMG_3220.JPGIMG_3221.JPG


Shape at the bottom is not matching between the door and the rear fender.
IMG_3229.JPG


Gap with the front fender is is very small and inconsistent.
IMG_3222.JPG


All hinge positions were identified for ease of installation in the future.
 

eriknetherlands

Moderator
Site Donor
Messages
2,773
Reaction score
2,007
Location
Netherlands, Eindhoven area
I like the approach you take, ensuring that you have established a base line.

Enjoy the process! Whenever you have part that you can't place, do challenge us and start the fun game of "who can ID this part"
 

Cyrano

Member
Messages
14
Reaction score
28
Location
France
Thanks !

At the moment, I am more in a mode "Hum... I have not seen that part in any of the boxes!"

But if I find something that I can't place, for sure I'll challenge you guys!
 

Krzysztof

Well-Known Member
Site Donor
Messages
1,659
Reaction score
793
Location
Poland

It looks Your E9 is in the similar shape as mine. Nothing to be happy with but still to be saved!

I wish you will be successful with the restoration and it will be another point of motivation once I will start to resurrect mine...

Great you are doing a lot of pictures and sharing some. Thanks and good luck with the whole process.

P.S. For the sills ... less bits to drill out - time saver. ;-)
 

BarneyT

Well-Known Member
Site Donor
Messages
244
Reaction score
844
Location
Austin, Texas
I only know one person that can save a car in that shape and it’s Miklos Meszaros ( CSL Garage ) in Budapest Hungary, look him up… pictures of his work saving E9 coupes may be of help to you…
 

Krzysztof

Well-Known Member
Site Donor
Messages
1,659
Reaction score
793
Location
Poland
Good for us is there are still also Others Body Workers around. Quite often they are too busy to advertise themselves. :)
 

Cyrano

Member
Messages
14
Reaction score
28
Location
France
Some more work on the body.

I spent the last few days removing the protective coating (not sure about the exact name). That was somehow tedious!! I was not expecting such a large amount of material under the body!

A few surprises:

1. The support of the differential is broken and the transverse metal sheet cracked. The sheets of the spare wheel well and the tank support does not seem to be fully welded. This is a bit weird... Any thoughts?
Photo2.jpgPhoto3.jpg


2. The right rail frame at the front is bent. It has been repaired as we can see the rust on it but the shape of the rail is still slightly deformed. I will have to check the alignment. I did not identify anything weird on the engine support but will have to investigate further after sand blasting.
Photo7.jpg


3. One of the support of the propeller shaft seems bent. Nothing detrimental, but need to be fixed.
Photo4.jpgPhoto5.jpgPhoto5b.jpg


4. I noticed a few rust spot around the rear axle main support but I do not have clear picture yet (rear support is still in place). I'll share a few picture later.


I am not sure yet how to proceed with the next step. I am hesitating between 2 approaches:
- Sandblasting the body: All rust will vanish to get a full view of the work in front of me.
- Work on the major body work before sandblasting: the part not requiring work will remain protected with the original paint until I send the car to sandblasting.

I have a few weeks to think about it...
 

Attachments

  • Photo6.jpg
    Photo6.jpg
    111.2 KB · Views: 29

Breiti

Well-Known Member
Messages
165
Reaction score
184
Location
Mainz Germany
I strugle with the same question befor.
So i blast only the visible aereas to fix the issues there and than i blast the whole floor.
for me, the only way to avoid more rost while fixing.

point 1: eiiigk, w.t.h. seams like a hard driven car... there was a thread about supporting / reinforce that aerea.
point 2: seams like you got the answere for your small fender to door gap.

Breiti
 

Krzysztof

Well-Known Member
Site Donor
Messages
1,659
Reaction score
793
Location
Poland
It's enormous work You have done!

Looking on the pictures car is quite well preserved underneath.

I think also @Breiti was doing all by hand and sanding/soda blasting afterwards.

You both are motivating me to do most of the stripping on my own with blasting used in some specific areas with rust or repairs
 

Krzysztof

Well-Known Member
Site Donor
Messages
1,659
Reaction score
793
Location
Poland
I strugle with the same question befor.
So i blast only the visible aereas to fix the issues there and than i blast the whole floor.
for me, the only way to avoid more rost while fixing.

point 1: eiiigk, w.t.h. seams like a hard driven car... there was a thread about supporting / reinforce that aerea.
point 2: seams like you got the answere for your small fender to door gap.

Breiti

Where to find the right thread about E9 chassis reinforcements?

Are they secure as sometimes elasticity is done by purpose, so reinforcing can do more damage like cracks in other areas (e.g. on the border of reinforcements)?
 

Cyrano

Member
Messages
14
Reaction score
28
Location
France
Are they secure as sometimes elasticity is done by purpose, so reinforcing can do more damage like cracks in other areas (e.g. on the border of reinforcements)?

That's what I thought when I red the thread. The additional strength may lead to constraint being transferred to other area, which are weaker. In the meantime, having body flexing and breakage on a car with stock engine and powertrain (even driven hard), does not seem appropriate.
It seems that the weak point is mostly related to metal sheet thickness between the main structural parts.

Specifically to my car, there was a shock on the front (probably a pavement), and I am wondering if the breakage of the differential support may be due to a local weakness or mechanical unbalance. Not sure if both issues are related.
 

jefflit

Well-Known Member
Site Donor $
Messages
328
Reaction score
508
Location
Los Angeles, CA
1709322774322.png
 

Attachments

  • 1709322691299.png
    1709322691299.png
    15.4 KB · Views: 24
Top