Vinyl repair advice?

Manthri Srinath

Well-Known Member
Messages
149
Reaction score
103
Location
Santa Cruz, CA
You know, this may be conclusive. Sorry about the flash point. I’m sitting in the car, in the dark. These are from my from my owners handbook, that came with the car when it was new. I’d say that that trim piece DOES NOT sit over the wood after all. Whaddya think?
 

Attachments

  • EBD6D02A-3FDB-46B5-B494-08CFF7D9B3FB.jpeg
    EBD6D02A-3FDB-46B5-B494-08CFF7D9B3FB.jpeg
    378.3 KB · Views: 160
  • 1A60EE77-3952-4D4A-96AD-412E9B3445D9.jpeg
    1A60EE77-3952-4D4A-96AD-412E9B3445D9.jpeg
    319.9 KB · Views: 176

paul

Well-Known Member
Site Donor
Messages
321
Reaction score
305
Location
Australia, Queensland, Gold Coast
Markos is right........I have just rebuilt my console and converted to an A/c one. The side boards do have a tendency to want to droop (gravity) so I clamped it while I sorted the support brackets. also covered them with leather.
 

Attachments

  • IMG_6047.jpg
    IMG_6047.jpg
    130.7 KB · Views: 173

Markos

Well-Known Member
Site Donor
Messages
13,369
Reaction score
7,502
Location
Seattle, WA
Sorry for the spin. This has been a real-time learning opportunity for me. Anyway, the vinyl is paper thin and plastic-like. It was welded together with heat, very similar to the door panels. The stitch seam is a special weld to look like a stitch. The underside, and vent holes are also welded shut. I’m guessing that the stitch was welded first, and the other bits were cut and welded at the same time with a purpose built machine.

Factory photos:

No AC:
29A3CB23-1D7F-48B0-A203-48840E01E2D2.jpeg
048F6EC7-31E4-45D4-99E3-44DC96576837.jpeg


AC: It does protrude more. Note the distance from the heater face to the leading edge of the console. The heater face looks more recessed due to the console sides sticking out more.
AF2E1A12-2277-4C4F-AB76-AA3CF2552A61.jpeg
 

JayWltrs

Well-Known Member
Site Donor $
Messages
954
Reaction score
535
Location
Oklahoma City
My shifter box is off right now, so I'll see check this weekend if it is possible to get it under the lip w/o doing more damage. Some time ago, I looked for something to re-create the stitch impression. IIRC, no exact mold or pinwheel was readily available, but it might be possible to improvise such a small run.
 

eriknetherlands

Moderator
Site Donor
Messages
2,751
Reaction score
1,993
Location
Netherlands, Eindhoven area
going back tot he original question :)

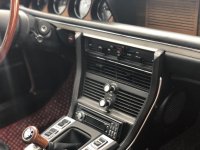
I used black silicone to fill up the holes. Silicone by itself tends to dry and smooth itself into a shiny surface, looking nice in your bathroom, but nnot here. If you wait a while for it to set, you can model its surface kind-of-like clay, and push some texture in. So I used some sandpaper to dull it, and landscaped my favorite grain (pattern) into it with a non stick plastic (like a PP straw, steel works as well). If it sticks, dip it in dishwasher soap first before shaping the grain.

Not as good as original but for 5 euro's and 1 hour its quite rewarding.

practice perhaps outside the car first to learn about the drying time and stickiness of your silicone. you don't want it to stick to all your fingers while you're still in the car.
 

Manthri Srinath

Well-Known Member
Messages
149
Reaction score
103
Location
Santa Cruz, CA
I’m
My shifter box is off right now, so I'll see check this weekend if it is possible to get it under the lip w/o doing more damage. Some time ago, I looked for something to re-create the stitch impression. IIRC, no exact mold or pinwheel was readily available, but it might be possible to improvise such a small run.
I’m not going to do it till the new year, but I’ll look into getting a cosmetic leather paint on that thing. Pretty sure I don’t want to dismantle it. It’s all pretty tight in there. Last thing I want is a loose console with idiopathic squeaks and rattles. I’ll keep everyone updated if I come up with anything interesting. Thanks for all the advice!
 

aearch

Well-Known Member
Site Donor $
Messages
4,114
Reaction score
589
Location
pleasant hill , ca
like markos said por 7 will work
you can work it as it dries and imprint a pattern if need be
sand and use maquires 40 to satin finish
 
Last edited:
Top