The end is near....SCOTTeVEST's Baby

Status
Not open for further replies.

e9john

Well-Known Member
Site Donor
Messages
154
Reaction score
71
Location
Rochdale, UK.
Agree - that's a bit barbaric for the level of refinement we'd like to think our cars have.
I found that the clips on mine had rusted and expanded inside the trim causing small splits in the trim that only showed up after rechroming, they said they could be filled with silver solder and rechromed but I had a spare set that they did at no extra cost to me and these turned out to be OK. I will cover everything with Waxoyl when I put them back on the car.
 

scottevest

Well-Known Member
Site Donor
Messages
1,999
Reaction score
605
Location
Ketchum, Idaho
BTW, per Gary in the video, he doesn't think it will be easy to remove the bumper quickly and put back on quickly. He followed Mario's suggestion, but feels that removing bumper in future will require taking headlights out....
 

adawil2002

Well-Known Member
Site Donor $$
Messages
5,184
Reaction score
3,048
Location
Brunswick, Maine
On 1969-73 cars the front bumper has captured carriage bolts in the frame rails. It's a 2 person job to remove Athena's bumper and a 3 person job to install with the air dam on.
 

scottevest

Well-Known Member
Site Donor
Messages
1,999
Reaction score
605
Location
Ketchum, Idaho
Scott,
"If anyone has pictures or further information on how to do above, it would be appreciated"
If Gary is any good, he can figure out how to make the appropriate slots for the front bumper mounting.
It's not rocket science. Here's a few comments based on the conversion Mario did for me.
Note: the 74 and up cars had a reinforced section of at the very front of the front frame rails. Because the profile of the front frame rail is different from the 73 and earlier cars ... the slots for the mounting arms end up a bit more outboard than on the earlier cars.

(sorry but I don't know why some pics are upside down. They appear right side up on my laptop. PM me if you want the originals via email.

PICTURE #1: yellow arrow shows where the bumper mounting arm goes into the nose of the body.

View attachment 43203

PICTURE #2: shows the arm thru-bolted to the driver-side frame rail. I would use a piece of flat steel stock to transfer this mounting orientation forward to the valance so the slots can be cut at the right place. It's not critical because if you screw up you can weld your mistake shut and cut again. (it seems to have uploaded upside down, sorry about that)
View attachment 43205

PICTURE #3: shows you the passenger frame rail w/o the mounting arm. Here it's easy to see that the frame rail front part is fatter (reinforced for 74). The early frame rails don't have that front bulge. They are flat along their entire length. This means you will need a spacer for the bumper mount arms to bolt up flat against your frame rails. You can see this spacer in via the yellow arrow in Picture #1.
View attachment 43206

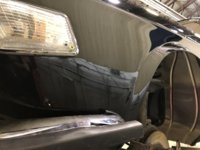
PICTURE #4: close up of the slot with rubber grommet (driver side). The positioning can be determined by the tape measure and distance from the valance oval opening . HOWEVER, I would NOT use this photo and measurement to cut. I would go by what I said about Picture #2, where you project the outside face of the front frame rail up to the inside surface of the nose. That'll show you where to cut the slot.
View attachment 43207

PICTURE #5, #6: close up of the slot in the nose. I would cut it and use the rubber grommet. It'll be almost invisible on a black car. If I had a silver car like this I might leave the grommet off.
View attachment 43208 View attachment 43209


PICTURE #7: Once the slots are cut, clamp your mount arms on to the frame rails, with the front ends sticking out of the front of the nose. Then offer up the front bumper assembly (the whole thing or just the center section, doesn't matter too much at this point). Because the profile of the 74 and later frame rails is thicker, the mounting arms will be spaced a bit wider apart than on the earlier cars. This means the ears at the front of the mounting arms will be laterally too far apart to match the mounting bolts on the back side of the bumper over-riders. You will need to length the end of the mounting arm (e.g. make them laterally wider). This picture has this front "end" of the arm arrowed in orange. Note how it's not very wide, maybe only 2".
View attachment 43210

PICTURE #8: this is on the PASSENGER side. It shows the BACKSIDE of the front bumper so you can see the front end of the mounting arm. You can see the weld where the end of the mount arm was cutoff and a new much wider piece added. This wider end extends inward toward the centerline of the car to match the bumper mounting bolt location. Use a slot rather than a hole so you don't have to get the width of this modified end perfect.
View attachment 43211


Once your arms are modified, then attach the complete front bumper assembly . If you haven't yet drilled out the front frame rails for thru bolts, you can now adjust the fore-aft positioning of the front bumper so the bumper ends are at the right place on the fender sides (see PICTURE #9). The OEM position puts the backside of the bumper pretty close to the lower valance (see PICTURE #8). Note: the clearance between the lower back side of the bumper and the valance was pretty darn tight on my car. My (beatup) CSL spoiler just barely fits in that gap. If I were to do it again, I'd space the bumper as much as 1/4" further forward.

Well, good luck with this. Like I said, this is not rocket science so your shop should have no problem doing a good job. You're getting a pretty big restoration for $16k-ish. That's cheap!

John

John, Gary followed your instructions, but as indicated in the last video from yesterday, he feels that it will not be easy for me to remove and re-install bumper on demand. Any idea on what we are doing wrong?
 

scottevest

Well-Known Member
Site Donor
Messages
1,999
Reaction score
605
Location
Ketchum, Idaho
On 1969-73 cars the front bumper has captured carriage bolts in the frame rails. It's a 2 person job to remove Athena's bumper and a 3 person job to install with the air dam on.
ok. i thought someone in this thread thought it could be done much more easily. Not a huge deal I suppose. I suspect i will end up leaving the bumper on for several years until i get sick of it, then take it off for a few years.
 

HB Chris

Well-Known Member
Site Donor $$
Messages
19,418
Reaction score
8,759
Location
Huntington Beach, CA
Just FYI: US/NA coupes in ‘73 have the 2 1/2 mph bumper and no carriage bolts. The bolt goes all of the way through the frame rail. As posted earlier, it’s not a lot of fun reinstalling a front bumper.
 

scottevest

Well-Known Member
Site Donor
Messages
1,999
Reaction score
605
Location
Ketchum, Idaho
Just FYI: US/NA coupes in ‘73 have the 2 1/2 mph bumper and no carriage bolts. The bolt goes all of the way through the frame rail. As posted earlier, it’s not a lot of fun reinstalling a front bumper.
I am using the 73 bumper with the 72 rod to install to get closer.
 

adawil2002

Well-Known Member
Site Donor $$
Messages
5,184
Reaction score
3,048
Location
Brunswick, Maine
Just FYI: US/NA coupes in ‘73 have the 2 1/2 mph bumper and no carriage bolts. The bolt goes all of the way through the frame rail. As posted earlier, it’s not a lot of fun reinstalling a front bumper.

Thanks Chris, I didn't know the '73s were different.
 

HB Chris

Well-Known Member
Site Donor $$
Messages
19,418
Reaction score
8,759
Location
Huntington Beach, CA
Andrew, I think the through bolt makes it easier but the reinforced bumper iron makes it tougher as it really needs to be a bit loose at the bumper end to slide it in. Stan will confirm I’m sure.
 

arnie

Well-Known Member
Messages
222
Reaction score
69
Location
Germany
He followed Mario's suggestion, but feels that removing bumper in future will require taking headlights out....

That really sounds weird.

I think there must have been a certain misunderstanding where and how to attach European style bumper brackets. Did you check the position of the slots for the brackets by comparison of Andrews car for instance

3_1_18 bumper off.jpg

and yours.

Screenshot 2018-05-03 14.50.37.jpg

For me it looks different. Maybe this is the reason for the mounting problems now ?!?

They did a perfect paint job, btw. I'm really jealous how straight the panels are, but the metal works don't impress me at all.
 

JFENG

Well-Known Member
Site Donor
Messages
3,182
Reaction score
1,398
Location
Bahston (Boston)
Keep the connection between the mounting arm and bumper slightly loose so the arms can be moved about a teeny bit.

Prop up the whole bumper assembly on some cardboard boxes of the right height for the arms to be horizontal and align with the slots.
Use masking tape on the L/R fenders around and forward of the holes for the bumper ends.

Incrementally slide the bumper back and carefully guide the arms into the grommets (use lube if you prefer). Do up the frame bolts loosely, then the bumper ends. Adjust the fit, and tighten it all up. Don't forget the bolts at the front of the mount arms.
 

scottevest

Well-Known Member
Site Donor
Messages
1,999
Reaction score
605
Location
Ketchum, Idaho
Thanks @bfeng and @arnie for information on bumpers. Franky, I can't believe he can't figure this out after all the instructions. I am hoping there is just a communication issue. I will report back. I sent him the information, again.

I had an almost oh shit moment today. Someone I trust with paint saw the car and thought there were several imperfections in the paint, i.e. "fisheyes" and what appeared to be dirt caught in the paint. I didn't look carefully enough yet and frankly was just trusting Benny to get it right, since it is his reputation, etc. So, I headed to the shop ready to point stuff out to him, hoping I wouldn't see anything. Sure enough, when I got there and looked carefully but not super carefully, I saw what he was talking about. I pointed it out to Benny who said he would take care of it, but frankly I think he may have to respray portions of it in order to properly fix. I also noticed more orange peel than I hoped to see too. Benny said all of that could be taken care of with some more buffing and sanding which is anticipated. Overall I am very impressed with how the paint looks but there are definitely a few spots that would REALLY bother me if not attended too. Do you think I am being too fussy?

Also, it appears the brake rotors sent by w&n are wrong. Seems odd they would get it so wrong.

All of this is in the 10 min video. One image is below but tough to see clearly.

I have faith in Benny, but hope our expectations are in line with reality.


Attachments

  • IMG_8244.JPG
    IMG_8244.JPG
    241.9 KB · Views: 160

vince

Well-Known Member
Site Donor
Messages
1,461
Reaction score
1,447
Location
West Linn, Oregon
Hi Scott,

I don't want to sound too harsh but you should do yourself and the shop a favor and stay away for a few days. That last video was a little tough to watch, I felt sorry for those guys. One of the guys was trying to talk to you about his concerns with the rotors and you ignored him by getting completely got lost in the imperfections in the paint. Those guys have done ton of work on your car and it looks really good but as he says in the video, your not paying for a show perfect paint job - that would have cost thousands more. There are going to be some imperfections. They look like they take a lot of pride in their work. If I was them, I would have been really pissed off about this last visit where you basically asked why isn't there more done and why does all of this look so shitty. Just a suggestion (before they kick you out), don't go back for a couple of weeks and let them get some work done.

In the meantime, go look at the paint on some new BMWs at the dealer, I bet for sure your new paint job looks way better.

Vince
 

scottevest

Well-Known Member
Site Donor
Messages
1,999
Reaction score
605
Location
Ketchum, Idaho
Hi Scott,

I don't want to sound too harsh but you should do yourself and the shop a favor and stay away for a few days. That last video was a little tough to watch, I felt sorry for those guys. One of the guys was trying to talk to you about his concerns with the rotors and you ignored him by getting completely got lost in the imperfections in the paint. Those guys have done ton of work on your car and it looks really good but as he says in the video, your not paying for a show perfect paint job - that would have cost thousands more. There are going to be some imperfections. They look like they take a lot of pride in their work. If I was them, I would have been really pissed off about this last visit where you basically asked why isn't there more done and why does all of this look so shitty. Just a suggestion (before they kick you out), don't go back for a couple of weeks and let them get some work done.

In the meantime, go look at the paint on some new BMWs at the dealer, I bet for sure your new paint job looks way better.

Vince
While I appreciate your opinion, in this case, the imperfections were really glaring; not good at all, and pointed out to me by someone else that is familiar with paint work. He told me unequivocally not to except the vehicle unless those are fixed. You could not see that well in the video but trust me if you saw them it would bother you immensely. Basically there is dirt on the base coat of paint. It was sloppy in a couple of areas that need to be fixed. The rotor I understand. Gary explained it to me well after the video was over. The guys are not upset with me at all but I can assure you without a doubt that if you saw the couple of imperfections that I pointed out you would not accept the vehicle. Overall the paint work and everything else is fantastic but these couple of areas frankly I would have repaired if they happen tomorrow after I picked up the car.

They have repeatedly promised me the vehicle would be completed by a date certain even so much is insisting that I put pressure on the wood guy and make sure all parts were overnighted so yes I am getting a little frustrated. But I am sure all will be OK in the end. I am the type of person that when I look someone in the eye and tell them something will be done on a date certain I do everything in my power to make that happen. I have learned in this case to be more patient and understanding but to a point.
 

scottevest

Well-Known Member
Site Donor
Messages
1,999
Reaction score
605
Location
Ketchum, Idaho
@vince I just watched the video again to be sure I did not piss them off as I recall not pissing them off. Trust me, the imperfections I pointed out are really glaring and would bother you immensely especially if you knew that it was a result of dirt on the base coat. I had no intention of going by there today, but someone specifically who saw the car told me to go by and have this conversation sooner rather than later so that there were no surprises.

This was the sole reason I went there today. Frankly, based upon Benny‘s response in the video I suspect that he has no intention of fixing this and I will just have to live with it. Frankly, I will live with it for the summer and bring it in this winter again and ask him to fix it even if he charges me to do so. The two spots in particular look like shit.

I could see how you would draw the conclusion that you did above however if you’re just watching the videos and not in person looking at the vehicle and having the relationship that I have had. Please keep your comments coming I appreciate them.
 

JFENG

Well-Known Member
Site Donor
Messages
3,182
Reaction score
1,398
Location
Bahston (Boston)
Scott,
A handful of 2 cent opinions.
(1) To err is human. To take responsibility and fix is the difference between a good and an average shop.
(2) I don't think any body shop I know would like it if I posted a video of problems I found in their work. they might be cordial and smiling, but I suspect they aren't thrilled about it. I think no good shop would mind if you found a problem with their work, discussed it, they had a chance to fix the problem, and then you went public with the final result.
(3) Fisheyes: I hate to say it, but these things do happen. I have a very small one on the hood of my Alfa Giulietta. But I only paid $300 to get the hood resprayed, and specifically told the shop what mattered and what didn't (and I told them I only wanted "race car quality").
(4) I think any good shop would fix those paint defects if you were willing to work with them on some additional project cost. I know it might not seem fair to you, but if it was understood that you weren't originally paying for a show quality finish ... a few small defects might be understandable.

Finally, any promise of completion date on a project where there is continuous scope creep and lots of invention and learning (e.g. this is not the 10th E9 they've done) is asking for an unreasonable commitment. Frankly, I know of no really good restoration shop that'll give you a commitment on price or date for a project when:
(a) there are just too many unknowns and running changes, (b) the shop doesn't have deep expertise in your specific model car, (c) you buy a lot of the parts or direct them on where to get parts (making you responsible for incorrect or wrong stuff, and you have to pay the shop for the time they waste when dealing with such parts).

A friend once told me: You can have any 2 of these 3: quality, speed, and cheap. You've got cheap, so do you want quality or do you want speed?
 

JFENG

Well-Known Member
Site Donor
Messages
3,182
Reaction score
1,398
Location
Bahston (Boston)
I'm afraid I have to agree with Arnie. It looks as though the bumper mount arm slots were cut too high up and mainly into the nose panel adjacent to the grill rather than in the lower valance piece. But then I don't know exactly how Benny's mounting scheme works, so this might be ok.
What I do know is it does NOT appear that you guys went the way Mario and other E9 experts do the bumper conversion. But perhaps you've done something different, and better? I don't know because I've not seen it in person.

Finally, I think Vince makes some good points. In my business the customer is ALMOST always right. But your project has been so convoluted (you started with just a repaint), and as far as I can tell the shop has bent over backwards to do what you want despite their lack of familiarity with the car/work and your sometimes soft ability to give them expert guidance.

I'd give it a couple days, then call and tell Benny that you appreciate all he's put up with, you're delighted with the value for money of his work, that you prioritize getting things done well over rushing to hit a deadline, and that you'd like to hear his recommendations regarding the areas of paintwork that weren't quite what you had hoped for.
 
Status
Not open for further replies.
Top