FLoor pan question

qcabra

Active Member
Messages
61
Reaction score
1
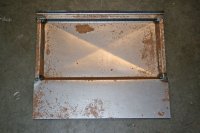
Has anybody made their own floor pans by using a bead roller and whatever is used to create the circle and square indentations??? Speaking of which, are the circles stamped or pressed or what?. I apologize for the poor description. I was thinking of buying a bead roller and making floor pans for my CS. I know wolf and a number of other places sell them but I would possibly like to fabricate them.

In summary,
What tools are necessary besides a bead roller?

What tool creates the circular and square indentations?

Should I overlap the floor pans when welding them or butt them up against each other?

While we're on the subject, what about the rocker panels? It looks like they are a much more difficult animal. Does anybody have any suggestions with regard to the rocker panels?

Does anybody have templates they would sell?

Does anybody have any floor pans and rocker panels they want to sell cheap?


I'll have all the worked checked out and cleared by somebody who knows what they're doing.
THanks and have a good day...
 

Koopman

Well-Known Member
Site Donor $
Messages
2,683
Reaction score
616
Location
Uxbridge,Ma
floor pans

Hi,
I have a brand new set that I had installed in my 67 2000cs which is now a parts car. Unfortunatly I due to a knee replacement and a recent shoulder replacement I am not capable of cutting them out. The car is at a local salvage yard for storage reasons. It also has the two doors. If I can get someone to cut them out I will PM you.I believe I paid nearly $500 at LaJolla.
I also put in both inner and intermedium rocker panel on both sides before trashing the car. Oh well if I had only believed in all the articles I read about restoring these cars.
Call with any questions. 508-277-8698
Koopman
 

Sven

Well-Known Member
Site Donor $
Messages
1,145
Reaction score
110
Location
Seattle
The floor pans are formed with a large steel die - definitely not a home operation. The rocker panels are long, with many bends and depressions, especially the portion behind the rear quarter panel.

Mike Pelly sells some reproduction floor pans.

http://www.dagsites.com/e9_floor_pans/

I bought replacement rocker panels from W&N. They were reasonably priced for such a critical element of the body. If you buy enough parts from them, then even with shipping costs to the USA, the costs are less than buying new stateside. I know they have rear pans, not sure about fronts.

I made one simple floor pan using an 18" homemade brake press and 1mm sheet metal. I did not end up using it since my original floors ended up in better condition than I expected. It is cross braked for strength at the panel center.
 

Attachments

  • FloorPan.jpg
    FloorPan.jpg
    92.8 KB · Views: 139

qcabra

Active Member
Messages
61
Reaction score
1
FLoor pans

THanks for the suggestions. I'll have to put a plan together. Figured it could be fun to make them. THe biggest obstacle seems to be the embossed? circles and squares.
 

steve in reno

Well-Known Member
Messages
609
Reaction score
77
Location
reno,nevada USA
I replaced all 4 of my pans using Mike Pelly's product.
I definitely recommend his pans.
They are of excellent quality.
Over lap weld panels, plug weld.
You don't weld in a long continuous line. Will cause warping and poor fit.
I had a neighbor that walked me through the process.
I used a 120volt mig/tig cheap-o welder.
It will take you hours and hours, of welding to complete this project.
Cover glass and other items from the slag that will be thrown around during welding. Very important!!
The welding is not hard to do, and very rewarding when complete.
My car was a different beast when the pans were complete. It tightened up the flexing and made a whole new, and desired, ride.
HTH
steve
 

gazzol

Well-Known Member
Messages
466
Reaction score
113
Location
Preston, England
It is possible to make your own with a bead/swage roller. You could try rolling the circle in first and then the oblong and then the diagonals but every time you roll in a different section you will distort the metal and it will twist and go out of shape. You could still use the pieces as they should be ok once they are clamped into position before welding it's just that their natural tendency will be to twist.
Another method if you want to have a go but want to spare the expense of the bead roller is to mark out the area you want to lower then place the piece on a wooden anvil (any piece of wood will do as long as its a nice big strong piece that isn't too soft) then using a punch or chisel go round the line you have marked out. The idea is to do this slowly and not try to achieve the depth you require in one blow of the hammer as this will stretch the metal too much/too quickly. What you will have when you have achieved the depth you require is a trench in the metal all around the line you marked out, now if you are careful you can lower the rest of the metal to the depth of the trench, do it slowly with light blows with a flat faced hammer and you'll make a nice job that shouldn't need too much time with a dolly.

I have used this method many times in the past to make swages and steps in sheet metal and it works but it is a little time consuming but at least its free.
 

qcabra

Active Member
Messages
61
Reaction score
1
Floor pans

Thanks everybody for the replies. I've read nothing but good things about Mike Pellys floor pans. I have a few coupes that I'm paring out and 2 I'm trying to make nice. I'm really having a hard time with the thought of junking a rusted coupe so I'm thinking about using a grinder, welder, sheet metal, and whatever else to weld together a Frankencoupe. It's rusted in many of the usual places but with enough hard work, I believe I can get at least one together. The drive-train, front end , and engine are all pretty good. I would rather put more sweat equity than $$$ into it. Thanks for all the input.Please offer any suggestions you have. It's really inspiring to see the progress a lot of people made on Coupes that looked "beyond repair".
Thanks again
 
Top