Anticipation...

Belgiumbarry

Well-Known Member
Messages
1,618
Reaction score
1,117
Location
Belgium
as far i see on my car , that nut is free...., nothing to hold it in place . You will have to demount the trunk liner .
 

Willem Tell

Well-Known Member
Site Donor $
Messages
340
Reaction score
315
Location
Zug, Switzerland
Could you just "permanently" attach a license plate frame which allows you to switch the plate easily?
Thanks Bmachine, that's the idea. I was going to use kind of an old-fashioned frame and add a spring-loaded backing, as it matches what I already have mounted on the Tii. I like the retro look that I have, so if I can get some sheet steel or aluminum to make a sub-frame, I'll go that route.
It may be easier to use one like you sent a link for, and change my Tii to the same. They're available locally here.

Just spotted your build link. Beautiful motor! I've go some reading to do!
 
Last edited:

Willem Tell

Well-Known Member
Site Donor $
Messages
340
Reaction score
315
Location
Zug, Switzerland
as far i see on my car , that nut is free...., nothing to hold it in place . You will have to demount the trunk liner .
Thanks for confirming Bbarry, glad I didn't let that nut drop! I don't really need to remove that panel, just thought it would be easier to polish that panel and scope out the license mount with it in hand.
 

Belgiumbarry

Well-Known Member
Messages
1,618
Reaction score
1,117
Location
Belgium
just looked at my trunk liner , it has indeed 2 acces holes for the outer 2 bolts , which we use for the license plate .But not for the center one. You could drill a extra hole and put afterwords a nice plug in it ?
The steel frame behind it in the middle has a hole to acces the nut from top.
 

Willem Tell

Well-Known Member
Site Donor $
Messages
340
Reaction score
315
Location
Zug, Switzerland
Oldenzaal had a friend in Italy dig up the original registration data, which was different from the 1994 original document I have.

The car was manufactured in Dec. 1973, delivered to a dealer in Verona in April(?)/June(?) 1974, but was not sold/first registered until May 13, 1975.
E9 Original Registration Record.jpg

This is the current original title that I have for the car, for the second number plate I have a record for: UD 520825
Registration_Italy front marked.jpg
Registration Italy back marked.jpg
BMW Certificate Turkis E9.jpg


The first name I have is of Mr. Busso Libera Oscuro on an insurance policy from Nov. 02, 1978.
1978 Insurance cert Busso Libera Oscuro 02.11.78 - marked.jpg

It looks like it was transferred to his son(?) Giovanni Oscuro Mar. 30, 1979. It remained with Giovanni Oscuro

1979 Registration Renewal 30.03.79 UG - marked.jpg

This doc shows that he renewed the registration in 1988, but the records from Italy show that it was removed from service (de-registered) from 1986 until 2013
1986 Registration Renewal 15.04.86 UG - Copy.jpg

G. Oscuro sold the car to Luca Cerchier in 1994, and Cerchier moved it from Venezia to Udine (suburb of Venice) in 1985 and registered the car there.
1994 Registration Annotation 23.05.94 CLM marked.jpg


According to the title, it appears to have changed hands in 1994, 1997, 2013, and finally was removed from circulation in 2017 for export to Holland.

And as I said on the FAQ, if I didn't feel like I've won the lottery already, there was a 1986 lottery ticket among the papers for the chance to win 500 Million Lire!

1986 Registration Lottery Udine - Copy.jpg
 

Willem Tell

Well-Known Member
Site Donor $
Messages
340
Reaction score
315
Location
Zug, Switzerland
So... I didn't pass inspection, but that was no surprise, they're quite tough on Oldtimers here, expecting them to be "perfect", which means better than new. Let's face it, these cars always leaked oil! I don't think they pass any Oldtimer without sending you off with "homework"!

I was so focused on getting wax into cavities while it was still newly renovated and completely dry that I neglected to check basic things like headlight alignment (adjusted), and the search for the all-important fluid leaks!

Hopefully I have lift time tomorrow to address:
the very minor drip coming from the front passenger corner of the upper valve head (re-torque valve cover?),
possible brake fluid from the master cylinder (somewhere),
and I can get a better look at the fuel pump assembly. I have a fuel leak, and it appears to be coming from the body of the pump where the Bakelite section meets the metal pump cylinder. Too bad, because it's a brand new pump, and the correct configuration with the round connector plug.
I talked to Oldenzaal, and they immediately sent me a replacement, due Friday. (But it will be the currently available generic Bosch as for the E28 and Tii.)
Question: Is there a rebuild gasket kit available for these pumps? I would like to retain the correct plug-type pump if possible.

The biggest pain was that they wouldn't pass my brand-new Kumho tires - 195R70x14 91H. H-rated for max 210 Kmh, not V-rated for the 220Kmh E9 max speed rating.
Bulent was looking into the logistics of a tire trade. In the meantime, I thought of a good solution: I told Bulent that I really liked the look of the MagLite 5-section wheels with the 9" chrome hubcaps, so he gave me a set as part of the deal. So I will mount new Vredestein Sprint Classics, a nice, retro-looking tire on the CSL 20-spoke alloys, and I'll throw the Kumhos on the MagLites with the chrome hubcaps. I can change them as my mood strikes me! ;) Until the next inspection in six year's time!

They actually failed me for these bolts being "too short":
Brake Bolts (1).jpg
Brake Bolts (2).jpg

I pulled the rear wheel, brake caliper, and hub and !@$%&?! I would have to disassemble the whole E-Brake assembly to get to those off!
Fortunately, I went on the BMW OEM site and drilled down to the brake assembly. As you all know (but I didn't), it (#14) is an assembly, not bolts, so good thing I did not embark on the e-brake disassembly, and buttoned it back up!
upload_2018-10-31_20-7-26.png

I will replace the lock nut with a normal hex nut to gain 2mm, and call it a day! It has a wave washer under it anyway.

They dinged me for my e-brake adjustment being asymmetric. I am counting days for thrust bearings, and M14 bolt/nut to arrive to reproduce Grice's FAQ e-brake upgrade. I contacted Grice, but with part price changes, he's not building the kits anymore. Politics aside, if you haven't done that for your left-leaning E9 e-brake handle, you really should; it feels so much better!

What else?
Too much paint on the block for the engine number to be clearly visible... I guess I'll have to sand off perfectly good paint to reveal it. (I didn't have any problem reading it!)

A couple of drops of tranny oil from a new rear seal.... I have a leaking front seal on a newly-rebuilt Getrag 235 from Metric Mechanic for my Tii, so not an unheard of thing. Jim Rowe sent me the seal and tool to install it.)
I'm planning to change the tranny and diff oil soon anyway, so I will throw some stop-leak in there now, and change the tranny oil after I pass inspection.
The tranny and diff were the only parts of the car not rebuilt (both work perfectly well), but Oldenzaal replaced the front and rear tranny seals while they had the driveline out.
Question: Since the seals are new, does it make sense to replace the the 90-weight hypoid gear oil with ATF when I re-fill it?? [I don't know that I can get RedLine here in CH; it's a fairly restricted (protected) market.]
I have a 10-liter drum of Zepf 90W Hypoid in the garage, so I don't mind using it for this!


In the meantime, if we progress on the other fixes, I have prepped my Lokari inner fenders for installation. I am following the lead from ericnetherlands and replacing the steel staples with rivets. The rivets are relatively easy going in... removing the staples on the other hand!!!...:mad:
Lokari Fender Prep (1).JPG
Lokari Fender Prep (2).JPG

It's funny, I installed Lokaris front and back on my Tii and I got grief in the FAQ forum, but here they make perfect sense to everyone! (And I am not on my knees with a dental pick removing crap from around my directionals and other hard-to-reach structures on the Tii!)
That leads me to a...
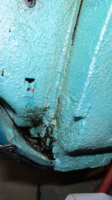
Question: What is the purpose of this hole? Recall Dan Mooney's "I just couldn't stop myself opening Pandora's Box!"
upload_2018-10-31_21-23-54.png


What is its purpose, other than to act as a perfect venturi tube and suck everything up from the road into our inner fenders?
As far as I can tell, that hole is not an air path to the heater box, so what is its purpose?
Why not just block it off with closed cell foam?
IMG_2218.JPG

One from each side....
IMG_2275.JPG

This was during my first inspection visit, so I tasked Oldenzaal with getting up in there and vacuuming whatever they could out of those cavities. They did a good job, and the cavities were pretty clear when I went back in last week with my endoscope before waxing. I taped a flexible piece of plastic electrical conduit to my vacuum and worked it up into these cavities again, then I shot wax in as far as I could reach in every direction.
I had Oldenzaal drill a couple of 8mm hoes in each A-pillar so that I could shoot wax into the base of the A-pillar:
upload_2018-10-31_21-44-27.png

Sacrilege, I know, but practical. Had I been more familiar with the E9 chassis, I would have realized that it's not necessary; the mounting clip holes are big enough for access.
No, the wax you see was applied from the outside, not leaking through a sieve of rust holes! In retrospect, I wish I had applied melted Vasoline in these highly visible areas. I may go back and leach this up with turpentine and do just that.

On my Tii I painted the Lokaris with rubberized black paint. It looks good, but grass tends to stick to it.
I like ericnetherlands bare-metal look. I think I will do the same, and take a note from Zinz and spray them down well with penetrating oil to slow oxidation.
 
Last edited:

milwaukeesk

Member.
Site Donor
Messages
270
Reaction score
144
Location
Atlanta GA
Regarding the hole... and what's the point. I'm also confused.... Would be interested in the answer. Also curious why filling it will closed cell foam would or wouldn't be a good idea. Seems like a no brainer to close off but I must be missing something.
 

JFENG

Well-Known Member
Site Donor
Messages
3,182
Reaction score
1,398
Location
Bahston (Boston)
I'm confused. Were E9's delivered new with V-rated or H-rated tires. What was original spec?
 

Keshav

Well-Known Member
Site Donor $$
Messages
2,769
Reaction score
2,780
Location
Germany
I'm confused. Were E9's delivered new with V-rated or H-rated tires. What was original spec?

Per my recollection, E9‘s had (6.5” rims) 195/70/h(r)14 and Csl’s (7”rims) 205/70/h(r)14. Due to the chrome arches on the Csl’s, BMW installed a larger size rim and tire to try to fill up the ‘gaping wheel wells’.
I’m sure others will add to this.......
 

Willem Tell

Well-Known Member
Site Donor $
Messages
340
Reaction score
315
Location
Zug, Switzerland
I'm confused. Were E9's delivered new with V-rated or H-rated tires. What was original spec?
Feng, I don't know the original delivered tire, but in Switzerland they require that every car be shod with tires that are rated for its maximum speed. They did the same on my '72 MBZ.
I actually knew this going in, and somehow I completely forgot to raise it with Oldenzaal. My bad, as they would have changed the tires before shipment.

Regarding the hole... and what's the point. I'm also confused.... Would be interested in the answer. Also curious why filling it will closed cell foam would or wouldn't be a good idea. Seems like a no brainer to close off but I must be missing something.
If I was not installing Lokaris, I would close them off with closed cell foam. That little space opens up to the A-pillar at the wind screen, across over the wheel arch, and down to the base of the A-pillar. Why would anyone want water and dirt flying into those closed spaces on every drive?!!
 

arnie

Well-Known Member
Messages
222
Reaction score
69
Location
Germany
It's fairly easy for the required speed index for the tires (at least for German delivered cars). If the vmax in the papers is higher than 210 km/h, you have to use "V"-tires (approved to a vmax of 240 km/h) for your summer tires. For the winter spec tires it's allowed to use lower rated ones like "H" or even lower. Most Germans have stickers at their dash board with the max allowed speed for the winter tires.

I don't know if this stickers are mandatory, or just to remind yourself, that vmax is reduced then. A bit strange regulation, since also in winter times the conditions are very often, that there's no problem to reach vmax with your car. German authorities, but Swiss ones sound even more insane ..... :)

So the 3 Liter E9s should need "V"-tires, at least the ones with manual tranny. Vmax for injected was 220 and carburated 213. Maybe for an automatic 3,0 CS it was sufficient to have the "H"-rated tires, if they don't ran more than 210 km/h ?!?
2,5 and also 2800 CS will be legal with "H"- tires.

@Willem Tell: The hole in the front wheel housing doesn't have any purpose, but collecting dirt. On my car I decided to close every hole or gap or whatever would be able to pick up and store debris from the road, even although I also have Lokaris.

Swiss technical inspectors seem to be bored from their jobs, so that they like to piss off their clients with nasty bullshit. The bolts for the handbrake cable aren't too short, they just never had self securing nuts. What giant idiot would deny the approval because of this ???

Greets

Ingo
 

Keshav

Well-Known Member
Site Donor $$
Messages
2,769
Reaction score
2,780
Location
Germany

Attachments

  • 8787F273-84E0-4A2E-94AA-9DC46DF89D29.png
    8787F273-84E0-4A2E-94AA-9DC46DF89D29.png
    2.5 MB · Views: 233

Willem Tell

Well-Known Member
Site Donor $
Messages
340
Reaction score
315
Location
Zug, Switzerland
I’m thinking you might be missing the ‘schott blech’, possibly on both sides? Not that they substitute the Lokaris, but originally these were the covers to protect the A pillar etc from the elements.
Thanks Keshav. I had them remove those for both of my inspections, but I do have them in place. However the "offending hole" is forward and above the 'Schott blech'.
I'm with Arnie... My car is currently stone dry, so I'm thinking to hermetically seal these cavities before I install the Lokari inner fenders.
I will also paint the inside edge of the fender edges with melted Vasoline before I install the Lokari.
 

Belgiumbarry

Well-Known Member
Messages
1,618
Reaction score
1,117
Location
Belgium
again , as already mentioned, i'm not fan of Lokari's…. unless you drive a lot gravel roads to avoid stone chips … in rain , the Lokari's won't sure be water tight, so everything behind those get wet , just the same as they weren't there . But then, it will take a much longer time to dry out when in garage.

Longer time wet = more time for corrosion …. just my 2cents.
 

Willem Tell

Well-Known Member
Site Donor $
Messages
340
Reaction score
315
Location
Zug, Switzerland
I got up into the front wheel wells again, took a closer look, and found the channels that allow water and grit all the way up and onto the top of the A-pillar, that tray in front of the glass gasket, and front rails. Twisted the hose around and shot wax all over the place up in there until it was running out of every gap.
Looks ugly now, but after it sets I will go back and clean up the exposed runs with turpentine.
I have scraps of high quality 30mm-thick closed cell foam left over from my sound isolation projects, so after waxing I cut some up and closed off the big hole and all of the nooks and crannies around it.
I also covered the surfaces up in the nose below the grills with Öwaldol, the EU equivalent of Penetrol. It's transparent, so it gets into all of the seams, but is not obvious like the wax.

Question: Can someone tell me, are the E9 grills easy to remove like the '02 grills, or more of a hassle? I haven't really had a chance to eyeball them with so many other details to pursue.

I tried melting Vaseline to inject into seams where the black would show, but I only had a tea pot for boiling water. Apparently Vaseline melts just a few degrees above water boiling point (I am at 1500ft elevation), so it requires a hot plate to melt it.
I feel much better now about getting this thing out on the odd rainy day.
It was late when I finished last night so photos will follow.

Once I get past the inspection, I will get more lift time to install the Lokari inner fenders.
I hear what you're saying BBarry, but I put the Lokaris on my Tii, and I think they work great. They keep tons of debris out of the seams and from up around the directional lights. They're designed so that there is about 1-2 cm of gap front and back and more all around with a small scoop in the front for forced air to circulate and dry the inside of the fender.

I decided that I will put the Vredestein V-rated on the traditional 5-section Maglite alloys with hubcap for a really classic retro look, and keep the Kumhos on the CSL 20-spoke for when I'm feeling "sporty".

Like these:
Profil_sprintclassic_WM.jpg

upload_2018-11-5_20-48-21.png

https://www.classic-trader.com/uk/cars/listing/bmw/3-0/3-0-cs/1974/146261
When I see an unrestored car like this at €47,000 as a presumed "good start" for a resto CS, I count myself lucky for my deal!

I don't have a radio or speakers installed. I have the mounting tray and an '80s radio that Oldenzaal threw in, but I don't miss 'em, as I prefer to listen to the engine and that nice, resonant stainless exhaust. But having some tunes and better volume for the phone GPS is a plus, so I found this cool little Bluetooth speaker to put in the tray. Works great.
upload_2018-11-5_21-2-50.png

I need some power for it, so I need to install a USB charger. I could hard-wire a USB jack up inside the console, but just for fun, I worked out a cool way to integrate it into the console:
IMG_2912.JPG
IMG_2914.JPG
IMG_2915 (1).JPG
IMG_2917.JPG
IMG_2972.JPG

IMG_2971.JPG

Yes, that is a baggie tie from my favorite Spanish Almond bag! I get the tires mounted Thursday and will be replacing the brake master cylinder, so I'll get a shot of the "lighter" in the console.
I cannot believe the amount of engineering that went into the cigarette lighter hand piece. That thing is virtually indestructible (or would be if I hadn't destroyed it taking it apart). MAN, that thing was built to last 200 years!

Unfortunately, I had to replace the fuel pump, as the original one must have set too long without fuel, and the internal gasket was leaking. Too bad, as I would have liked to keep the original configuration there. I wired the replacement so that the round plug is still there in case I ever find a good NOS pump in this configuration.

IMG_2904.JPG
IMG_2906.JPG


I have to replace the master cylinder, even thought the brakes work perfectly, and there is no discernible leak now. But unfortunately there was at some point because sadly, it caused some damage to the paint on the chassis rail:
IMG_2896.JPG
IMG_2897.JPG
IMG_2898.JPG
IMG_2901.JPG
IMG_2902.JPG
IMG_2903.JPG

The inspector would not just accept that "it seems OK now", so better to bite the bullet and replace it. It would cost me more than the purchase price of the MC to rent a Control Plate that allows me to drive the car for two days to get the tires swapped and to the mechanic to help replace the MC and bleed the brakes.

The tires and the MC are the last two items on my inspection "homework". I can't complain, I could not see the MC leak without it being up on a lift and closely inspected, so he saved me from some potentially ugly corrosion.
Once this is all worked out and I don't have the inspection hanging over my head, I can remove that paint, brush on some Brunox, and then cover it over again. I insisted on getting a couple of deciliters of matching paint for the Turkis and my Inka Tii, and Oldenzaal came through.

Oldenzaal sent me the fuel pump immediately at no charge, and will cover the cost of the master cylinder as I needed to order it directly to me to get it installed before the inspection at exactly 10:08 on the 21st November. :confused:

Inspections are interesting, if not intimidating here. Not like the DMV in the States, where you queue up and wait... Here, yYou make an appointment weeks in advance to show up at Inspection Lane 3 of 5 at YY:08 sharp. The inspection takes exactly 22 minutes to spin, bounce, lift, rev, brake, and otherwise stress your car. One drop of oil on his glove, and "you're outta there"! As if these cars didn't leak oil when they were new!
In my case I had to wait longer post-inspection because he wrote up a detailed list of homework (eight to-do's), most of which were easy to knock out. (I would have done a pre-inspection, but you can't rent a Control Plate to move it until after they have determined it's safe to move by inspecting it. Catch-22 gotcha!)
Imagine trying to get an old MG, Riley, Jag or Triumph through that gauntlet! :mad:
 
Last edited:

Bmachine

Well-Known Member
Site Donor $
Site Donor $$
Messages
3,533
Reaction score
1,790
Location
Northern California coast
What a story. Once again we are incredibly lucky in the US to have good weather (at least in the southwest) and fairly lenient regulations for pre 1976 cars.
 
Top