Caliper Failure and Rebuild

Ives

Well-Known Member
Site Donor $
Site Donor $$
Messages
287
Reaction score
99
Location
Healdsburg, Ca.
My current project, a 1974 Euro delivery 3.0 CS, a Turkis I call Sixto, has seen significant progress over the last year since some of you saw it at Legends in 2013. The 745 (M106) engine is installed as well as the tranny, diff and suspension. The rebuilt calipers and brakes were completely installed and Sixto was ready to be hauled to Turbo Hoses when SFDon and I discovered that 3 of the 4 calipers were leaking. After checking the connections and bleed screws it was determined that the rebuilds had failed and were pulled. I paid between $62 and $78 for each caliper and it probably is no surprise that the sellers did not do much of a rebuild for that price.

Thanks to Terry C I was directed to Eric Shea at PMB in Sandy Utah for a professional rebuild of a couple of sets of CS calipers. Historically PMB has done Porsche and Mercedes rebuilds and when I contacted Eric I referenced the E9 Board and told him his thorough, website detailed services would, more than likely, receive an enthusiastic welcome from our community especially for those owners that don't have the time or expertise to "do it themselves".

In looking at the time and labor expense of installing calipers that were of an unknown level of rebuild I think that doing it right the first time is particularly salient with my project.

I have given Eric permission to post pictures of the progress of my rebuild on our board and I will update here how it all works out when I reinstall the set of calipers.

Regards, Jon
 

Ohmess

I wanna DRIVE!
Site Donor $
Messages
4,903
Reaction score
2,735
Location
Aiken, SC
I have not dealt with PMB, but Don previously provided a link to their caliper rebuild article and, having done a handful of rebuilds myself, their article is excellent. If it is reflective of their work, I suspect you will get a very good product.
 

MyFemurHurts

Well-Known Member
Messages
771
Reaction score
17
Location
NorCal
M106 powered E9? :oops: I'd love to see some pictures, or even better, a video of that thing in action. :shock:
 

Ives

Well-Known Member
Site Donor $
Site Donor $$
Messages
287
Reaction score
99
Location
Healdsburg, Ca.
Caliper Rebuilders

I guess the question is hanging out there—who rebuilt the calipers?
LenS,

The three failing calipers came from 3 different vendors. The front refurbs came from Try Auto Parts-US and Amazing Savings Auto Parts. The names should have been enough to give me at least a second thought. The rear caliper that failed came from Summit Racing. The only one that did not fail was rebuilt by SFDon.

Regards, Jon
 

NewSixCoupe

Well-Known Member
Site Donor
Messages
1,008
Reaction score
32
Location
Northeast
I guess these things happen. My master cylinder was rebuilt twice by White Post. I had heard about PMB for years in Porsche circles; pricey but the results are superb.
 

HB Chris

Well-Known Member
Site Donor $$
Messages
19,418
Reaction score
8,759
Location
Huntington Beach, CA
I had a pair of calipers rebuilt and they leaked at the new bleed screw. I bought BMW bleed screws and problem was solved.
 

DougE

Well-Known Member
Site Donor
Messages
279
Reaction score
25
Location
Raleigh, NC
You might try UCX, maybe you can send the calipers you have for rebuild. I've used their product on a number cars with good results. If they will not deal with you directly maybe they can connect you with one of their distributors

Doug

http://www.ucx.com/
 
Messages
20
Reaction score
1
Hey Gang...

...looks like it took a while to get my permissions sorted here but amongst Jon's concern for me being alive, I tried again today and voilà!

I'm an admin on another board so I'm pretty sensitive to spam threads. I'll be as transparent as I can herein. I discussed our process with Jon and we both thought it would be a cool thing for the Bimmer crowd to see.

Here's my take; there are DIY guys and not so DIY guys. I was a DIY guy and this is how the business got started a little over ten years ago. As a DIY guy, I'll probably do something myself regardless so, as a business owner, I figured "If they're going to do it themselves... they might as well do it "properly". I know "it's not rocket science" but, there is a right and a wrong way and... some of the things we've all learned over the years can be pretty darned wrong.

Now that I know I can post, let me get some pictures together and start this thing from the beginning. ;)

Weigh in with any questions at any time gang. I'll do my best to answer them ASAP.

Read on; you'll learn why you should have your caliper re-plated or re-anodized. We’ll explain why you should never “hone” the bore and why you should never take a pair of pliers to your pistons. Why painting is generally not a great idea and what you should do with your fasteners. We'll explain the pitfalls with “Big Box” rebuilders and show you all of the steps to bring your calipers back to brand spanking new condition.
 
Last edited:
Messages
20
Reaction score
1
Let's get started...

Thanks Don!

We've all heard “Any job worth doing is worth doing right”. As with any job, this job starts with good prep. This means having the right tools on hand and finding the right suppliers for every step of your project. Let’s start with the specialty tools. The ones you may not have in the tool box. Thinking ahead, Amazon may be able to deliver these before you even crack a lug nut.

Specialty Tools: Ribe Bit Set
Ribe (pronounced reebie) Bits – If we’re talking about any of the ATE calipers all but the very first few calipers produced used Ribe fasteners. While these 5-point star bits look amazingly similar to a common Torx bit, they are not the same. A Ribe bit and fastener has a much more pronounced shoulder with sharp edges. Word of caution: Torx bits will fit in Ribe fasteners. And now a word on using Torx bits; they would be fine for “assembly” work but I would caution anyone from using them to disassemble a caliper that has been stuck together for 40 plus years. The main issue is, most of these fasteners are NLA. If you ruin one, you’re going to have to purchase a core caliper in order to get a proper replacement. Throughout this thread we’ll be concentrating on the care required to extract these fasteners without damaging them and, how to treat them so they'll last another 40 years. Ribe bits are an important part of this. Ribe bit sets can be found on Amazon for around $30.00.

I can't stress this part enough. Treat your fasteners like gold. Many of these odd size (7-9mm) fasteners are NLA in “any” configuration, let alone Ribe. Numerous calls to Ribe to have fasteners re-manufactured have been met with silence. About the only calipers you can readily get 12.9 fasteners for are those with M8 fasteners. Then again, they won’t be Ribe and they won’t be original. The rest are priceless. Treat them that way.
 

Attachments

  • Ribe Bit 001.jpg
    Ribe Bit 001.jpg
    53.9 KB · Views: 179
Messages
20
Reaction score
1
Zinc Plating

Next I'm going to get on my ole soapbox...

Zinc Plating
Next up in our preparation section we’ll address the major problem with all calipers needing a rebuild and all home-grown and big-box calipers that have been rebuilt. This is extremely important. 99.9999% of all caliper failures is caused by rust… (Read these next words very carefully as it is the most important part of a caliper rebuild)

“Rust Inside the bore”.

Calipers fail because of rust build up inside the bore. Brake fluid is hygroscopic. That means it attracts water. You system is open (note the small holes on the top of the fluid reservoir cap). If you do not change your brake fluid regularly, water will work its way into your system and, it likes to gather around the rubber seals. As it gathers, it mixes with old brake fluid and, it creates a shellac-like component that causes the piston to stick. Left alone for very long and it will actually rust through the pistons hard nickel coating and you’ll need new pistons. ATE does a great job plating pistons (with the exception of their S-Caliper pistons which show up on early Porsches and some Alfa factory race team cars).

There are a couple more areas and issues that will cause rust to form inside the caliper. It’s time to expose some Internet myths:

1. “Hone the caliper bores.” This is incorrect. DO NOT hone the caliper bores. They “do” make brake hones. For the life of me, I’m trying to think of one thing you would want to “hone” in a bore. It’s not like caliper bores grow sharp fangs over the years. Rust is about the only thing that can cause a bore to need to be honed however, if you have rust in your bores, you don’t want to hone it and leave the surrounding fresh metal exposed for it to come back. You want to remove it. Ask yourself a simple question; would I sand all of the paint off my car and leave it out in the rain? Bores need to be re-plated NOT HONED.

2. “You don’t need to plate your calipers. Just wire brush them, Scotch-Brite the pistons and bores and spray them with some caliper paint. Plating is just bling”. This is also incorrect. As above, Scotch-Brite is basically the same as honing. When you wire brush you calipers you are removing a vital protective coating from the outside of the caliper. The fact that you have a caliper to rebuild today is because the ATE factory plated them with zinc some 30-40 years ago.

You have two caliper bodies sitting in front of you on the table. One is a rusty hulk that’s been wire brushed clean and has the bore honed or Scotch-Brite’d. The other is a core that has been stripped of all its rust on the body and re-plated in factory zinc. Which caliper will you use for your car?

Find a competent metal finisher in your area that can plate yellow zinc. Here’s another Internet myth: “The calipers are cad plated”. This is incorrect. While many of the fasteners and bits and pieces on your restoration are cad plated, the brake calipers are made by a company called ATE (not BMW) and they used zinc because of its superior corrosion protection. Zinc is a sacrificial coating that will begin to corrode protecting the steel around it. Again, this is why your calipers have lasted as long as they have.

This is also where we can answer some questions about big-box rebuilders. While you may have saved $50.00 on your calipers, your car could be worth tens or hundreds of thousands of dollars. You purchased a rebuilt caliper from RockAuto, AutoZone or PEP Boys. You may even brag to your buddies online about how much money you saved, sneering and taunting those specialty suppliers looking to “rip you off”. You have actually purchased the following:

• A good core caliper
• A caliper with absolutely no protective finish on the bodies or the fasteners
• A caliper with no protective finish in the bore.
• A caliper with cheap aftermarket seal kits (that will crumble away soon)
• A caliper with the pistons, more than likely, installed improperly… (we’ll show you how simple it is to do it right).
• A caliper with aftermarket (wrong) pistons with inferior plating (factory is nickel)
• A caliper with an extra bleeder drilled in it to save time and expense of matching left and right units.
• A caliper that will be solid rust in 2-4 months.
• A caliper that will be deemed “unusable” in 5-10 years. They will rust and pit beyond usable condition.

And the list goes on. I am adamant about getting the proper caliper on your car. Chances are, the proper calipers are the ones you currently have in your possession. You just have to treat them properly. The way the factory did thirty, forty, fifty years ago. This is why zinc plating is an important pre-step in the process of restoring your calipers. Look for a plater that will not charge a “minimum” batch charge. Look for one that does or has done a lot of automotive restoration work. Large batch platers may not want to touch your greasy, rusty calipers. Start making the calls now. If all else fails, we offer a plating service for this reason. You may be in a smaller market where a plating service isn’t available or, your plater may charge a minimum batch charge that would make plating some calipers cost prohibitive. A word of caution: taking parts off your car and sending them to a plater can be highly addictive.

A word about painting and coating calipers; here’s a caliper (the gold one in the thumbnails below) from a popular retailer that offers “Polymer Coatings”. Everything looks fancy on the outside and the marketing hyperbole runs thick on their site but, it’s the inside that counts when it comes to calipers. Thick coatings can encapsulate heat and the raw, untreated steel in the bore has already began to rust. This caliper pictured below is from another customer who decided not to use these calipers on his car. Wise decision as you can tell.

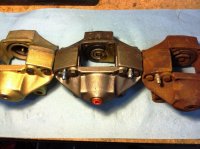
We were fortunate enough to grab a batch of core calipers from a shops inventory. They were calling it quits and selling their remaining inventory. The little gem we found should spell it out for you. Look at the pictures below. From left to right; the first caliper is a re-plated caliper, you can see the bore and all received plating and this one is ready for final assembly. The second caliper is a big-box vibratory polished and oiled caliper. The third caliper is the same type caliper from the same big-box rebuilder after some time exposed to the elements. The last caliper was never even installed. It was found in the big-box rebuilder shipping container with a tag on it. No zinc coating = rust and a ruined caliper.

A final word on plating to sum things up; It should be obvious now, you will want to have your calipers plated. Remember, zinc is a sacrificial coating that has protected your cast steel calipers for this long. It will do a great job of protecting them for another fifty years. Even if you want to paint your calipers red in honor of the real big red caliper used, plate them first and then rattle can to your hearts delight. You wouldn't put a rusty crank back in your $15,000 engine rebuild. Hit Google and find a competent metal finisher in your area.
If the car is driven regularly and hard, the brakes can get hot enough to get rid of some of that moisture but, over time, your fluid will be bad and will not work as well as it once did. This is why you should change your fluid annually “especially” if you only drive it in the summer months. Sitting for an extended period of time will cause the rust and fluid shellac buildup to begin.

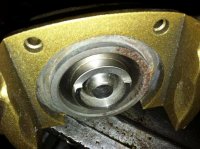
One other cause for rust inside the caliper is “damaged dust seals”. These are the seals that snap on top of the pistons. As you can see in the example on the left and in the middle below, all of the rust on these pistons is also “above” where the bore seal would contact the caliper. Because the dust seals were damaged (cheap aftermarket seals do not have enough anti-ozonates and they crack and crumble) water came in from the top as well. See the rust on the dust boot flange?
 

Attachments

  • Piston Rust 002.jpg
    Piston Rust 002.jpg
    93.5 KB · Views: 218
  • Goldline 003b.jpg
    Goldline 003b.jpg
    95.1 KB · Views: 204
  • Caliper Comparison 004.jpg
    Caliper Comparison 004.jpg
    95.9 KB · Views: 219
Last edited:

3nsahalee

Well-Known Member
Site Donor
Messages
248
Reaction score
127
Location
Tucson, AZ
This has to be among the top 5 most informative auto related posts EVER!
Thank you so much for taking the time for an extremely in-depth lesson, and for sharing your expertise with us.
You have gone far beyond any professional's contributions to any car forum that I've seen.
Mere words alone cannot express how fortunate this forum is to have this thread of insight into clarifying the great brake abyss and all the misnomers and misinformation that we've all heard/read.
Big man-hug and a 'You da man!' to PMB
Kudos, thank you, gracias, merci, and mahalo!!!
 
Messages
20
Reaction score
1
Wow... Thanks! :)

Stay tuned, we're just gettin started here!

I just had to drag my daughter to soccer practice and drag my wife out to dinner.

More in the morning.
 
Messages
20
Reaction score
1
Tools Needed
Now we have the more challenging items ticked off our checklist. The rest will be common tools that every DIY guy or gal should have hanging around the garage. Where we use some specialty tools, we’ll substitute with a more common workbench work around. Here’s a list of tools that are very handy for the job:

• Air compressor
• Air wrench
• Set of 6-sided sockets
• 3” 3/8 extension
• 3/8” Ratchet
• Torque wrench
• ½” Breaker bar
• Needle nose pliers
• Dental pick arrangement
• MAP torch
• Punch Set
• Bench vise
• Vise-Grips
• C-Clamps (2 at least)
• Large Rubber stopper (for 48mm bore)
• Smaller Rubber stopper (for 35-38mm bore)
• Steel sheet stock the size of the pad cavity or, an old pad backing plate
• Vibratory polisher/Rock polisher or 0000 steel wool
• Proper ATE seal kits for your calipers
• EPDM caliper ½ seals

Prior to Removal
Before you take your calipers off the car we’ll want to know a few things about the pistons. Has the car been sitting for a long period of time or, is it your daily driver? This will help determine the condition of the calipers and pistons. If it’s been sitting, chances are the pistons are stuck or binding. If this is the case, you probably will not be able to free them up using the simple “compressed air method” (more on that as we progress). If it’s been your daily driver and you’ve changed the fluid annually then chances are compressed air should work. We've torn apart thousands of calipers and this is almost always the case.

If the car has been sitting, now is the time to get the pistons moving. By leaving the caliper attached to a fluid system (your brake system) you should be able to free up the pistons. Fluid does not compress and air does. This is why the compressed air method won’t work on a stuck piston. Use a buddy and press the pedal until you hear the cracking and creaking of the pistons moving. Remove the pads so they will have some room to travel. Place an old brake pad backing plate or a ¼” of plywood in the bore so the piston won’t come completely out. Bottom line, we need to get the pistons moving using fluid. If they are totally frozen there are a few things we can do on the bench or, you may want to consider professional help at this point. Calipers that have been sitting in adverse climates for too long can be damaged beyond repair. The pistons have been known to completely rust/bond to the dust boot flange causing a failure (see picture below). When this happens, the caliper is a good door-stop. The good news is, most of these steel calipers can be found as cores rather inexpensively.

If the car is a daily or occasional driver and you’re certain the pistons are working, take a few stabs at the pedal to make sure everything is freed up and remove the calipers from the car. These should be good candidates for a compressed air removal.
 

Attachments

  • Damaged Flange 005.jpg
    Damaged Flange 005.jpg
    93 KB · Views: 163
Messages
20
Reaction score
1
On The Bench
All of your pistons have hopefully moved a bit and the calipers are on the bench. Before we get into piston removal let’s get the accessories off. That means pads, pins and springs. Many of these items are hard to find as ATE has not been a very good supplier to the aftermarket community for pad kits (springs and pins). Threat them with care and see if your metal plater can extend their life a bit. ATE hasn't been good about supplying the market with these. If your pad kits are readily available, I'd recommend getting new. They may seem pricey but break them down to the component level and it's around $6-8 bucks a part. The springs can lose their tension over the years and new is always best (if you can find them). Using a pair of needle nose pliers, pull the pin clips up and out. Use the needle nose and the caliper body as leverage. Later calipers will have a spring that is integrated into the end of the pin so this step won’t be necessary. Using the appropriate punch, drive out the pin holding the pads and pad springs in place. Keep a finger on the spring as you do this to prevent it from flying across the shop. Remove the spring and then push out the second pin and remove the pads.

Next, remove the piston dust boots. There should be a wire clip running around the perimeter of the seal. Take a dental pick and pry this clip up and out. Remove the rubber dust boot and toss everything in the trash. This is where I'll try some image tags. I know some sites like them and some not so much. Now we'll get into some specifics and pictures of Jon's calipers.

This is a shot of the boot coming off the rear calipers.

1798470_10152391576533193_2290195262969782147_n.jpg
 
Top