Driveline-Suspension-Engine Redo

Sven

Well-Known Member
Site Donor $
Messages
1,145
Reaction score
110
Location
Seattle
This project began in early April of this year. The new owner of a beautiful Granatrot 74 CS was interested in a complete engine, driveline and suspension refresh along with a Megasquirt conversion. The car is one of the driest coupes I have ever seen. Very solid. The plan was to find an m30b35 donor engine and convert to EFI. More on that later.

The patient:
 

Attachments

  • CoupeInDrive.jpg
    CoupeInDrive.jpg
    83.3 KB · Views: 421
  • CozyCoupes.jpg
    CozyCoupes.jpg
    100.4 KB · Views: 368
  • OldEngineBay.jpg
    OldEngineBay.jpg
    95.7 KB · Views: 405
  • LeftFenderTop.jpg
    LeftFenderTop.jpg
    76.2 KB · Views: 376
  • RightFenderTop.jpg
    RightFenderTop.jpg
    93 KB · Views: 369

Sven

Well-Known Member
Site Donor $
Messages
1,145
Reaction score
110
Location
Seattle
The gutting

And so it begins……with the help of another local couper, the owner and me, we made quick work of dropping the engine, drivetrain and suspension. The dolly I fabricated for my car a few years ago was again put to use (the third car so far). After the car was mounted on the dolly, we sent it out to a local paint shop to have the engine bay resprayed. Matching the Granatrot color took a couple of tries before the shop got it right.

It is always surprising how much time is needed just for the cleaning.

Note, the factory crimped downpipes. What's that about?
 

Attachments

  • LocalHelp.jpg
    LocalHelp.jpg
    94.5 KB · Views: 357
  • Downpipes.jpg
    Downpipes.jpg
    50 KB · Views: 355
  • EmptyBay.jpg
    EmptyBay.jpg
    95.8 KB · Views: 367
  • EngineOut.jpg
    EngineOut.jpg
    95.4 KB · Views: 371
  • HappyOwner.jpg
    HappyOwner.jpg
    94.4 KB · Views: 359

Sven

Well-Known Member
Site Donor $
Messages
1,145
Reaction score
110
Location
Seattle
The pieces

While the body was out for painting we continued with the disassembly, cleaning and more cleaning, preparing the parts for powder coating and zinc plating. This was also the time to rebuild brake calipers (seals falling apart), replace the rear wheel bearings, assess everything and get all the new parts ordered. We sent the steering box out for rebuilding, found a good Tii brake booster (modified rod length), found an LSD (had it rebuilt locally), lengthen and rebuilt propeller shaft, rebuilt both rear axles, installed upsized sway bars, replaced all rubber bushings, etc. Lastly, had new stainless hard brake lines fabricated.
 

Attachments

  • RearSuspension.jpg
    RearSuspension.jpg
    96.1 KB · Views: 344
  • PressureValve.jpg
    PressureValve.jpg
    93.2 KB · Views: 325
  • CaliperOld.jpg
    CaliperOld.jpg
    64.2 KB · Views: 316
  • PartsToPowderCoating.jpg
    PartsToPowderCoating.jpg
    80.5 KB · Views: 327
  • PartsToPlate.jpg
    PartsToPlate.jpg
    96.4 KB · Views: 325

Sven

Well-Known Member
Site Donor $
Messages
1,145
Reaction score
110
Location
Seattle
The new bay

The newly sprayed engine bay made for a dramatic change from the old faded one. Yes, onwards to the reassembly. Now the fun begins...
 

Attachments

  • EngineBay1.jpg
    EngineBay1.jpg
    93.1 KB · Views: 358
  • EngineBay2.jpg
    EngineBay2.jpg
    95.4 KB · Views: 370
  • EngineBay3.jpg
    EngineBay3.jpg
    95.2 KB · Views: 332

Sven

Well-Known Member
Site Donor $
Messages
1,145
Reaction score
110
Location
Seattle
The coatings

One of the photos show all the suspension parts layed out after coming back from the powder coaters. The front and rear suspension assemblies are put back together and set on dollies ready for sliding under the car. It is so much easier to work on these when not laying on one's back under the car.

Yes, the rotors look a bit rusty, but they had only a few hundred miles on them at the start, so we reused them.
 

Attachments

  • PowderedParts.jpg
    PowderedParts.jpg
    94.1 KB · Views: 352
  • RearSuspTogether1.jpg
    RearSuspTogether1.jpg
    103.4 KB · Views: 317
  • RearSuspArm.jpg
    RearSuspArm.jpg
    96.8 KB · Views: 327
  • FrontSuspTogether.jpg
    FrontSuspTogether.jpg
    98.1 KB · Views: 434

Sven

Well-Known Member
Site Donor $
Messages
1,145
Reaction score
110
Location
Seattle
The internals - the sexy stuff

The engine modifications to the stock m30b35 engine included: Paul Burke high compression pistons, the Paul Burke N21 cam, lightened flywheel, 320i intake runners, new oil pump, and ported intake and exhaust. We ended up using a b34 block as they are stronger (plus the b35 block had the cracks around some of the head bolt holes). The shop added a tab for the cam sensor (for MS sequential injection) welded onto the adjustable cam sprocket made up by Paul Burke.

The intake parts and oil pan were clear coated with a high temp coating.
 

Attachments

  • PaulBurkeCam.jpg
    PaulBurkeCam.jpg
    47.6 KB · Views: 319
  • HighCompPiston.jpg
    HighCompPiston.jpg
    80 KB · Views: 358
  • CoatedExManifolds.jpg
    CoatedExManifolds.jpg
    98.8 KB · Views: 321
  • CoatedIntakeOil.jpg
    CoatedIntakeOil.jpg
    100.6 KB · Views: 331
  • CamSensor.jpg
    CamSensor.jpg
    91.7 KB · Views: 341
Last edited:

Sven

Well-Known Member
Site Donor $
Messages
1,145
Reaction score
110
Location
Seattle
The accessories

The old style intakes were hogged out to port match to the b35 head. First we had material welded to the outside of the intakes so we would have enough meat left on the stub intake flanges after widening the opening. We used the stock “L” jet fuel rail and short hoses connected to the injectors using La Jolla’s custom injector barbed cups – precious pieces.

We purchased the rear diff. reinforcing plate kit from Coupe King. The longer piece needed quite a bit of cutting down to fit. This was welded in place, then primed and undercoated.
 

Attachments

  • IntakePorting.jpg
    IntakePorting.jpg
    90.8 KB · Views: 380
  • FuelRail.jpg
    FuelRail.jpg
    92.4 KB · Views: 349
  • ACCompressor.jpg
    ACCompressor.jpg
    92.6 KB · Views: 356
  • AC-Closeup1.jpg
    AC-Closeup1.jpg
    89 KB · Views: 350
  • ALTPSCloseup.jpg
    ALTPSCloseup.jpg
    93.9 KB · Views: 357

Sven

Well-Known Member
Site Donor $
Messages
1,145
Reaction score
110
Location
Seattle
The beast

Here is the engine fully assembled and ready for installing. This in one of my favorite parts of the rebuild. This beast is a thing of beauty. You roll it under the car, carefully drop the car, screw in four bolts and its in.
 

Attachments

  • EngineFront.jpg
    EngineFront.jpg
    91.4 KB · Views: 378
  • EngineLeft1.jpg
    EngineLeft1.jpg
    92.9 KB · Views: 344
  • EngineRear.jpg
    EngineRear.jpg
    84 KB · Views: 344
  • EngineLeft.jpg
    EngineLeft.jpg
    94.8 KB · Views: 335
  • EngineUnderCar.jpg
    EngineUnderCar.jpg
    88.9 KB · Views: 374

Sven

Well-Known Member
Site Donor $
Messages
1,145
Reaction score
110
Location
Seattle
The black box

A bit about the electronics. The goal was to build and install a Megaquirt 3 full featured ecu using their base MS3 board. We built a custom wiring harness for all the new fuel injection stuff (using labeled wiring available from DIYA). I used a 55 pin motronic connector I removed from a 179 ecu box. DIYAuto has a small adaptor board that interfaces with the 55 pin connector. This board also had room for installing an ignition driver and second MAP sensor for realtime barometric correction. A fuse panel provides fuses for the coil, fuel pump, injectors, idle valve, O2 sensor, and a few other goodies. The newer Innovate LC-2 O2 controller is small enough to fit inside the box as well. The box is mounted in the void above the glove box. It is easy to get to, and remove, if any further mods/wiring are needed.
 

Attachments

  • Components.jpg
    Components.jpg
    101.4 KB · Views: 296
  • BoxGuts.jpg
    BoxGuts.jpg
    94.5 KB · Views: 274
  • BaroCloseup.jpg
    BaroCloseup.jpg
    84.4 KB · Views: 263
  • BoxExternal1.jpg
    BoxExternal1.jpg
    96.2 KB · Views: 275
  • BoxExternal2.jpg
    BoxExternal2.jpg
    94.1 KB · Views: 284

Sven

Well-Known Member
Site Donor $
Messages
1,145
Reaction score
110
Location
Seattle
The exhaust - undersides

The exhaust was modeled after the 2.5” stainless system on my car, except without the catalytic converter. Mid 80’s cast iron manifolds similar, but slightly larger than the stock manifolds, were high temp ceramic coated inside and out. The new 1-3/4” stainless downpipes were also ceramic coated. From there, via a flex coupling, through a 18 x 4 center resonator, then to the 5 x 8 x 24 oval muffler, and then out the polished stainless tip. A great sound, just a bit louder than mine.


to be continued....
 

Attachments

  • EngineBottom.jpg
    EngineBottom.jpg
    91.3 KB · Views: 321
  • DownPipesToCenter.jpg
    DownPipesToCenter.jpg
    89 KB · Views: 322
  • BendToMuffler.jpg
    BendToMuffler.jpg
    92.3 KB · Views: 302

alanmcg

Well-Known Member
Messages
375
Reaction score
3
Location
Seattle
and then....

dont forget the best part sven....

after all this amazing work, sven and michael bring the car over to my house. michael graciously offers me the car for a test drive .... of course i jump in. the performance is AMAZING - so different from my stockish 3.5, it is not even comparable.

while abiding by michael's request not to exceed 5k rpm, im not sparing any throttle on the way up there (read floored). WOW!!! so impressive. i pull up to a stoplight, and note the distinct smell of antifreeze, and see a slight puff of smoke from up front.

head straight back, pull into my driveway - sven and michael, all smiles anticipating the exclamations of joy and envy, until they see the steady stream of leaking fluid puddling on my driveway. now sven looks concerned, and michael looks.... how do you say..... sad, with overtones of anger and depression.

the clearance between the fan and the new alu radiator was always pretty tight, and when we opened the hood we saw the clearance was now minus 1/2 inch. as the beastly engine torqued and strained at it's mountings, it threw the (new) fan, into the (new) radiator. ouch. thank goodness for the fan clutch.

other than the sounds of me appologizing, not much being said.... 'well, lets get it back to my house.' says sven. so we top up the fluid and off they go.

car all put back together now (re-cored old radiator, much better clearance), and surprisingly, michael has not brought it back over for another test drive .... weird.
 

Sven

Well-Known Member
Site Donor $
Messages
1,145
Reaction score
110
Location
Seattle
Alan summed that up about right. This aluminum radiator came from a recent batch made up for the e9 crowd. The clearance was a bit misleading in that the alum. angle bar across the top of the radiator had its vertical leg facing down and about 1/4" rearward of the core below. That ended up being a prefect place for the fan blade to hook and then get drawn further into the core itself. I thought about grinding that off flush with the core ....

Steve - It's a Magnaflow #12286. My restoration website shows some better photos of this layout. Next time I am under the car I will take some shots of the tail end (and the finished engine bay).
 

BavarianCream

Well-Known Member
Site Donor $
Messages
167
Reaction score
135
Location
Park City UT
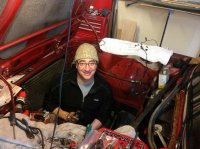
First off I’d like to say this project would never have happened without this forum, so a huge thanks to everyone here. It’s where I met the other Seattle coupe owners and also found the person selling the car.

After seeing a post last summer by Sven for a coupe meet in Seattle, although not owning one at the time I asked if I could come and was welcomed.

I cannot speak more highly of the guys I met there. This is truly an amazing group of coupe owners who are knowledgeable, generous and a lot of fun to be around.

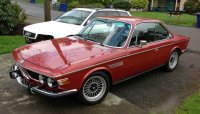
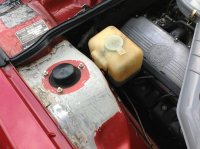
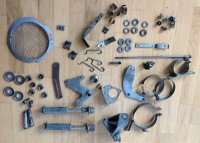
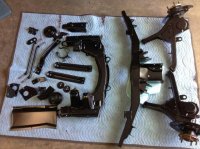
Alan who hosted the event was also good friends with the the coupe owner whos car I ended up buying a couple of months later. Although Granolt was not the color I was looking for, the car was as close to rust free as you can get after spending its life in California and Arizona. Its previous owners had taken really good care of her, she was straight, ran well and had some really good updates, bumpers, carl nelson springs, off set Coupe King Alpinas etc. so a great starting point.

I’d like to say a BIG thanks to some of the people who helped throughout this process.

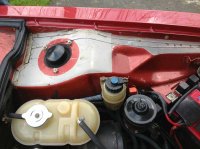
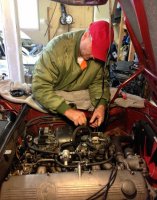
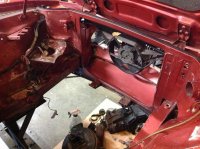
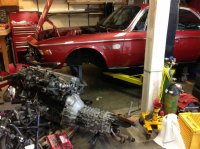
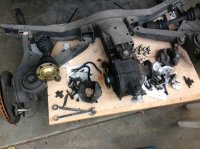
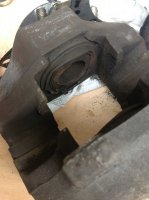
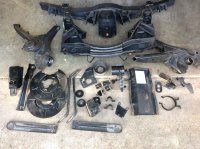
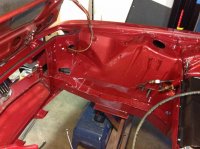
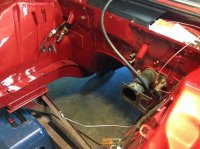
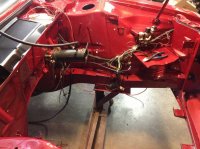
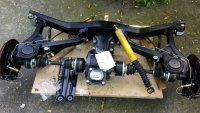
Alan was there on day one helping with the dis-assembly and the dropping of the engine, as well as the reinstall, plus lots of other bits here and there including the test drive described below where he carefully helped us figure out some minor measurement issues with the radiator. I’ve been keeping a wide berth of Alan’s house on my latest test drives.

Bill, who’s doing a beautiful restoration of his own coupe, helped on many occasions with advice, parts and hours of his time trailering the car back and forth to the paint shop! Thanks Bill.

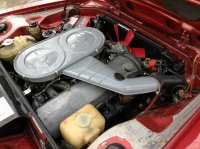
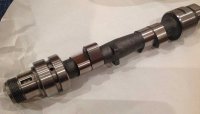
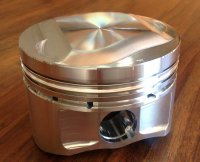
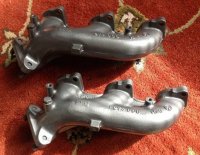
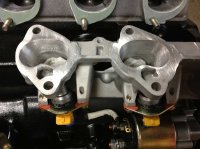
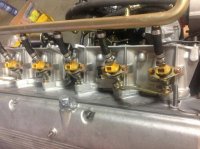
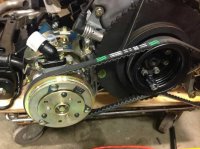
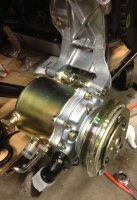
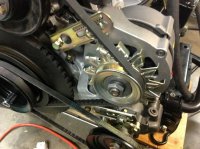
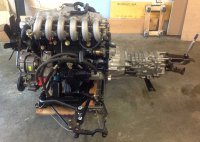
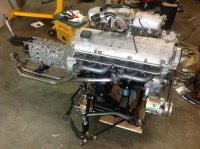
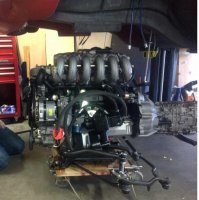
The guys at Autosport in Seattle for building the engine, Ben and Carl at Carl Nelson for parts and recommendations, and SfDon too for advice and support.

Then there’s Sven. I cannot say enough about how truly amazing he is. He’s a master of these cars. An Architect by trade he’s incredibly detailed, and has the ability to figure out and understand the most complex parts of this type of mechanical and electrical engineering. He is a perfectionist, never letting the smallest detail go by, and when I would say “that’s good enough” he’d say no, and make it better. I don’t have a new engine I have a “Sven-gine”. BIg Thanks Sven!

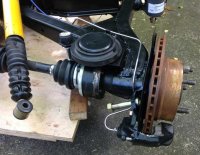
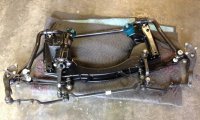
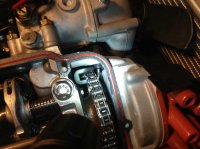
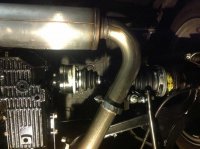
Although I’ve only been able to put about 500 miles on her so far I cannot describe how amazing she is to drive. The new engine is a BEAST! The suspension work makes the car feel like new, and the exhaust system growls. The weather’s holding out right now so should be finished breaking her in soon and then the real fun begins.
 

HB Chris

Well-Known Member
Site Donor $$
Messages
19,418
Reaction score
8,759
Location
Huntington Beach, CA
As many of us know, it's not just the cars it's the people that makes this group so fantastic. Congrats on your acquisition and thanks to the crew in Seattle for making your dream a reality. Enjoy!
 

decoupe

(deceased)
Messages
1,333
Reaction score
16
Location
Alberta, Canada
Great looking car and congratulations on you new careers. The ulitmate test of a dry car is under the front fender sound mats and this one looks perfect - a great purchase by the looks of it.

Sven - is there someone in Portland or Seattle that rebuilds Getrag 265 transmissions?

Thanks
 
Top