CV joints

deQuincey

Quousque tandem...?
Site Donor
Messages
8,432
Reaction score
2,445
Location
BIO - 43°15'46.5"N 2°56'03.7"W
CV shafts repair & overhaul

this was a pending issue, i feel no vibration nor noise down there, but a casual inspection of the area revealed a broken rubber boot, so it was a matter of time to accomplish this little mission,

you may consider that i am a bit methodic, so it taked ages to decide where to start, checking the possible hoist/support points, and buying the necessary pieces for a complete refurbishment

someone said this was a dirty, dirty job, well it is not true, it is ....worse than that !

my supporting setup has finally become this:


...using the wheel support plate to position two supports, the jack you see in the center is only for a peculiar operation that is needed to remove the CV shafts once the bolts had been undone


you must reach a 18º angle to be able to remove the shafts, so once the bolts are out is time to lift a bit the centre of the car and let the wheel supports fall a bit

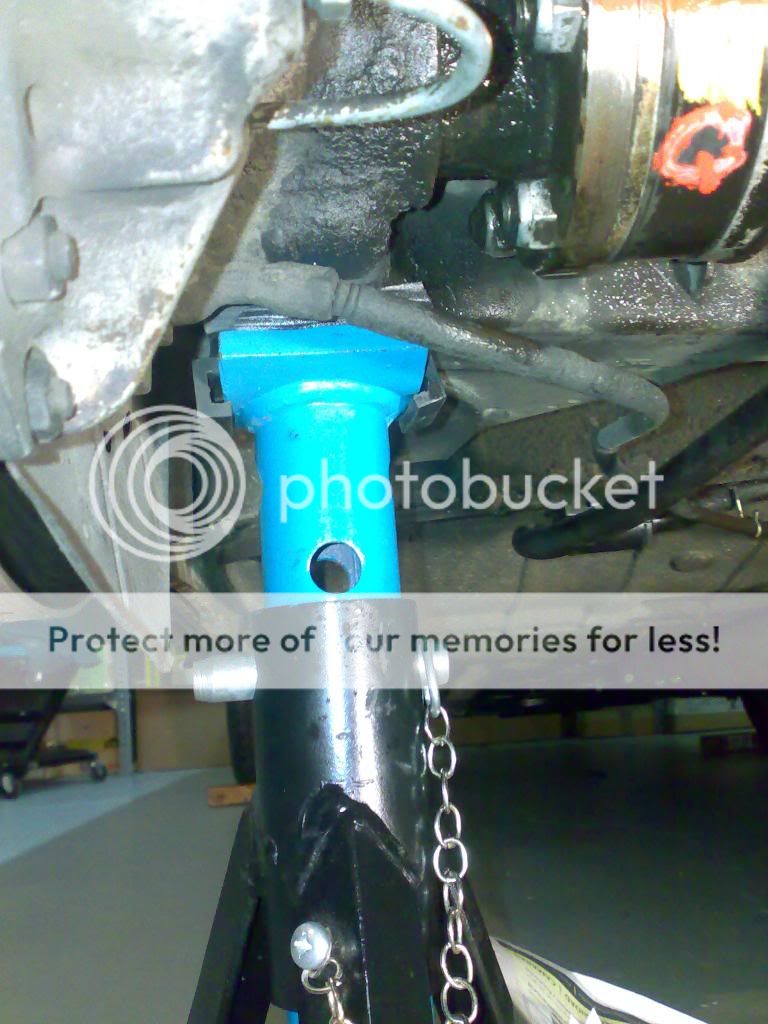
the jack is placed against the differential using a rubber block and a piece of wood
 
Last edited:

deQuincey

Quousque tandem...?
Site Donor
Messages
8,432
Reaction score
2,445
Location
BIO - 43°15'46.5"N 2°56'03.7"W
one of the first things is to spray a decent ammount of penetrating oil using your favourite spray, the bolts and nuts are somehow blocked, so that will certainly help

the second thing is depending on the ammount of dirt you find in there, my intention was to assure a good operation on the tools, considering that the "allen-headed" bolts will be difficult to operate (and if you can not introduce the tool correctly you may experience the terrible situation of a broken-rounded head) i cleaned the head allen holes one by one, i cleaned the nut faces too,...in my case it was really dirty, a mixture of dust, oil, grease,...fortytwo years

funny, the interior halves of the CV shafts were not as dirty as the outer ones

you need to apply a lot of torque in a not very comfortable position,...view of the two tools:


there is no need of dissasembling the rear exhaust

 
Last edited:

deQuincey

Quousque tandem...?
Site Donor
Messages
8,432
Reaction score
2,445
Location
BIO - 43°15'46.5"N 2°56'03.7"W
first thing after cleaning and before reomving them, is to mark them as clear as possible, i marked the relative position of all elements, probably is not needed, but...

just curious thing, the shafts are painted to identify side:

yellow paint means outer (wheel side)
white paint mark means inner (diferential side)


here a detailed view of the broken rubber boot that caused this nasty work:


deQuincey

Quousque tandem...?
Site Donor
Messages
8,432
Reaction score
2,445
Location
BIO - 43°15'46.5"N 2°56'03.7"W
now is time to remove the metallic clamps, and cut the rubber boots,


to remove the caps, just a few hits with a small hammer (distributed in the circumference)

here i found a problem (you can see it in the previous picture), lets see if i am able to explain it, when reading about these CV shafts in the blue books something surprised me, they say you must never force them an angle bigger than 18º, i can not imagine the reason,...now i have witnesed the result of a past careless operation

my inner side covers are badly deformed, due to probably the installation of the rear shockabsorbers, they let the wheels fall without the mentioned shockabs, and then the 18º angle was overpassed

fortunately a friend is sending me a spare from germany to solve this problem, BTW the CVjoints are no more available, yes they can be repaired, but...
 

deQuincey

Quousque tandem...?
Site Donor
Messages
8,432
Reaction score
2,445
Location
BIO - 43°15'46.5"N 2°56'03.7"W
then you remove a retaining clip

and you remove the parts one from the other by rotating and removing the balls one by one, i can not explain the process, but it flows as you rotate and tilt the housing


then, to extract the central support of the system i used this:

 
Last edited:

Stevehose

Well-Known Member
Site Donor $$
Messages
13,019
Reaction score
5,693
Location
Sarasota, FL
Wow-epic post DQ, I am going to take a close look at doing this sometime. Thanks for this.
 

deQuincey

Quousque tandem...?
Site Donor
Messages
8,432
Reaction score
2,445
Location
BIO - 43°15'46.5"N 2°56'03.7"W
details of dissasembly

for me the most important thing is to mark as much as possible to reasemble in the same position and place:


using paint remover:


axis clean and repaint:


seet he damaged interior cover that was cause of the break of the rubber boot: compare the wrong (left one) with the good one (right side)


there is a solution comming in a parcel from germany,...
 

deQuincey

Quousque tandem...?
Site Donor
Messages
8,432
Reaction score
2,445
Location
BIO - 43°15'46.5"N 2°56'03.7"W
discovering some problems

it has always been said that is better to find a car that has never been repaired,...well this was repaired, one of the sides of the CVjoints was repaired, a different boot was placed, and more important, different grease (more liquid) was found, and this is the result:


you can see that the balls of the renewed one are darker than the original:

than means, incorrect working performance, and less heat dissipation, so the balls were "burned", and that means, damaging the "jail":


deQuincey

Quousque tandem...?
Site Donor
Messages
8,432
Reaction score
2,445
Location
BIO - 43°15'46.5"N 2°56'03.7"W
assembly done

well, the covers next to the differential were very deteriorated, so my friend Patrick sent me an spare from his e3 (vielen danke)

you can not use the e3 CV on the e9, but i can use the covers, and the mechanisms

the inner covers of the e3 are a bit shorter than the e9 ones, but that makes no problem


i painted the covers in black after a anti-rust primer:


here you can see the differences (the short one is from e3)


i cleaned the mechanisms carefully, first with petrol, and then with alcohol, and finally i blew air through them and let them dry


using semisynth moly grease, weight 120gramms for each side:


as part of the grease remains in the cup, i pour 140gramms


remember that i marked everything, so i repeat the exact positioning


sealant:


use the blots to center and align


press diagonally into position,


must be 42,5mm


special clamps


and ready to go to the car:


one of the dirtyests jobs i have ever done
 
Last edited:

bavbob

Well-Known Member
Site Donor
Messages
3,380
Reaction score
1,592
Location
Boston, Ma
Brilliant. Even more so, how do you clean your hands so quickly between images?...or is your camera oil-proof?
 

Peter Coomaraswamy

Well-Known Member
Site Donor $$
Messages
3,787
Reaction score
896
Location
Austin, TX
anyone who can perform that operation and keep their workspace that clean needs to take up brain surgery for a hobby! :) I'm no rocket scientist but I think I was filthy for a week after doing mine. Beautiful work!
 

deQuincey

Quousque tandem...?
Site Donor
Messages
8,432
Reaction score
2,445
Location
BIO - 43°15'46.5"N 2°56'03.7"W
final assembly:


tips: use a jack under the diff, using a block of wood to spread the contact point, the jack in the diff is needed to assure an angle between the diff and the wheel sides, otherwise is impossible to introduce the CVjoints

as soon as you introduce them, place a bolt or two in each side, and then proceed little by little doing the bolts until contact of nuts to their sitting position but still a bit loose, do it sequentially to assure the centering of the parts

dont forget the bicromated plates that sit between two bolts

it seems to be impossible to give the right torque with an adequate tool, you can not introduce any tool there !, so the torque given was: "that-is-all-i-can-push-this-f-tool"! (in Newton x meters obviously), theoretically 85 N.m


another tip, i place the CVjoints, and start aproaching the CVjoints to their sitting plates little by little using the bolts and nuts sequentially and in diagonal, when there is an even contact of all the nuts to their bolts, i released the jack and in that position (real working situation with the weight of the car acting) i finished doing the bolts
 

Gazz

Well-Known Member
Site Donor
Messages
945
Reaction score
620
Location
Gold Coast Australia
It's people like this talented and generous man who make E9coupe such a valuable resource for newbs like me. I am inspired to return something informative myself, though I cannot hope to match the magnífica presentación shown by deQuincey. Muchas gracias.
 

Sven

Well-Known Member
Site Donor $
Messages
1,145
Reaction score
110
Location
Seattle
Great work deQ. I wish I had thought of using some sealant on the covers when I redid mine a few years ago. I get a little seepage.
 

deQuincey

Quousque tandem...?
Site Donor
Messages
8,432
Reaction score
2,445
Location
BIO - 43°15'46.5"N 2°56'03.7"W
a detail about how to handle the car:


this weekend was bleeding brakes day, so i had to place all four wheels out and rise the car to have access to the four brake calipers to bleed them

this little advice is for how to do this with limited equipment as a jack and four stands

for the rear area, you can use the differential to support the jack, use an extension for the jack as it is recommended by the manuals

for the front area if your car has a corrugated plate in the front axis, you can place the jack over there, and the put the stands on the subframe rails
 

pmansson

Well-Known Member
Messages
873
Reaction score
31
Location
switzerland and sweden
Imbalance from rear axle

Very, very impressive work! Hats off to that.
On one of my cars I have, have had, slight imbalance at around 80km/h. I have changed one of the drive shafts and have now sourced another NOS. A bit too early to determine if the imbalance lies in the faulty shafts or not. Interesting part about the 18 deg and consequences on the cups if the shafts are let to free fall when working on the springs and dampers. I think we worked a bit on one, on one of my many coupes where we saw the uneven circular edge. It wasn´t as badly damaged as yours though.
On one car I had grease sprayed on the underside of the car, due to a punctured rubber sleeve.
What grease should they be filled with?
I wasn´t aware of the inside vs outside on these shafts and the BMW colour codes (white and yellow). I guess I need to read more in the Blue Books.
 
Top